Disclosure: This post is sponsored by WORX Tools, all opinions are my own!
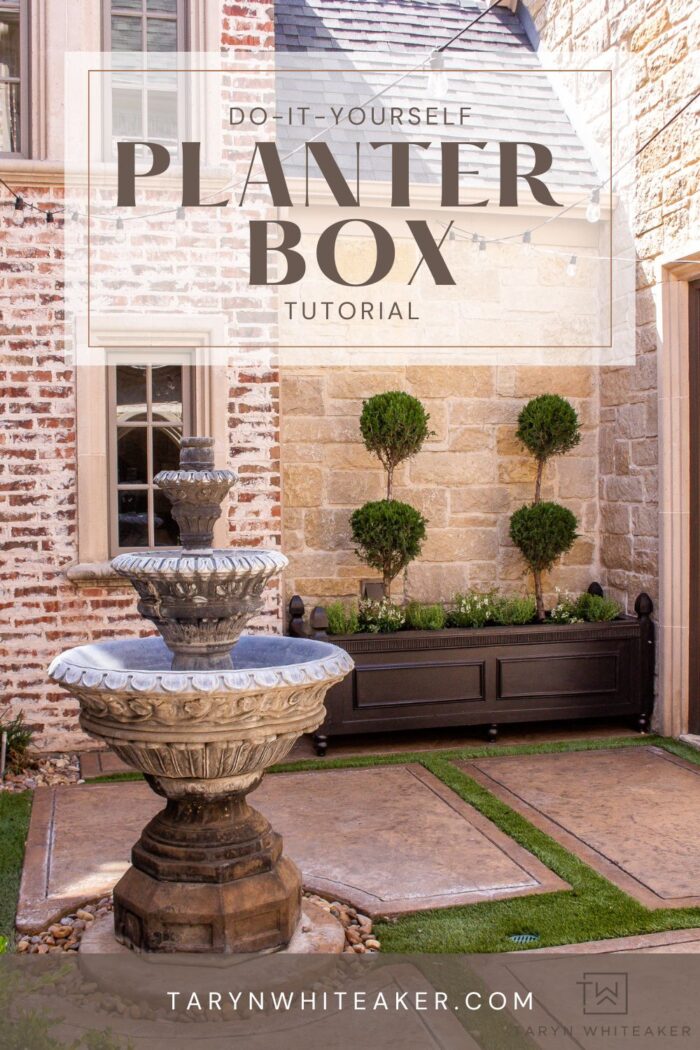
Our courtyard is one of the places that made me fall in love with this home. It is such a unique modern European style to it with the brick, stone and fountain right in the center of it. Since we moved in, I have only wanted to accentuate all of the features and make it feel even more like a modern Parisian garden; filled with lush greenery, lots of planters and a sense of serenity. There is this large stone wall off in the corner that is just begging for a beautiful climbing trellis and beautiful arrangement of fresh florals. I wouldn’t be able to find a planter large enough for this space, or one that fit it perfectly, so I decided to make my own DIY Modern French Country Planter Box.
DIY Modern French Country Planter Box
One of the reasons why I DIY is 1) to save money but 2) because I want a custom piece that I can’t buy. I needed a large planter 6′ long, I wanted it to have a modern french country look and fit the space perfectly. This is a type of build that you can easily customize and make your own adjustments to fit your own space.
How to Build Your Own Planter Box
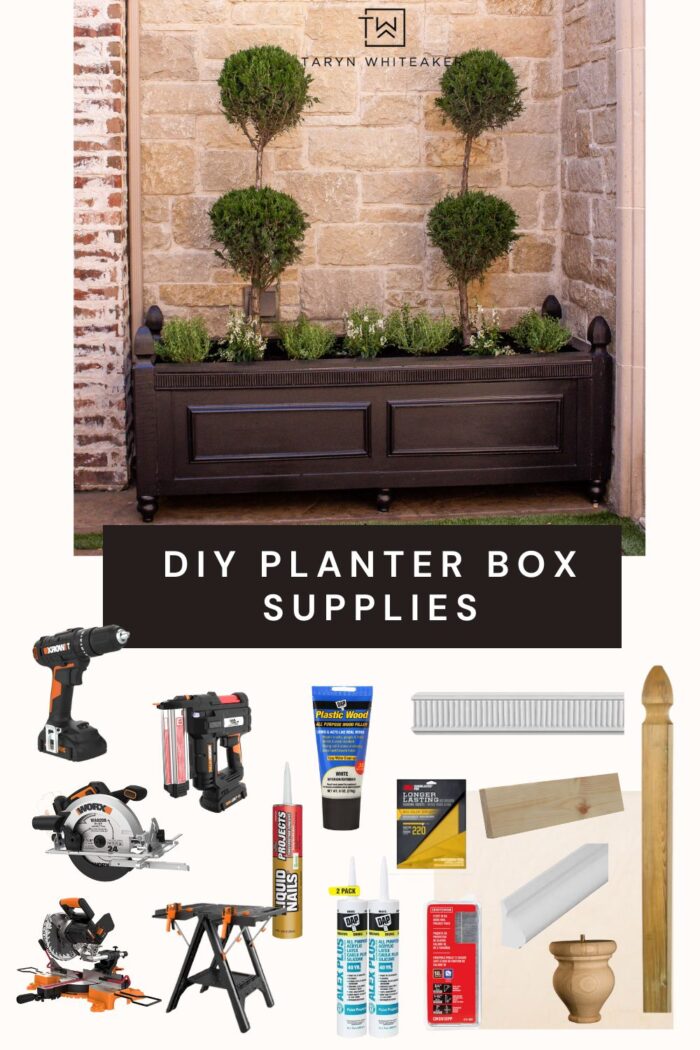
DIY Planter Box Supplies
I would consider this a more moderate build, it will be easier if you’ve done some basic builds but this won’t be impossible either! I’m going to walk you completely through the process and make it as easy as I can for you to do on your own!
TOOLS:
WORX Compound Miter Saw | WORX Nitro Brad Nailer & Stapler| WORX Circular Saw| WORX Impact Driver Combo Set| WORX Pegasus Work Table| Hammer| Caulking Gun| Pocket Hole Maker | Level | Measuring Tape
SUPPLIES:
(4) Gothic Deck Posts | (10) 2 X 4″ X 6′ |Primed Plywood (you want a smooth finish plywood)| PVC Trim |Reeded Trim | (3) 1/2″ X 3″ X 6′ Trim for Top Ledge | (6) Bun Feet Furniture Feet | Wood Screws | 18 Gauge Brad Nails| Liquid Nails | Caulk | Landscape Liner
DIY Modern French Country Planter Box Tutorial


Step 1: Cut Down Your Deck Posts
I wanted to have decorative elements on each of the 4 posts, I ended up using these Gothic Deck Posts and cut them down to the height I wanted. In order to not waste any wood and cut down on costs, I simply cut the deck posts in half at the 21″ mark, so I could use the bottom half of the posts for additional supports for the planter box.
To cut the posts, if you don’t have a large table saw, the other way to do it is use a WORX Circular Saw and cut one half way through, rotate the post and cut the other half. It worked perfectly for me.


Step 2: Cut Your Plywood Down To Size
Your planter box will most likely be a different size than mine. I made my plywood pieces 6′ long by 21″ wide, to fit the space perfectly. Remember to accommodate the width of the deck posts when calculating your desired overall width and length. I used 1/2″ plywood and I wish I would have done a 3/4″ to make the sides even sturdier.


Step 3: Attach The Plywood To The Deck Posts
This is important to note! You need to allow space at the top for the top ledge piece that will go on later. SO make sure to leave about 1/2″ space at the top. You can see where I laid it out in the left pic to make sure I attached the plywood down far enough.
I used my Pocket Hole Maker and my WORX Impact Driver Combo Set to create pocket holes. This is a great way to attached two pieces of wood without seeing the screws. Once I assembled all four sides, I added back in the deck posts scraps in the middle of the long pieces to give it more stability.


Step 4: Frame Out Your Planter Box
Could you have done this part before assembling the plywood? Yes, you could. But I wanted to determine my exact sizing and spacing first before I added in all the framing and support pieces. Since there will be so much soil in here, it will be heavy and I want to make sure this piece lasts for a long time! I simply used 2X4’s to add in supports along the top, bottom and sides and attached them to the posts.


Step 5: Add Your Decorative Trimwork!
This is by far my favorite part! Making a basic planter box a custom, unique piece for your home. I started with this Reeded Trim on the top edge. I then added the 1X3″ piece of pine to the top ledge for a polished look. I used my WORX Nitro Brad Nailer & Stapler to attached all of the trim.


I then used 1/4″ X 2″ pieces of thin trim around the rest of the edges to polish it off and added my favorite picture frame moulding using PVC Trim .

Step 6: Add The Furniture Feet
If you want a raised bed, this is when you can add the furniture feet onto the bottom of the posts. You want pre-drill holes and use furniture feet plates ( I didn’t use these and wish I had!).

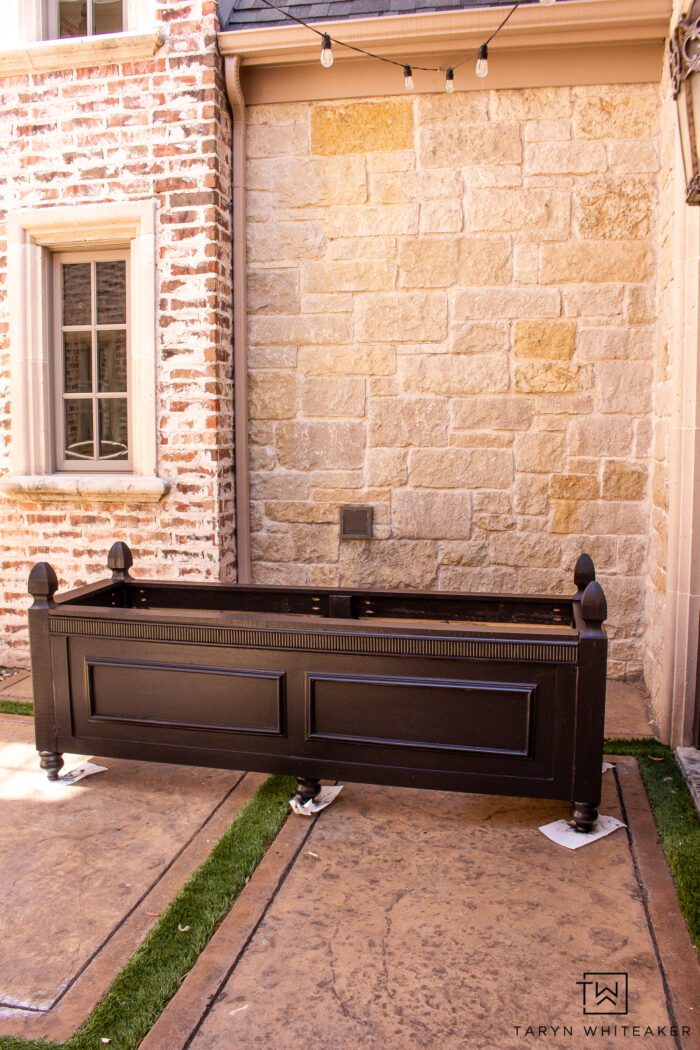
Step 7: Prime & Paint Your Planter Box (or stain!)
Since this is going to be sitting outside in all the weather elements, be sure to use exterior primer and exterior paint. I did a coat of primer and then two coats of Sherwin Williams Urethane Trim Enamel in Black Magic, Satin finish.


Step 8: Add The Bottom Of The Planter
Note: If you aren’t doing a raised planter box, and are just sitting it on the ground with dirt under it. You don’t need to build a bottom. You can just fill it with soil.
Again, because of the weight of the soil, PLUS wanting this to last for a while and knowing that wood will rot over time. I chose to add slated 2X4’s to the bottom of the planter box. I spaced them out ever so slightly to allow for drainage and secured them to the lower 2X4’s on the bottom part of the frame.
Then, I added two layers of landscape liner to hold the dirt in. I used a staple gun to attach it to the sides.
DIY Modern French Country Planter Box
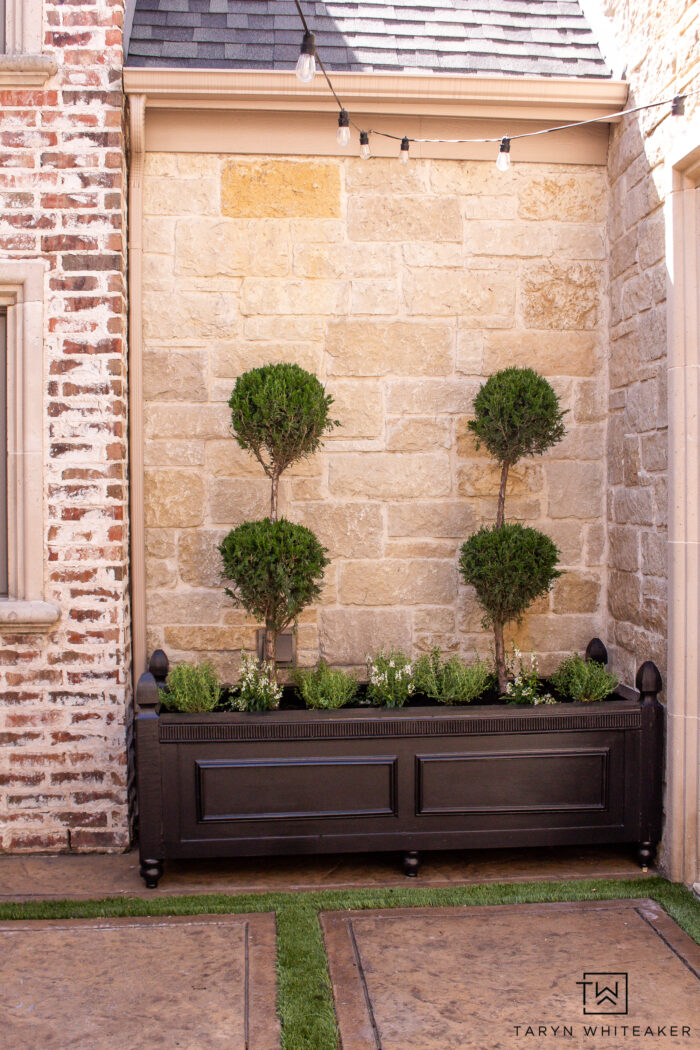
Fill it with planter box soil and your favorite plants and you are DONE! I really love that this fits the space so perfectly and brings in another decorative element to our courtyard. It only makes me want to keep adding more pots and plants and really create this French inspired garden in here.

Also, someone asked me if the topiary trees are real or fake, these are in need real. I definitely debated it though! These are said to get to 15′ tall, eeek. Kind hope they don’t. I would like them to get a little taller and wider to fill the space even more, but if they do get too tall we will have to keep trimming them!

Here is the view from the covered fireplace area on the opposite. It feels so much more complete now, instead of a blank space.

I’m just going to pretend I live in France now, OK. It’s my little escape. This black and white dress is from Amazon and under $50! It’s lined and very nice quality.

Watch The Video
About Taryn Whiteaker
Hi! I’m Taryn! The voice behind Taryn Whiteaker Designs. I launched this brand over 11 years ago when I became a stay-at-home mom. What started as a small craft and mom blog eventually grew into a full time design and DIY site. My goal has always been to inspire others (especially women!) with design ideas, DIY tutorials, entertaining ideas and give you the tools you need to complete them yourself!


Leave a Reply