• Skip to primary navigation
  • Skip to main content
  • Skip to primary sidebar
  • Skip to footer
  • Home
  • About
  • Contact
  • Partner with Taryn

Taryn Whiteaker Designs

DIY and Interior Blog

  • Our Dallas Home Tour
  • Shop My Pics
  • Home Styling
    • Room Reveals
      • Our Current Home
      • Our First Home
    • Seasonal Home Tours
  • DIY Projects
    • DIY Home Decor
    • Crafts & Sewing
    • Before and Afters
    • Before and Afters
    • Furniture Builds and Makeovers
  • Seasonal Decor
    • Christmas
    • Easter
    • Fall
    • Fourth of July
    • Halloween
    • Spring
    • Valentine’s Day
  • Printables
  • Entertaining
    • Parties
    • Tablescapes
  • Fashion
  • Travel

June 5, 2023

DIY Faux French Door Window Panes

I’ve seen many different ways to create faux French Door window panes on your windows and doors. From using electrical tape to click in pane systems. I wanted to explore a few different ways to create a faux window pane system on our exterior French Doors and I’m talking about how I did it on today’s post. After searching for different products, I landed on a different approach, something I hadn’t seen done before. Neither electrical tape or pricier click in systems, and I think it’s definitely an option you can do.

Also, if you missed the full balcony makeover reveal, you can check that out too!

DIY Faux French Door Window Panes

Learn how to create your own DIY Faux French Door Window Panes using adhesive trim from Amazon! Easy, budget friendly and removable!

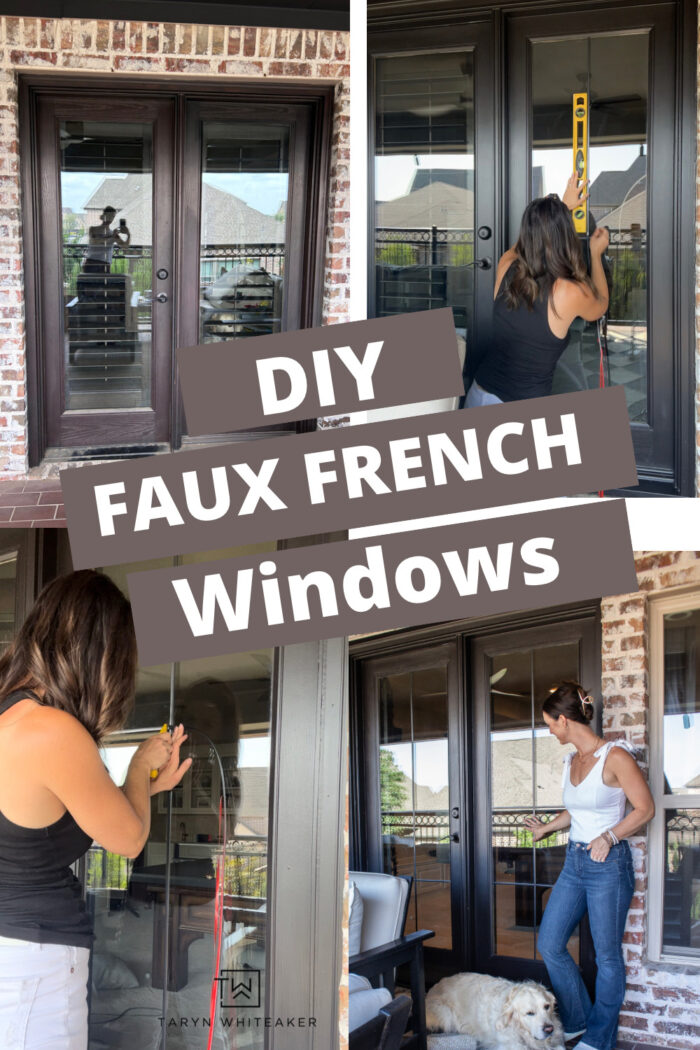
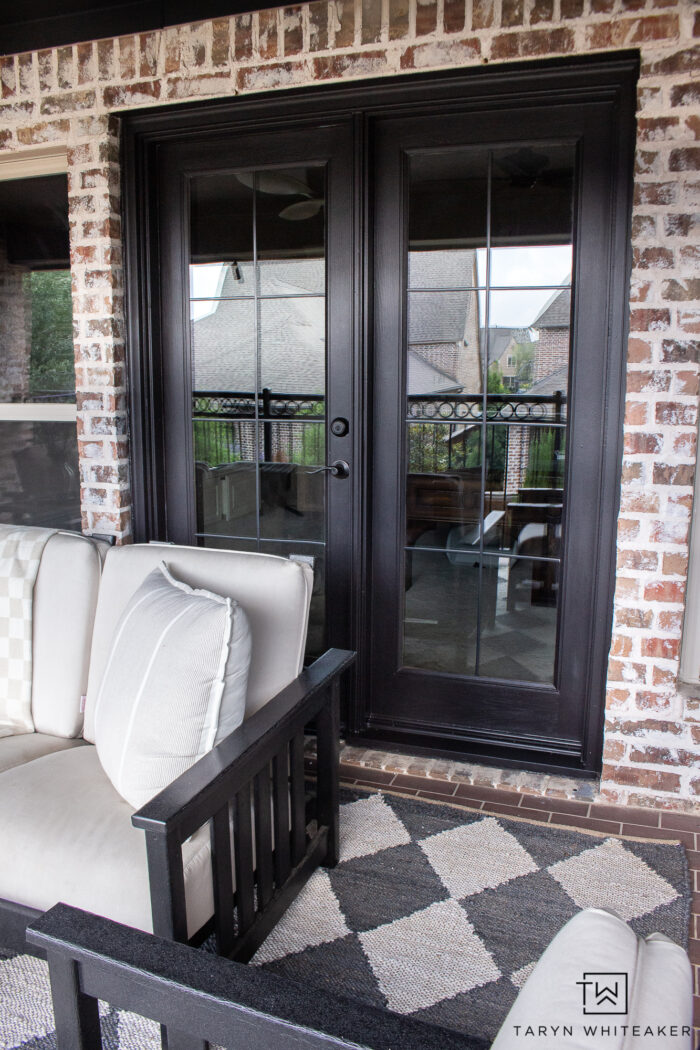
I started work on our exterior a few weeks ago and decided to update our large French Doors. After painting them Black Magic, I decided to try using Black Adhesive Trim on them to create my own faux window panes. Is this a solution for long term, high quality? No. But I think it looks a lot better than the electrical tape method, it’s budget friendly and from what I experienced I think it’s a good solution if you want to elevate the look of your windows or doors.

After getting a lot of questions about how I did this project I wanted to go into more details here so you can decide if it’s a project you want to try and if it’s a good fit for you.

Supplies

  1. Black Adhesive Trim
  2. Box Cutter Knife
  3. Black Sharpie
  4. Measuring Tape
  5. Level

And that’s really all you need!

BEFORE

Clean your windows! You want to get all the dust and dirt off of them so the adhesive sticks properly.

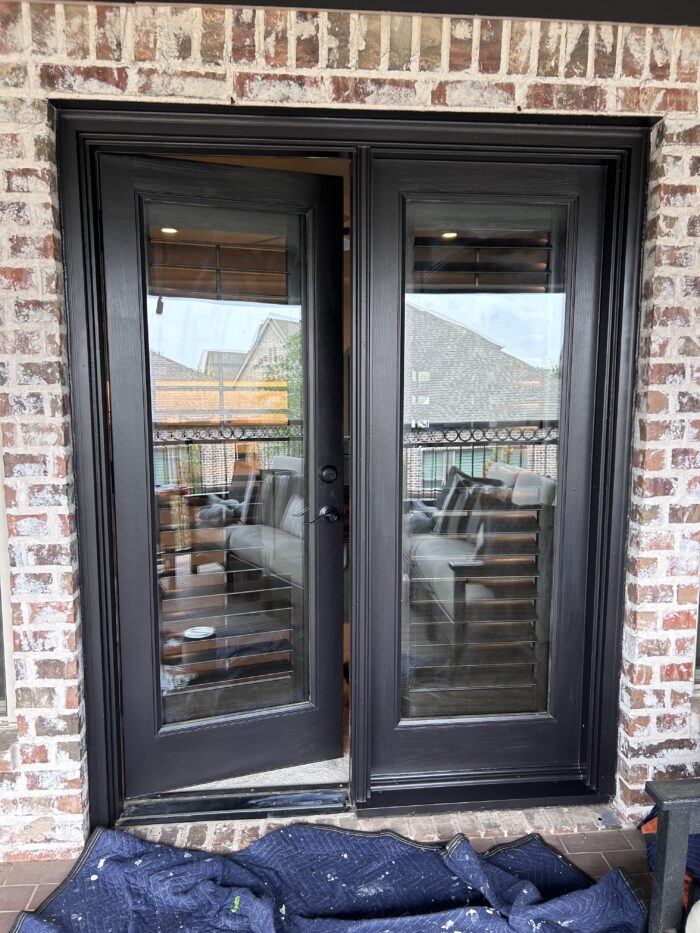
First things first, I gave our front door a fresh paint job, doing a coat of primer and then two coats of Sherwin Williams Black Magic. I used Sherwin Williams Emerald Urethane Paint specifically from trim and doors and it was AMAZING. The finish is so smooth and now I want to paint everything in my house!

How to Apply Adhesive Trim On your Windows

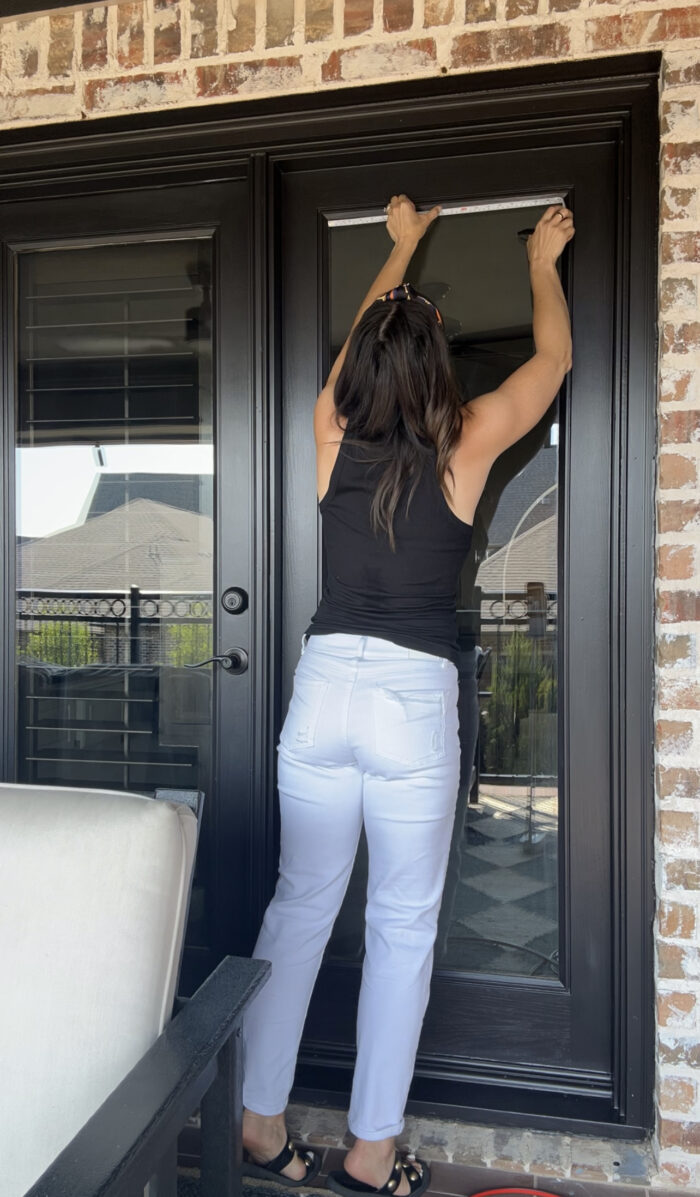
Use a tape measure to find the center of your window.

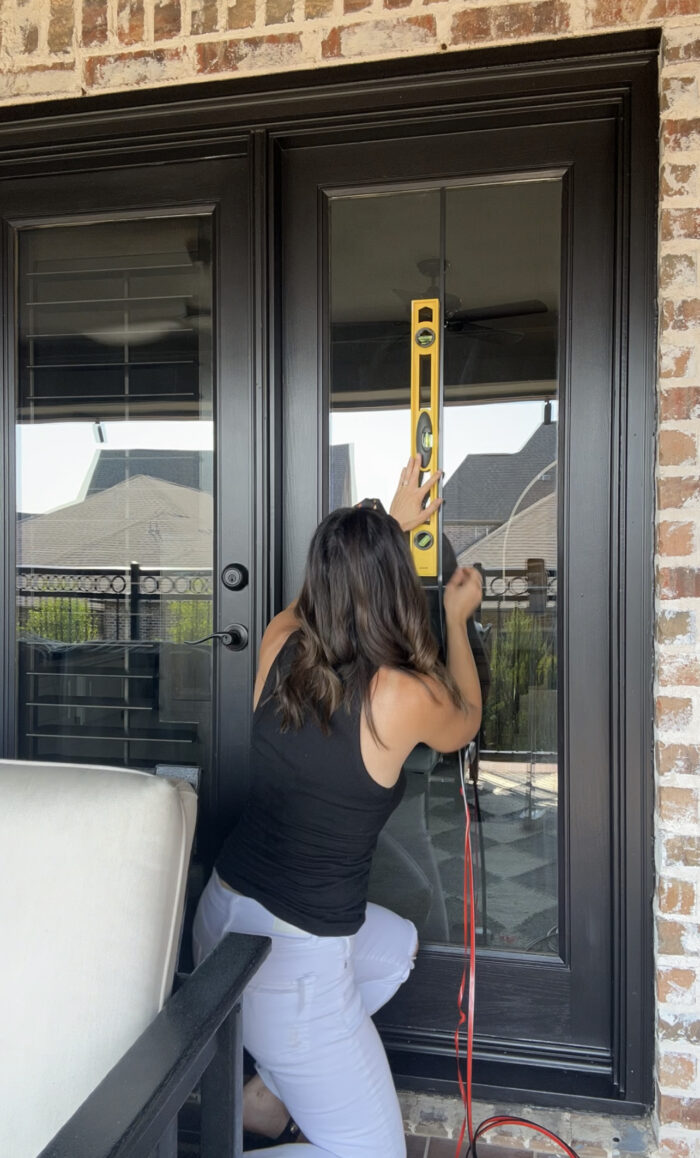
Gently peel back the sticker off the back of the adhesive strip, and place it directly in the middle of the window. Use a level to make sure it is going on in a straight line.

To create the pane boxes, I took the total height of the window and divided it by how many vertical window boxes I wanted. So if I wanted 4, I divided the total height by 4. That number is where you place the middle of the adhesive strip to create your horizontal line. Use a box cutter to trim the pieces. I suggest cutting them a little long and pushing them in.

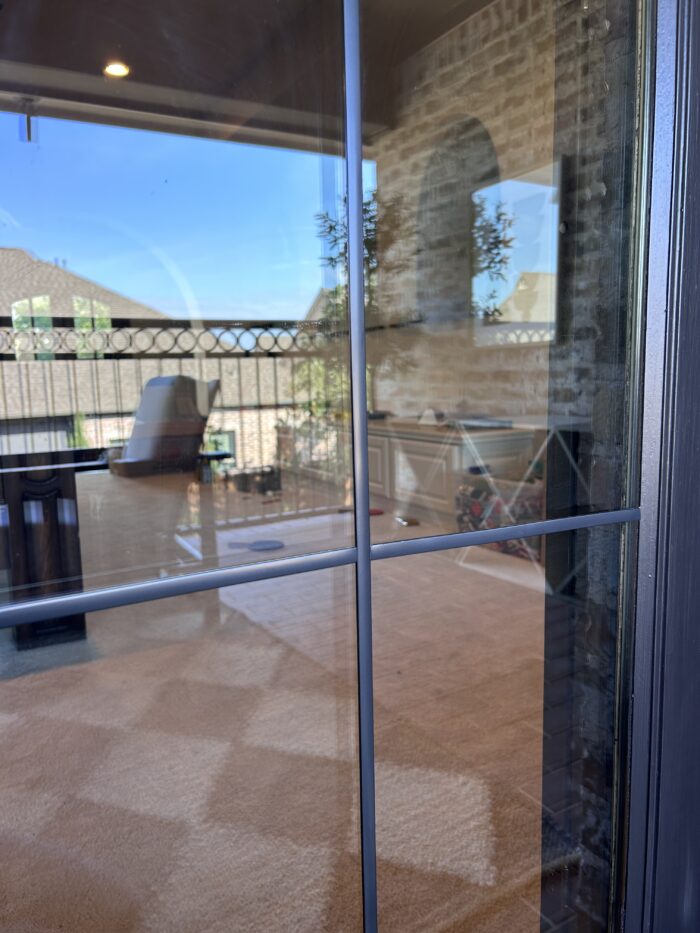
If you are patient and very precise, the intersection of the lines can be super clean! I love the look of this over electrical tape because it is actual moulding and is a plastic material and raised, versus just strips of tape on your windows. That may look good from far away, but this actually looks more like panes.

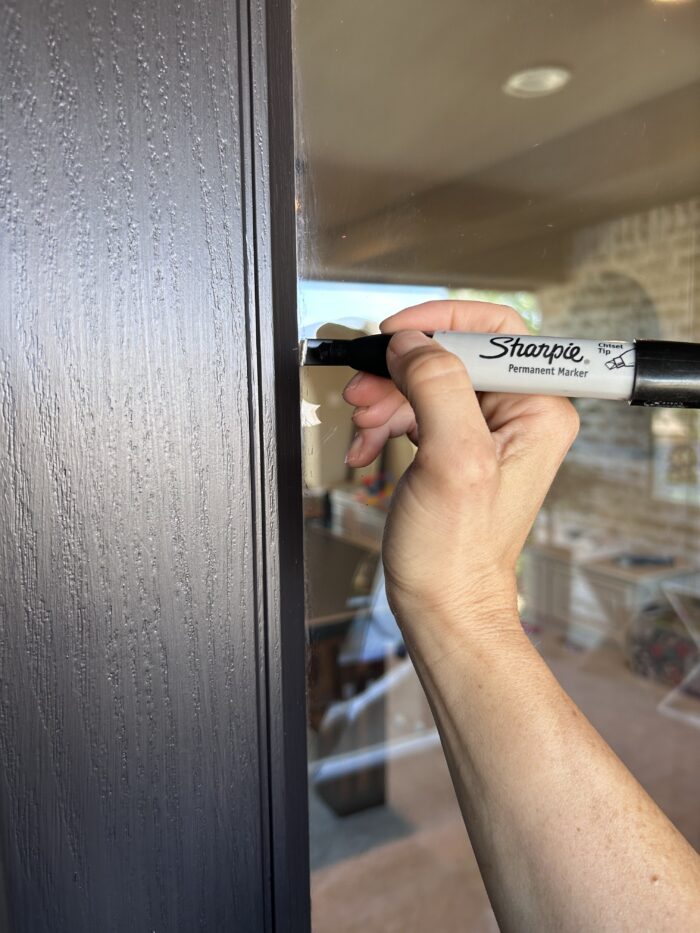
When using the black trim, the inside is still white. So you can take a sharpie and color the white edges.

DIY Faux Window Panes TIPS

  • The adhesive is very sticky, but I could also gently peel it off if I needed to reposition it. I didn’t see any residue left on the windows but that might change if it was on there longer.
  • Cut your strips a tiny bit longer than you think you need, it looks a lot better when I pushed the ends in pretty tight. You can still see the seams, how big they are will depend on how precise you are.
  • Depending on the style of your frame, you might see the white ends of the adhesive tape, if you are using the black color. So I took a Sharpie and colored the ends so they didn’t stand out.

Is this a long term fix? No. Is it a fun way to give your doors a fresh look? Yes. Best part, it’s just adhesive and you can peel it off any time you want. I even peeled off a few pieces and redid them and no residue was left on the windows. I’m sure that might change once they have been on longer, but lemon oil takes that off!

Learn how to create your own DIY Faux French Door Window Panes using adhesive trim from Amazon! Easy, budget friendly and removable!

This was a fun project, something that I didn’t have a lot of expectations going into and it ended up working out quite well! Now I get to do the other french doors around the house!

Watch The Process

About Taryn Whiteaker

Hi! I’m Taryn! The voice behind Taryn Whiteaker Designs. I launched this brand over 11 years ago when I became a stay-at-home mom. What started as a small craft and mom blog eventually grew into a full time design and DIY site. My goal has always been to inspire others (especially women!) with design ideas, DIY tutorials, entertaining ideas and give you the tools you need to complete them yourself!

You May Also Like:

  • TarynWhiteakerDesigns_PlanterBox-16
    DIY Modern French Country Planter Box
  • Modern French Country Balcony Decor-10
    Modern French Country Balcony Makeover
  • DIY Window Bench_TarynWhiteakerDesigns-15
    DIY Window Bench With Storage

Filed Under: ALL POSTS, Before and Afters, DIY Projects

Reader Interactions

Comments

  1. Carl says

    March 26, 2024 at 4:27 pm

    Why did you put the molding for the french door look on the outside of the door instead of the inside?

    Reply
    • Taryn Whiteaker says

      March 26, 2024 at 9:15 pm

      It’s not double sided, so it would just look like white adhesive from the other side.

      Reply
  2. Arelys says

    July 25, 2024 at 1:36 pm

    It looks amazing, my only question is you have to do the same inside so it doesn’t look white?

    Reply
    • Taryn Whiteaker says

      July 29, 2024 at 8:01 am

      You would have to do the grid on the opposite side too. I do believe there is a product that is black on the backside.

      Reply

Leave a Reply Cancel reply

Your email address will not be published. Required fields are marked *

Primary Sidebar

Looking For Something?

CONNECT

Meet Taryn

Taryn Whiteaker

Hi and welcome! I'm Taryn and the voice of style behind Taryn Whiteaker Designs. Sharing our journey of modernizing our European style home in Dallas. Thanks for stopping by and don't forget to subscribe to my mailing list to get all the latest updates! Read more...

Footer

THIS SITE

  • Home
  • About
  • Contact
  • Partner with Taryn

Privacy Policy

If you are interested in learning more about data that might be collected by this site you are encouraged to read the Privacy Policy

COPYRIGHT POLICY

All images on this site are copyright of Design, Dining and Diapers, LLC. Unless otherwise noted. You may not use these images without written permission. If you would like to feature a project shown on Design, Dining and Diapers you may use a maximum of 2 images and include a visible link back to the project.

More From The Gram

tarynwhiteaker_designs

Taryn Whiteaker Designs
AMAZON GIVEAWAY!!! 📦I’m giving away TWO $500 AMAZON GIVEAWAY!!! 📦I’m giving away TWO $500 Amazon Gift Cards to kick off Amazon Prime Day Deals! Yes two winners. Entry is simple: 

(1) Comment SHOP to visit my Amazon Storefront and follow! 
(2) Follow @tarynwhiteaker_designs @amazoninfluencerprogram AND @amazonhome 
(3) Tag a friend in the comments, the more the merrier! 
(4) Must be located in the United States

Giveaway closes July 13 at 10pm CT. Winners will be notified within 24 hours. 

*this giveaway is sponsored by Amazon Influencer Program.
Comment SHADES and I’ll send you a link to my go Comment SHADES and I’ll send you a link to my go-to Roman shades inside throughout the house. I add the blackout liner too and do the remote control option. They take minutes to install! So easy. 

Use code TARYN5 for extra 5% off. 

#homestyle #diy #diyhomedecor #decor #decorating #windowtreatments #homedesign #selectblinds
June recap! Not as many projects happened, but I’ve been enjoying summer life with the kids and making memories. 

My trip back to Seattle was so needed and refreshing. Summer in Seattle is unmatched.

We took our first family trip to Possum Kingdom Lake in Texas and we all fell in love. 

The kids finished up summer baseball, summer track and now we get a little break before football and fall sports.
Comment BED and I’ll send you a link to the comb Comment BED and I’ll send you a link to the combo storage and trundle bed I put in my son’s bedroom. It’s an amazing price, great quality, the color of the upholstery is a perfect oatmeal and the extra storage is so nice to have for kids stuff. 

#loweshomeimprovement #lowespartner #diy #kidsbedroom #kidsroomdecor #boysbedroom #kidsdecor #homedecor
Time to clean up the pavers, get rid of the water Time to clean up the pavers, get rid of the water residue, and make them look polished and glossy again! 

Comment YES PLEASE and I’ll send you the Stone Sealer + Gloss I’m using! 

#homedecor #dallasblogger #diyhomedecor #homeprojects #diy #diyproducts #bdcbrands #partner #exterior
Comment LINKS for these new fun finds! These artif Comment LINKS for these new fun finds! These artificial bushes can be used in planters or simply in the ground. Would look so great lining a driveway! 

#amazonfinds #neutralhome #exterior_design #exterior #exteriors #homedecor #homefinds #neutralhomedecor #dallasblogger #amazonhome #diyhomedecor
Comment SHOP for all the links to last month’s t Comment SHOP for all the links to last month’s top neutral home decor favs. 

#homedecorating #homestyle #homedecorideas #decoratingdeninteriors #decor #neutralhomedecor #doingneutralright #ispyraddesign #dallasblogger
I finally found THE piece for this corner on our c I finally found THE piece for this corner on our courtyard! It’s the perfect finishing touch. This outdoor mirror is absolutely stunning and very high quality. It would work well indoors too. I just love how it reflects the rest of the courtyard and you can see every angle in it. It makes the lights sparkle at night and it’s just dreamy! 

Comment SHOP and I’ll send you a link to the mirror and my approved artificial trees! 

#neutraldecor #dallasblogger #homedecor #exteriordecor #exteriors #diy #homestyle #homedetails #decorating
Comment SHOP for my favorite wireless art lights! Comment SHOP for my favorite wireless art lights! No hard wiring required, these are luxurious and the best I have found for quality battery operated lights. I will use them again and again! 

Color: antique brushed bronze jn purple bedroom
  Gold in baseball bedroom 

#lighting #amazonfind #homedecortips #decorating #homedecorlovers #homestyle #homedesign #homefinds #amazonhome #amazonhomefinds #amazonfinds
Follow on Instagram

Copyright© 2025 · Brunch Pro Theme by Shay Bocks · Hosting by 3116 Digital