• Skip to primary navigation
  • Skip to main content
  • Skip to primary sidebar
  • Skip to footer
  • Home
  • About
  • Contact
  • Partner with Taryn

Taryn Whiteaker Designs

DIY and Interior Blog

  • Our Dallas Home Tour
  • Shop My Pics
  • Home Styling
    • Room Reveals
      • Our Current Home
      • Our First Home
    • Seasonal Home Tours
  • DIY Projects
    • DIY Home Decor
    • Crafts & Sewing
    • Before and Afters
    • Before and Afters
    • Furniture Builds and Makeovers
  • Seasonal Decor
    • Christmas
    • Easter
    • Fall
    • Fourth of July
    • Halloween
    • Spring
    • Valentine’s Day
  • Printables
  • Entertaining
    • Parties
    • Tablescapes
  • Fashion
  • Travel

September 4, 2020

Bedroom Vertical Slat Wall

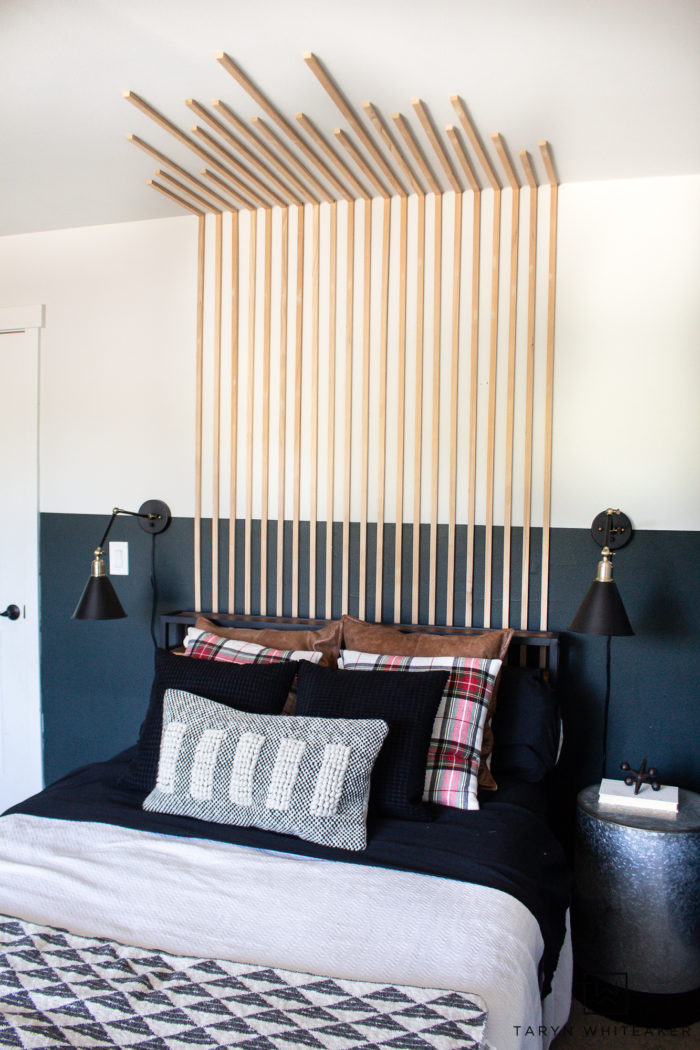
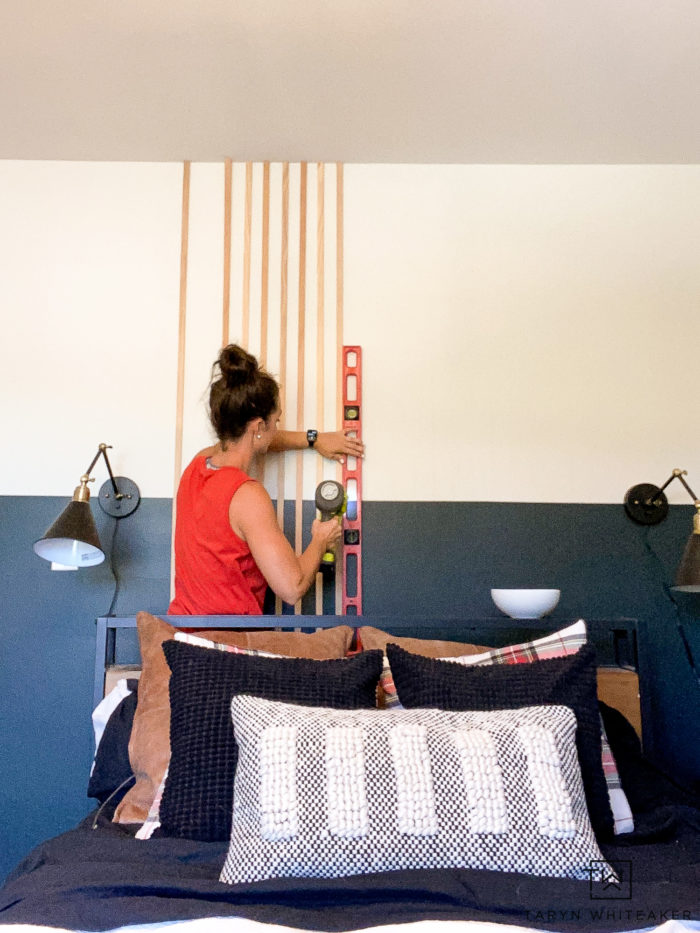
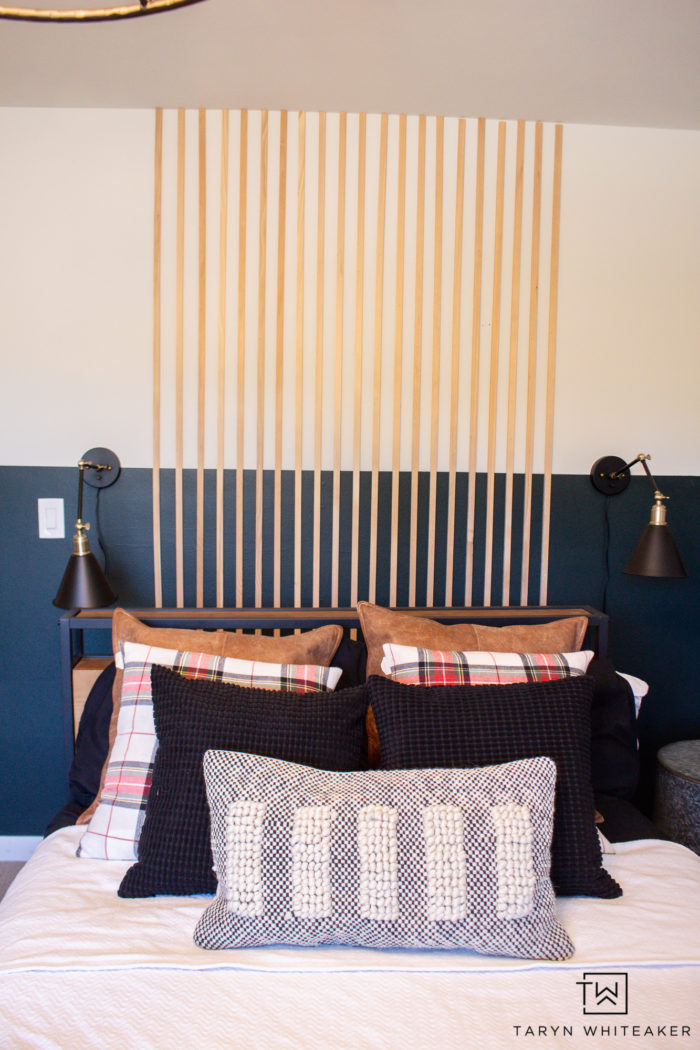
I finished up another part of my son’s room this week! If you remember from my inspiration post, I found a really cool bedroom on Pinterest that I loved and thought this Vertical Slat Wall accent piece was so different and brought so much dimension to the space. I thought it would be the perfect addition to this room.

Vertical Slat Wall Tutorial

Add dimension to your bedroom with this Vertical Slat Wall that also works as a DIY headboard! Easy bedroom DIY.

I’m still putting the finishing touches on this room, but I think it’s really coming together now! It has a cool mix of classic, mid-mod and rustic all tied up into one space.

The vertical slat wall is a big statement piece. Instead of hanging artwork or buying a new headboard (his is really short), this is a great alternative that adds dimension, texture and a wow element to the room. And best part, when you are laying under there, it kinda feels like you are in a fort!

Accent Wall Tutorial

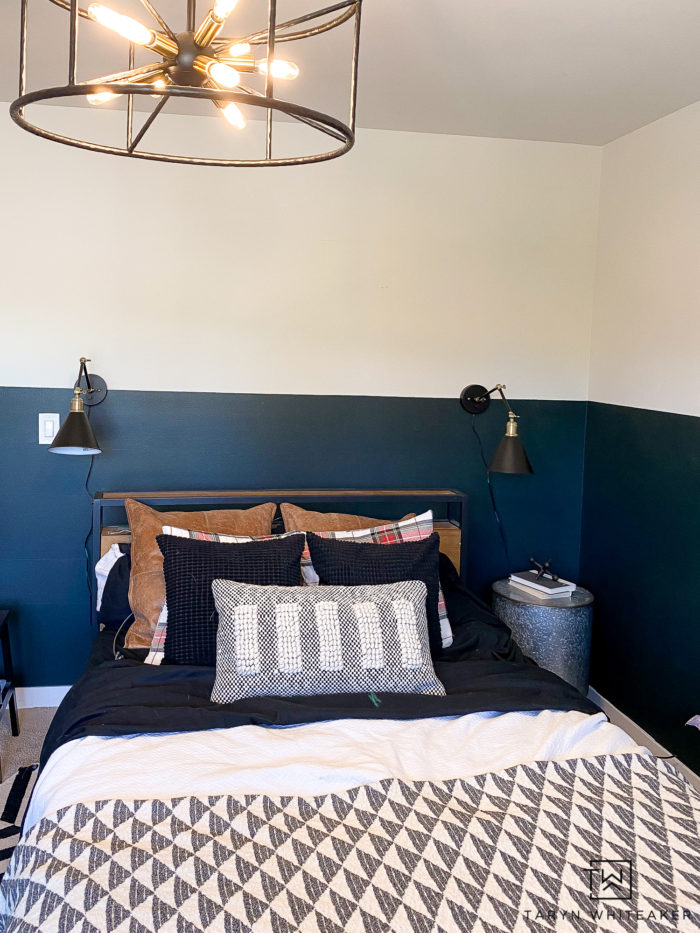
Here is what I started with. You could easily throw a great picture above the bed and call it good, but why not try something more? The whole process only took me about 1-2 hours, it was very simple!

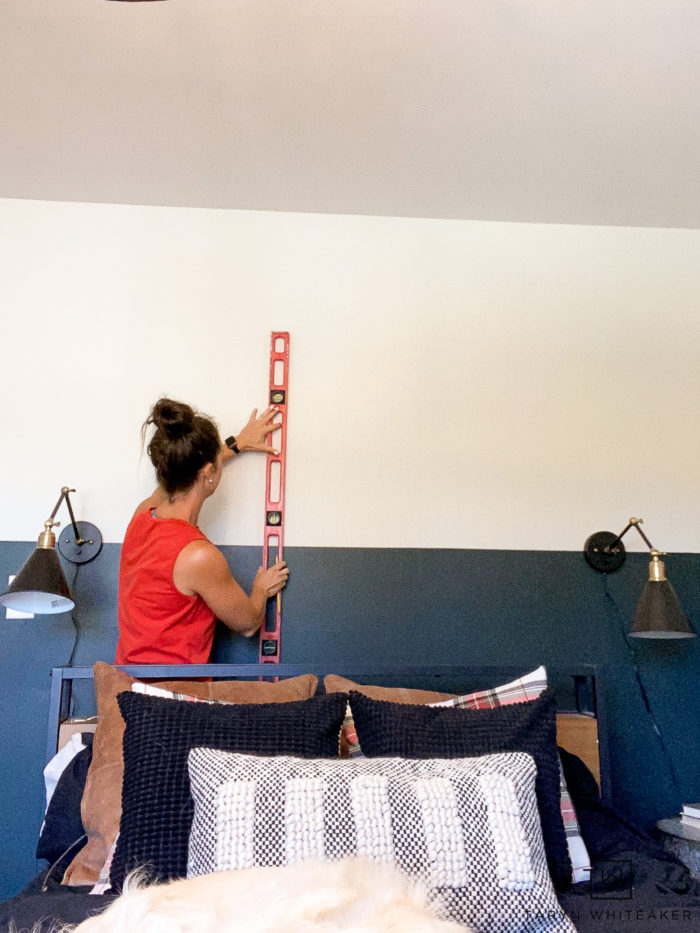
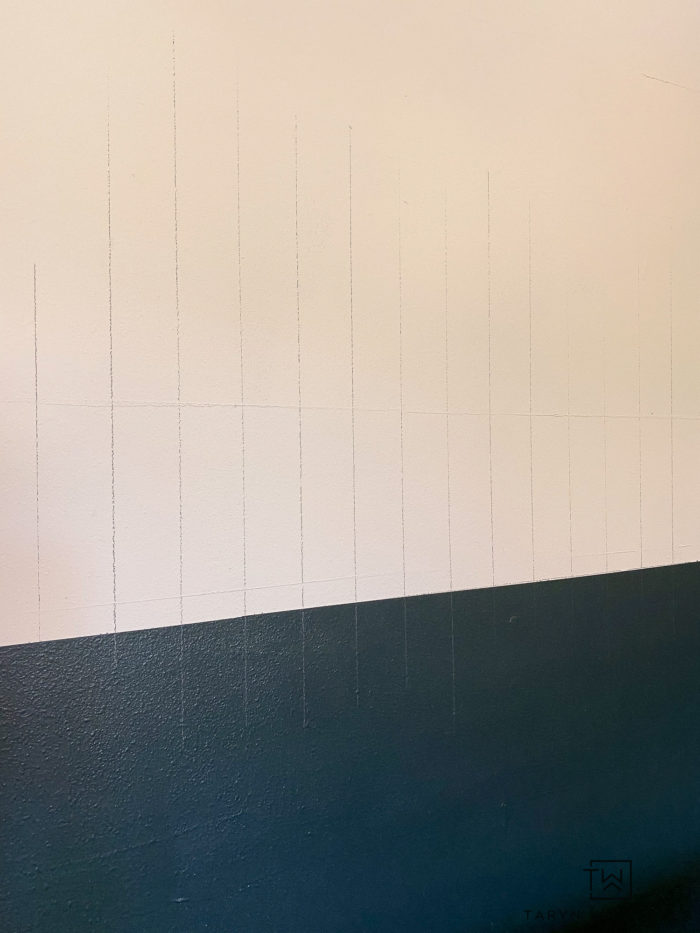
Start by marking lines on your wall. I used a level to keep them straight and did them exactly the width of the level to keep them consistent (about 2.5 inches apart).

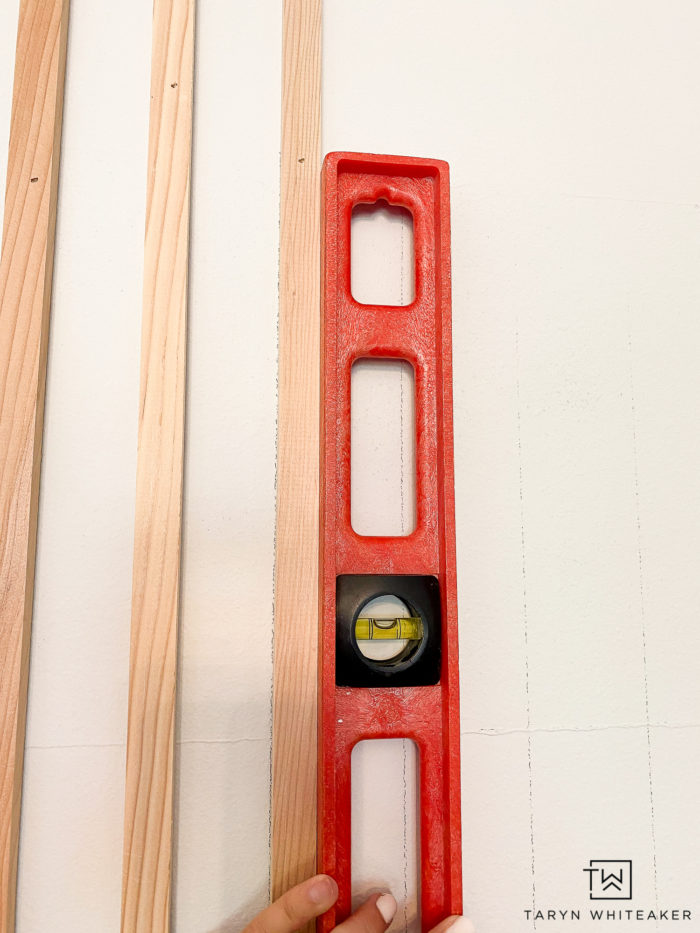
TIP: For the wood, I originally wanted a square trim but it is actually pretty pricey. So I decided to go with a 3/4″ X 1″. I definitely had to shop around to find the best price, Ace Hardware ended up being the best for me.

Cut your wood to the length of your wall. And install using a brad nailer. I used my level with each piece to make sure it was going up perfectly straight.

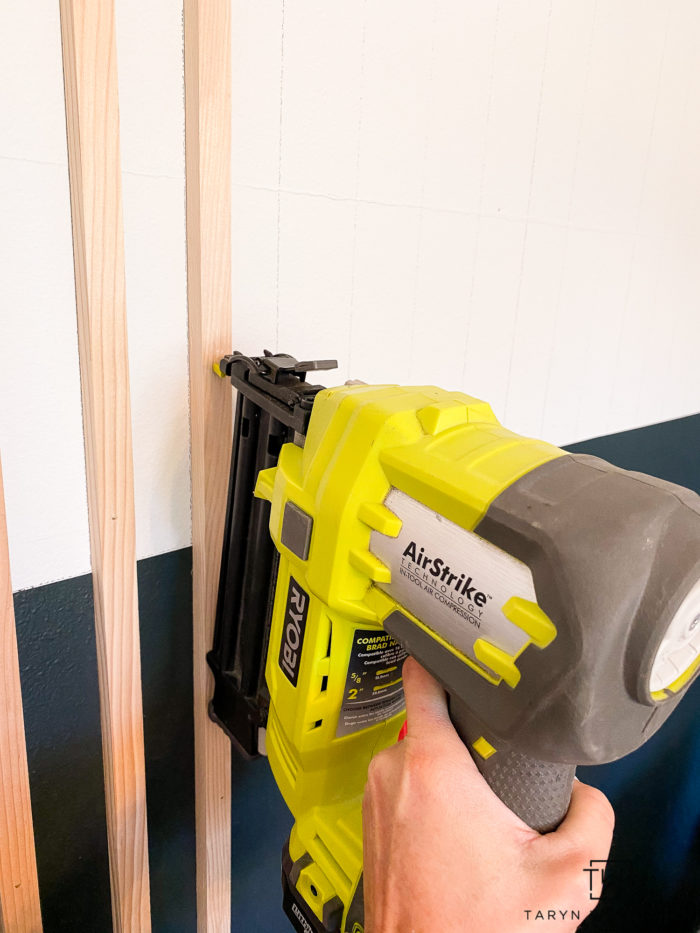
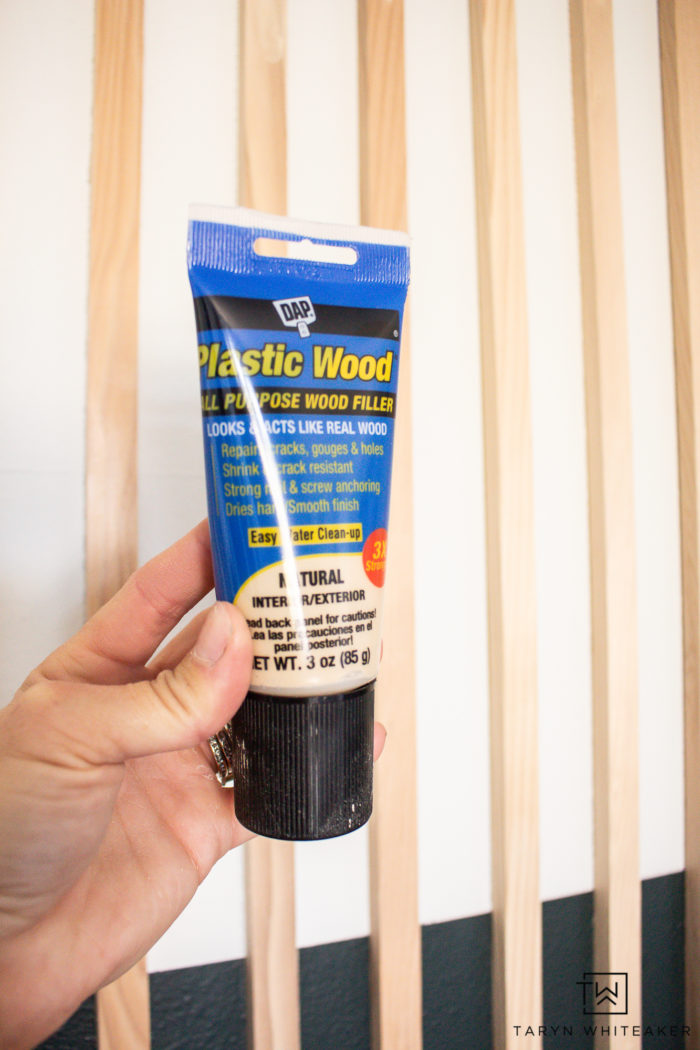
I did about 3-4 nails into each piece. To finish it off nicely, I just used a dab of natural wood filler into each hole to cover it up.

You could stop her and just do a nice accent piece behind the bed, but let’s take it one step further!

I loved that inspiration photo I found on Pinterest, I thought the planks on the ceiling add some drama so I went with that! I wasn’t very calculated with my board lengths here, I simply cut a whole bunch of different sizes, added a few shorter ones to the outside and varied them.

This was a fun project and I can’t wait to pull the whole room together and reveal it super soon!

About Taryn Whiteaker

Hi! I’m Taryn! The voice behind Taryn Whiteaker Designs. I launched this brand over 11 years ago when I became a stay-at-home mom. What started as a small craft and mom blog eventually grew into a full time design and DIY site. My goal has always been to inspire others (especially women!) with design ideas, DIY tutorials, entertaining ideas and give you the tools you need to complete them yourself!

You May Also Like:

  • SportsBedroom_TarynWhiteakerDesigns
    Boys Sports Bedroom Design Plans
  • home decor, home accents, home lighting, wall sconces, interior lighting, exterior lighting
    Home Accent Essential: Wall Sconces
  • IMG_3663
    Teen Bold Sports Bedroom Design
  • IMG_3506
    Tween Boys Bedroom Part 1
  • Baseball Bedroom-2
    Boys Bedroom Furniture & Lighting
  • Screen Shot 2025-01-10 at 1.53.33 PM
    Boys Football Bedroom Design Plans
  • Elle’s Dallas Bedroom (1)
    Cozy Neutral and Green Teen Bedroom
  • 1-3
    Where To Buy Affordable Wall Art

Filed Under: ALL POSTS, Before and Afters, DIY Home Decor, DIY Projects, Our Current Home, Our Home Projects, Room Reveals

Reader Interactions

Comments

  1. Jake says

    February 20, 2021 at 6:45 pm

    What length nails/brads did you use?

    Reply
  2. Patel says

    April 4, 2021 at 2:12 pm

    Did you apply some kind if oil to the wood slats for a finish or just used them as is?

    Reply
    • Taryn Whiteaker says

      April 4, 2021 at 10:39 pm

      In this case, I just left them as is!

      Reply

Leave a Reply Cancel reply

Your email address will not be published. Required fields are marked *

Primary Sidebar

Looking For Something?

CONNECT

Meet Taryn

Taryn Whiteaker

Hi and welcome! I'm Taryn and the voice of style behind Taryn Whiteaker Designs. Sharing our journey of modernizing our European style home in Dallas. Thanks for stopping by and don't forget to subscribe to my mailing list to get all the latest updates! Read more...

Footer

THIS SITE

  • Home
  • About
  • Contact
  • Partner with Taryn

Privacy Policy

If you are interested in learning more about data that might be collected by this site you are encouraged to read the Privacy Policy

COPYRIGHT POLICY

All images on this site are copyright of Design, Dining and Diapers, LLC. Unless otherwise noted. You may not use these images without written permission. If you would like to feature a project shown on Design, Dining and Diapers you may use a maximum of 2 images and include a visible link back to the project.

More From The Gram

tarynwhiteaker_designs

Taryn Whiteaker Designs
I finally have a drying rack! Here’s how I built I finally have a drying rack! Here’s how I built the custom drying rack for our laundry room to make it more functional. My @worxtools Switch Driver and Impact Driver were the real MVP’s of this project! Saving me time and energy. I love how it now doubles as a shelf to display antiques I’ve collected throughout the years and also helps me keep this place organized! 

Comment SUPPLIES for everything I used to build this piece! 

#worxtools #partner #dıy #diyhomedecor #homerenovation
Comment SHOP for all these pieces! What every 40-s Comment SHOP for all these pieces! What every 40-something girl is looking for this summer: cute, comfy, and sweat ready outfits for summer travels! I picked up these cute items from @halara_official to mix and match and I am obsessed with the material. Most of the items are made out of athletic material and are so soft. Perfect travel outfits, you still feel cute but very easy fabrics.

The price points are 👌🏼, almost everything is under $50! 

Use my code taryn2:for 20% OFF full-price items or Super code taryn26 : Spend $120 → 10% OFF / Spend $150 → 12% OFF
#halara #over40outfits #travelfit #traveloutfits #partner
Almost done! Since we vetoed the wallpaper on the Almost done! Since we vetoed the wallpaper on the ceiling, I still wanted a pop of pattern and decided to go with a little peel of a mural behind the washer and dryer! Just what it needed! 

Comment LAUNDRY to shop this space so far! 

#homedecor #diyhomedecor #wallmural #laundryroommakeover
It all started as a vision… comment REVEAL for a It all started as a vision… comment REVEAL for all the details on this bold, teen sports bedroom! 

#homedecor #diyhomedecor #kidsbedroom #sportsroom #beforeandafter
For the record he was very nice and helpful, but h For the record he was very nice and helpful, but had very little faith in me. 😉

PS. Happy Mother’s Day to all the strong, loving and beautiful mommas ❤️ 💪🏼 . 

#diyhomedecor #homedecor #renovation #laundryroommakeover
One of my favorite places to be. After 4 years in One of my favorite places to be. After 4 years in this house the porch swing is still in perfect condition, just time to replace the cushion and add some fresh outdoor pillows! 

Comment SWING for all the sources! 

#homedecor #exteriordecor #outdoorprojects #potterybarn #ballarddesigns
Still one of my favorite transformations to date…. 

Comment BEDROOM for all the sources. 

#homedecor #diyhomedecor #boysbedroom #kidsroom #homedesign
Comment SPRING and I’ll send you all my fav laye Comment SPRING and I’ll send you all my fav layered looks for spring, all affordable and budget friendly. Pieces I keep wearing over and over this season! 

#amazonfashion #amazonfinds #over40fashion #springoutfit #easyoutfits
Laundry room update number two! Walls have been sk Laundry room update number two! Walls have been skim coated and primed, first coat of paint on walls and trim. Cabinets are off and getting prepped… next up: installing dark wood ceiling, painting cabinets, hanging a surprise wall mural, and building a custom drying rack! 

Paint color: BM Cromwell Gray 

#homedecor #cromwellgray #diyhomedecor #homerenovation #diy
Follow on Instagram

Copyright© 2026 · Brunch Pro Theme by Shay Bocks · Hosting by 3116 Digital