• Skip to primary navigation
  • Skip to main content
  • Skip to primary sidebar
  • Skip to footer
  • Home
  • About
  • Contact
  • Partner with Taryn

Taryn Whiteaker Designs

DIY and Interior Blog

  • Our Dallas Home Tour
  • Shop My Pics
  • Home Styling
    • Room Reveals
      • Our Current Home
      • Our First Home
    • Seasonal Home Tours
  • DIY Projects
    • DIY Home Decor
    • Crafts & Sewing
    • Before and Afters
    • Before and Afters
    • Furniture Builds and Makeovers
  • Seasonal Decor
    • Christmas
    • Easter
    • Fall
    • Fourth of July
    • Halloween
    • Spring
    • Valentine’s Day
  • Printables
  • Entertaining
    • Parties
    • Tablescapes
  • Fashion
  • Travel

August 18, 2024

Installing Thin Brick Tiles

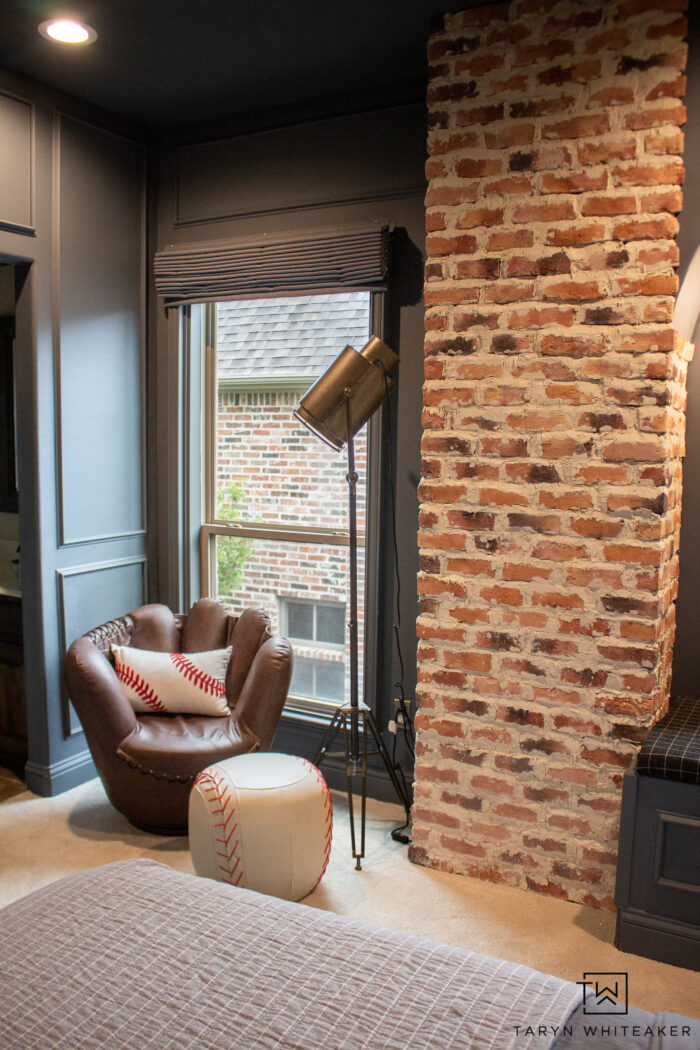
One of the finishing touches on my son’s sports themed bedroom was the brick chimney. I want to call it a faux chimney, but it really IS a chimney for the fireplace downstairs. Now it just actually looks like one! To create this look that mimicked the real brick facade of the fireplace in our dining room and on our exterior, I used thin brick tiles that were MUCH easier to install than regular solid bricks. These tiles are easy to install, even more simple than tiling, and can add so much texture to your space. I think these would also look great as an accent wall or backsplash. So let’s dive into what I learned installing thin brick tiles.

Installing Thin Brick Tiles

INSTALLING THIN BRICK TILES

Supplies For Brick Tile Accents

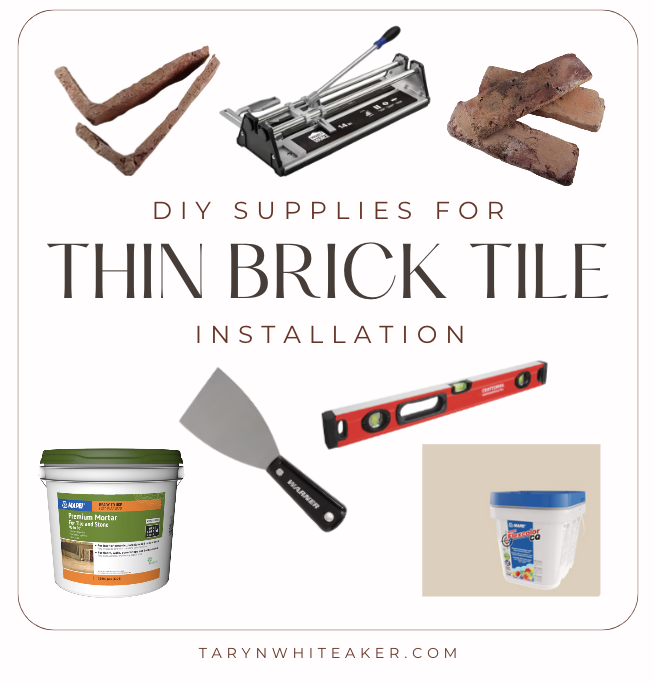
  • Old Chicago Rosse 8.20 in. x 2.50 in. Thin Brick Flats
  • Old Chicago Rosse Thing Brick Corners
  • Mortar For Stone
  • Light Almond Grout
  • Putty Knife
  • Tile Snapper
  • Level

How To Install Thin Brick Tiles

Mussle Bound Versus Mortar

First you want to prep your walls. The same way you would before any tiling project. Sand down any rough spots and make sure your walls are dust free. Here are all my fails and what worked best for me.

I have used mussel bound product before, it’s a great alternative to mortar for the right project. This wasn’t it. I used it for tiling our niche in the hallway and that was a perfect place for it. It’s mess free, extremely adhesive and a lot easier if you have ever tiled before. However, I tried it and the tiles just fell off. I think it was because the brick tiles are uneven and so rough, there just wasn’t enough adhere. So you definitely want to use a mortar for natural stone.

I started by applying the mortar directly to the wall like you would in most tile applications, but I realized that yet again due to the rough and uneven surface on the back of the tiles, that they weren’t sticking as well.

So I decided to apply the mortar directly onto the back of the brick tiles, where I could fill in mortar where it was needed. This worked perfectly.

Cutting Brick Tiles

I used the corner pieces for the corners and then the flat pieces in between. Because this is a small space, I had to trim down the flat bricks by about an inch or so, so I could fit 3 in a row. Since the bricks are not all the same size anyway, they are very organic and natural looking, I didn’t have to be as precise.

To cut the tiles, all I used was my Tile Snapper . I didn’t have to bring out my wet saw for this since it was all straight cuts.

The spacing of your bricks can vary. I wanted it to look as close to our current brick as possible, so I spaced mine out a little further with a thicker grout line. I also used a Level throughout the process to make sure my rows were straight.

Grouting Brick Tiles

Once I was done installing the tile, I waited 24 hours and then started grouting. Except, this didn’t go quite as planned and was a learning experience as well. With normal tiling, you apply the grout and then smooth it out with a sponge and remove the excess. Except this isn’t normal tile and it didn’t wash off the bricks. Plus, the grout lines in our home are rougher, not polished and did not appear to have been sponged over. So this wasn’t the right technique. I actually had to bristle brush off the entire section and scraped out all the grout.

Also, during this time I played around with grout color. I tried an off white and it was too stark, so I went with this light almond grout which was perfect. It gave it almost an antique, vintage look. It really complimented the color of the brick.

To apply, I used a gallon bag and turned it into a piping bag. I applied a first coat of squeezing it into all the cracks to fill them.

I let this dry and then then squeezed in a second coat. I played around with doing the piping bag and then applying it directly with the putty knife and spread it out. I spread it out flat and allowed it to go over the brick a little bit. This would be considered a German Schmear brick.

That’s it. It’s actually a pretty simple process and technique.

Thin Brick Tile Accent Wall

You can tour more of this room here!

About Taryn Whiteaker

Hi! I’m Taryn! The voice behind Taryn Whiteaker Designs. I launched this brand over 11 years ago when I became a stay-at-home mom. What started as a small craft and mom blog eventually grew into a full time design and DIY site. My goal has always been to inspire others (especially women!) with design ideas, DIY tutorials, entertaining ideas and give you the tools you need to complete them yourself!

You May Also Like:

  • English Country Backyard Dining Space-19
    Brick Outdoor Dining Space Refresh
  • DIY Wall Trellis-7
    Installing a Trellis On Brick Exterior
  • Brick Fireplace Decor-7
    Modern English Brick Fireplace Decor

Filed Under: ALL POSTS, Before and Afters, Dallas Home Projects, DIY Home Decor, DIY Projects, home decor

Reader Interactions

Comments

  1. Scarlet says

    August 28, 2024 at 11:40 am

    Wow, I love the texture and colors the brick tiles brought to the bedroom. It looks really great and provides a natural, lightening effect!

    Reply
  2. Lori Keller says

    October 7, 2024 at 12:47 pm

    Hi Taryn. This looks amazing…the entire room is so good. Question, how many Sq Ft of brick did this project take? Thank you so much!

    Reply
    • Taryn Whiteaker says

      November 24, 2024 at 9:53 am

      Hi! I think I used between 3-4 boxes but that is a combination of corner pieces and flat pieces.

      Reply

Leave a Reply Cancel reply

Your email address will not be published. Required fields are marked *

Primary Sidebar

Looking For Something?

CONNECT

Meet Taryn

Taryn Whiteaker

Hi and welcome! I'm Taryn and the voice of style behind Taryn Whiteaker Designs. Sharing our journey of modernizing our European style home in Dallas. Thanks for stopping by and don't forget to subscribe to my mailing list to get all the latest updates! Read more...

Footer

THIS SITE

  • Home
  • About
  • Contact
  • Partner with Taryn

Privacy Policy

If you are interested in learning more about data that might be collected by this site you are encouraged to read the Privacy Policy

COPYRIGHT POLICY

All images on this site are copyright of Design, Dining and Diapers, LLC. Unless otherwise noted. You may not use these images without written permission. If you would like to feature a project shown on Design, Dining and Diapers you may use a maximum of 2 images and include a visible link back to the project.

More From The Gram

tarynwhiteaker_designs

Taryn Whiteaker Designs
Comment LINKS for The top Amazon Finds from last m Comment LINKS for The top Amazon Finds from last month! 

1. My favorite 26” Artificial wreaths! The branches are so good. 
2. My most worn throw on cropped shirt. Wrinkle free! 
3. Watercolor Pumpkin pillow covers.
4. The best artificial garland! The main one I use around my house! 
5. The viral set of gold trays. These are solid and so pretty!
6. Portable TV! We use this so much more than I thought we would! Great family gift. 
7. The best lash serum. My daughter and I swear by it. 
8. Large black and white frames. 
9. Quarter zip sweater - looks so chic! 
10. Built-in Bra long sleeve shirt! 
11. 2-in-1 baked goods case or character board!
Kicking off Christmas!!!! Comment SHOP for my late Kicking off Christmas!!!! Comment SHOP for my latest haul from MacKenzie-Childs! The wreath and ornaments are my favorite. 

#homedecor #mcamassador #mackenziechilds2025 #dallasblogger #diyhomedecor #christmasdecor #christmas #holidayinspo #neutralhomedecor #unboxing
Installing the hidden bookshelf door in my sons ro Installing the hidden bookshelf door in my sons room, PART 2! The trim makes such a difference and I am in love with how the mural turned out! 

#boysroom #diyhomedecor #kidsroomdecor #diyproject #interiordesign #limitlesswalls #homedepot #homedesign
Sharing our outdoor Halloween decor for this year! Sharing our outdoor Halloween decor for this year! First time decorating this space with a little spookiness. Comment SHOP for links to everything! 

#halloweenhomedecor #halloween #exteriordecor #halloweenvibes #homegoods #amazonhome
Comment GHOSTS and I’ll DM you the link! Set of Comment GHOSTS and I’ll DM you the link! Set of three pop-up ghosts for under $100! 

#halloweenhomedecor #amazonfinds #amazonhome #halloweendecor #halloweenvibes
Closed 🎁$500 AMAZON GIVEAWAY!!! 🎁I’m givin Closed 🎁$500 AMAZON GIVEAWAY!!! 🎁I’m giving away TWO $500 Amazon Gift Cards to help with shopping! Yes two winners. Entry is simple: 

(1) Comment SHOP to visit my Amazon Storefront and follow! 
(2) Follow @tarynwhiteaker_designs @amazoninfluencerprogram AND @amazonhome 
(3) Tag a friend in the comments, the more the merrier! 
(4) Must be located in the United States

Giveaway closes October 11th at 10pm CT. Winners will be notified within 24 hours and will receive gift cards before October 16th. 

*this giveaway is sponsored by Amazon Influencer Program.
It’s the little things… It’s the little things…
Comment SHOP for September’s top sellers! #neu Comment SHOP for September’s top sellers! 

#neutralhomedecor #neutralhomeedit #neutraldecorstyles #homedecorating #homestyle #decorhome
Comment LINKS to shop this Halloween table decor! Comment LINKS to shop this Halloween table decor! Halloween is upon us… I don’t do scary, but I do love a good modern moody and elegant Halloween table for the dinner party I’ll never end up having 👻 I set up this Halloween table for a recent photo shoot and thought I’d share some of my favorite finds to create this look! 

The bleeding candles are so fun! 

#halloween #halloweenhomedecor #tablescapestyling #tabledecor #halloweenhomedecor #targetfinds #homegoods #amazonhome #mackenziechilds #targetstyle
Follow on Instagram

Copyright© 2025 · Brunch Pro Theme by Shay Bocks · Hosting by 3116 Digital