Disclosure: This post is in partnership with True Value.
I often get the question, ” I have a large wall that I don’t know what to do with?” and to be honest, I often struggle with the same problem! There are so many different ways to fill a large blank wall, but the hard part is deciding the best solution. From adding a gallery wall, to patterned paint design to a single piece of artwork, and wood! Adding a wood accent wall is such a great way to fill blank space but also add warmth, texture and design to a space. When I was designing my middle son’s nursery when we first moved into this house, this was my exact problem. I found this pic on Pinterest and I instantly knew that is what I wanted to do. I decided to go with a DIY Wood Striped Wall, it was the perfect solution for the rustic modern look that I wanted.
DIY Wood Striped Wall
 I love how this turned out! It was very easy to install and will be easy to take down (if we ever have to). It definitely adds a huge impact to the room and ties the whole look together.
 This look could work in almost any space and can be done with a variety of stains or distressing techniques to meet your needs.
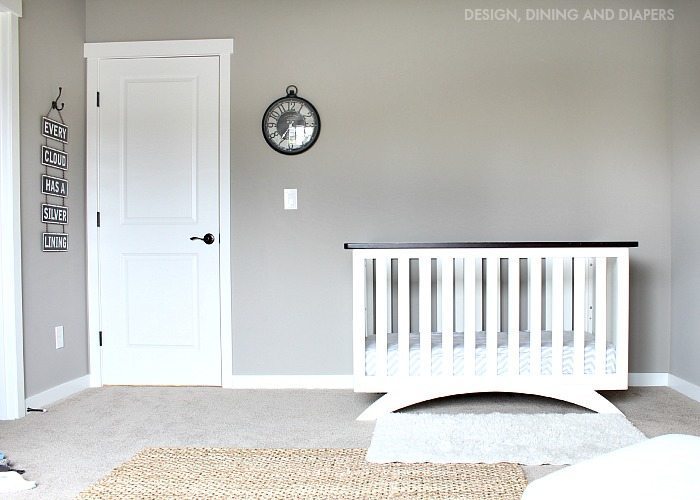
Here is what the wall looked like before. It was definitely lacking a ‘wow’ factor. If you are interested in doing something similar in your home, here is a quick tutorial for you.
HOW TO INSTALL A WOOD ACCENT WALL
– 1 in X 8 in X 12 ft boards (I used 5)
– 2″ Galvanized Nails
– Circular Saw
 I started with 12ft boards and stained them in Minwax Dark Walnut. My favorite stain.
 Then, I gave it two coats of polycrylic. I generally brush on my poly, but I decided to try the spray version and I actually really liked it. It might be my new go-to.
 The most time consuming part of the project was planning. I wanted to avoid cutting the boards around the light switch and outlet, so I decided to space the boards around them. I ended up using 8″ boards and I left a 10.5″ space in-between them. I highly recommend using a pencil and marking out the boards and spaces before putting everything up.
I placed the first board flush against the ceiling. Thankfully our ceiling was level so it made it easy to keep a straight line, but if you are working in an older house I recommend being very careful about how you place the first board because that will affect the rest of the wall. You’ll also want to use a level with each additional board just to double check. The first board was the only one that I had to add to, if you look closely there is a 21″ board filling in the gap on the upper left. The other boards fit perfectly.
 To secure the boards to the wall, we first found the studs in the wall. Then used 2″ galvanized nails to secure them. We did 3 sets of nails into studs and then another set on the ends of each board.
 Our boards bowed a little bit at the ends, so it was important to add an extra set of nails to the ends to help the board stay flush with the door trim.
WOOD STRIPED BEDROOM WALL
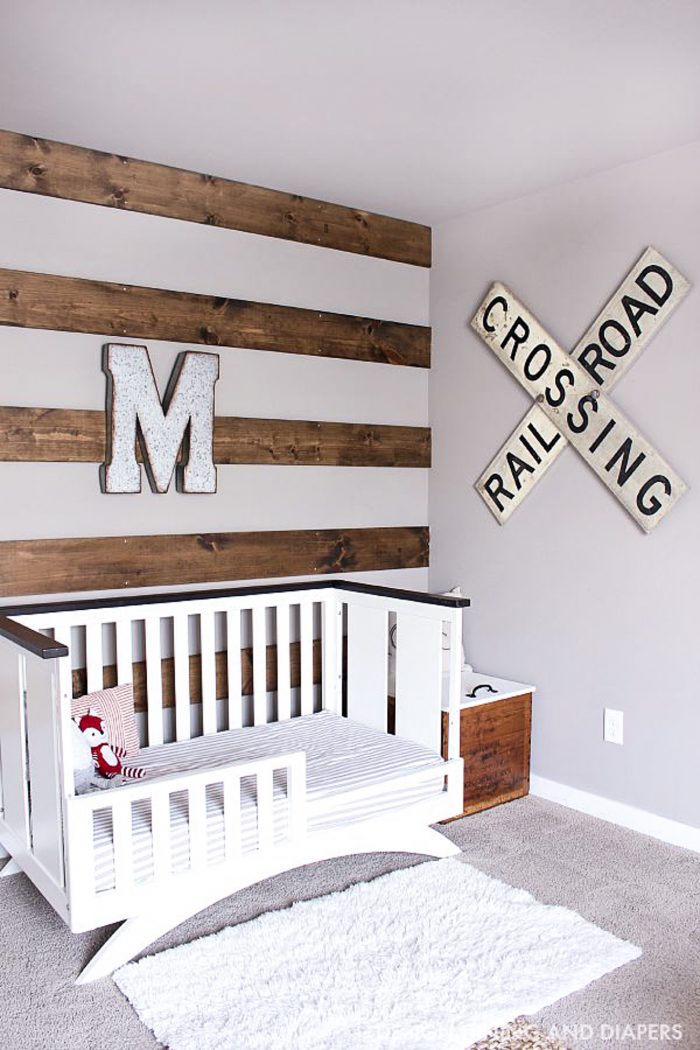
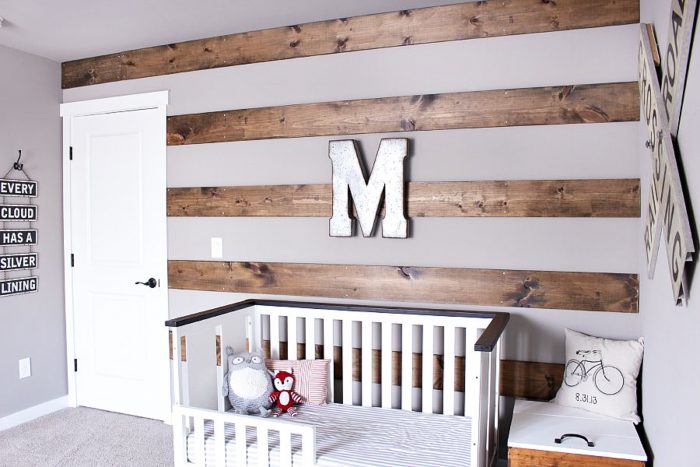
I love how our wall turned out! If you have any additional questions don’t be afraid to ask :) You can click here to see the completed rustic nursery, and now it’s turned into a rustic big boy room!
I was one of the bloggers selected by True Value to work on the DIY Squad. I have been compensated for my time commitment to the program as well as writing about my experience. I have also been compensated for the materials needed for my DIY project. However, my opinions are entirely my own and I have not been paid to publish positive comments.
About Taryn Whiteaker
Hi! I’m Taryn! The voice behind Taryn Whiteaker Designs. I launched this brand over 11 years ago when I became a stay-at-home mom. What started as a small craft and mom blog eventually grew into a full time design and DIY site. My goal has always been to inspire others (especially women!) with design ideas, DIY tutorials, entertaining ideas and give you the tools you need to complete them yourself!


This is so creative! Sometimes I feel like the full pallet walls are a little overwhelming, but this gives the look, plus adds some extra style while not being too overbearing. Love it!
Thank you!
Love this look!
Taryn it looks great – almost log cabin with really wide chinking! xo
Wow! I have never seen this done, but I just love it! Perfect rustic look for a boy!!
Love the wall! Thanks for sharing!
Can you tell me the make of your crib? I absolutely love it!
Hi Jenni! Thank you! Here is a link to the crib : http://www.amazon.com/gp/product/B004JNXMKO/ref=as_li_ss_tl?ie=UTF8&tag=desdinanddia-20&linkCode=as2&camp=217145&creative=399373&creativeASIN=B004JNXMKO
What a fun idea!!
This is fabulous, Taryn! I’ve been wanting to do something like this in my house but wasn’t sure how ~now I have all the info I need.. Thanks so much.
Wow what a gorgeous wall! Simply stunning!
This is so beautiful!! I’ve never seen something like this, but I am in LOVE! If we have a boy someday, I’m so doing this! Pinning. :)
I’m totally loving this take on the standard striped wall! Plus I’m a sucker for anything rustic…bravo!
Love how perfect this is for the room! It looks great! Stopped by from Linky Party Palooza!
Oh my gosh, coolest nursery ever! We have a short pallet wall, but I never thought to do stripes. It’s much more eye catching.
Thanks, Bobi
I love this look. I am going darker color paint. But I was wondering what kind of wood you used.
Love this! What color of pain do you have on walls?
Hi Leslie! Thanks for your comment. I actually don’t know the exact paint color, our builder did a custom paint color for this house, it isn’t one you can just pick up. I wish I could be more helpful!
How did you apply the stain? I just started this project and my stain came out sooo much darker than yours.
Hi Lisa! I always use a soft rag, like and old t-shirt. I rub it on and wipe off the extra. Just keep in mind different types of wood will absorb stain differently.
HI! We love this. Did you sand the boards first? I worry about splinters with little curious hands.
Thanks!
Hi! The boards I used were already pre-sanded. I did sand down the edges though where I cut them. I haven’t had any issues with splinters, sealing the boards will really help with this as well.
This is absolutely stunning. I’m all about an accent wall. What type of wood did you use?
Hi! This was made in a drywall?? or concrete wall??
Love!
I LOVE this!!! Wondering what kind of wood you used as well? Do you remember?
I’m dying to know, where did you get your crib?
Hi! Here is the crib! I spent a long time searching for it: http://bit.ly/2cspSVL
HI! I’m obsessed with this wooden striped wall! Where do I purchase the wood or find it?? Can you buy it at like home depot? Thanks!
Hi! It’s just regular wood from any hardware store, Home Depot will have plenty of options.
What kind of wood did you use for this project?
do you HAVE to seal it?
Hi- you don’t have to seal this necessarily, but I always recommend to maintain the wood and richen the color.
I absolutely LOVE that crib! Can I ask where you found it at? Thanks!
Thank you! Here is the link, but it says its unavailable, but at least you have the info on it! http://amzn.to/2j93kch
Do you remember how much stain you used and just one can of the spray polycrylic? Thanks, doing this in our baby’s nursery.
Hi – it’s Minwax Dark Walnut and I do believe I only used one can to do the two coats of Poly.
I just posted on another of your pages asking about this but I think this answers all my questions. Thanks!
Love it! Getting ready to do our sons room like this! May I ask, where did you get the railroad crossing sign from?
Hi! It was a fun vintage find from a local place.