You all may be familiar with the large wall in our dining area. The space right above our industrial metal console table. Over the course of the last few years, the space has become my designated place to decorate for the holidays. I do all of my seasonal displays here but it’s been missing something. An actual backdrop! With the help of True Value, I turned this boring blank wall into a shiplap display wall that can transition through the seasons.
DIY Shiplap Display Wall
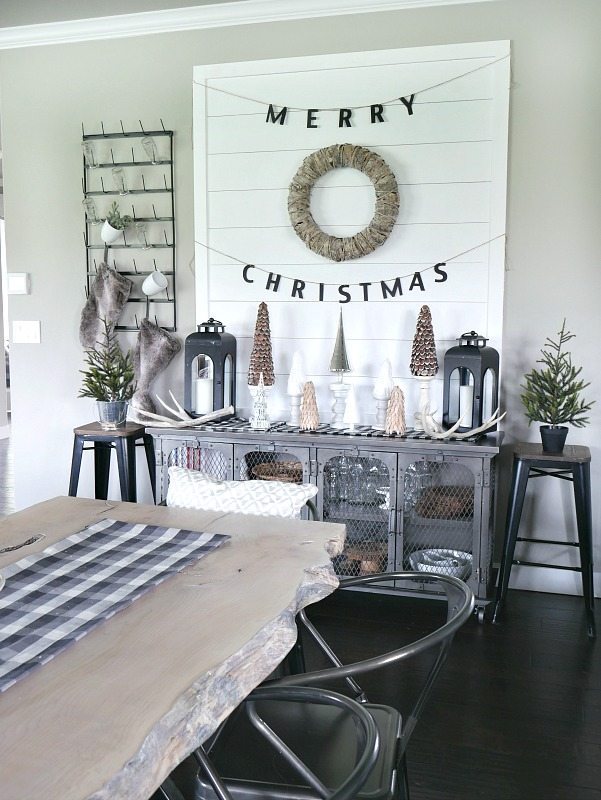
What I needed was something to fill the space and take advantage of the tall ceilings, something that would still allow me to easily change out my seasonal displays, set up party buffets and just be creative! Then it hit me, shiplap is white, bright, trendy and almost anything would look good in front of it. While I don’t see any full shiplap walls in my future, I am ok with doing a small DIY Shiplap Display Wall.
Eeeeeeek! I have waited so long to fill this space so I can create the beautiful Christmas vignettes that I have been envisioning. This is the icing on the cake to this year’s holiday decor and I can’t wait to play around with it for other holidays.
For this holidays this year, I added a bunch of decorative Christmas trees!

Modern Farmhouse Shiplap Display


I’ve seen a few people install something similar above fireplaces but today I’m going to show you how I installed mine on the wall. The total project cost me right around $60, THAT’S IT! And you can easily get it done in a weekend.

SHIPLAP DISPLAY WALL SUPPLIES
- 1/4″ plywood cut into 7″ strips (length will be determined by your space)
- 1″X3″ pre-finished molding
- white satin paint
- nail-filler
- white caulk
- painter’s tape
TOOLS
- stud finder
- brad nailer
- level
- small paint roller
- caulking gun
- pencil
- measuring tape
- ladder
HOW TO BUILD YOUR OWN SHIPLAP WALL

Here is the wall I started with. A nice, big, blank wall.

To kick off the project I used my stud finder to locate all of the studs in the space. I’m a stickler for nails going directly into studs, so this helped me determine the exact width of the shiplap.


I cut my boards to my desired length, they are 7″ X 54.5″ to fit my space. I gently sanded down any rough edges and then gave them one full coat of paint. Based on my experience putting a shiplap wall in our old home, I decided to paint before the boards went on the wall so I could get the edges.
I wanted the top of the display to be flush with the top of our cabinets. This will create a stream line look around our kitchen. Because of this, it was important for me to start at the top. I used a level to draw a pencil line at the top and then installed the first board on the line using a brad nailer. Then I worked my way down leaving a small gap between the boards. About 1/8″.

I used 2″ brad nails to make sure they went into the studs and also adjusted the settings on my nail gun so that the nails sunk into the wood a little bit. This will make it easier to patch the nail holes.

Periodically I would place the level vertically to make sure they were inline.
All my planks are on!


Time to frame this piece and add molding. I purchased pre-finished pieces. I started with the sides and then finished the top and bottom.Now it’s time to add polishing touches! Some people like rustic shiplap where you can see the nail holes, but I wanted a really polished look for this space.
I have to admit, the tedious steps are my least favorite but they make SUCH a difference! I filled all of the nail holes and then caulked along all the seams. Inside the molding and the outside. My cuts weren’t 100% perfect and the caulked smoothed all of those out.

For the last step, I gave the whole piece two more coats of paint.
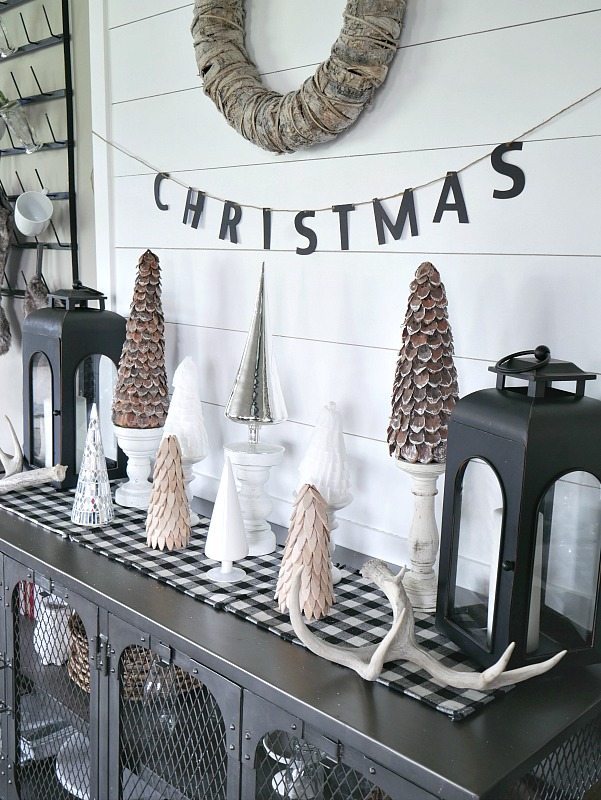
SHIPLAP DISPLAY WALL
Perfection. I really love how this turned out and not only is it the perfect backdrop to set up a holiday display with a smile wreath and trees.
This is a sponsored conversation written by me on behalf of True Value. The opinions and text are all mine.
You can view the shiplap wall with everyday decor too!
About Taryn Whiteaker
Hi! I’m Taryn! The voice behind Taryn Whiteaker Designs. I launched this brand over 11 years ago when I became a stay-at-home mom. What started as a small craft and mom blog eventually grew into a full time design and DIY site. My goal has always been to inspire others (especially women!) with design ideas, DIY tutorials, entertaining ideas and give you the tools you need to complete them yourself!


my goodness…YOU did a great job….it just looks lovely !!!!
your site is delightful to read through and your pictures are beautiful to look at….you make my heart sing with happiness………thank you for sharing all of this fun “STUFF” with me !
wishing you a very Merry CHRISTmas and a wonderful New Year too.
When you first said ship lap I was picturing the whole wall. I love this so much more! It’s perfect:)
I love that you just did a partial ship lap wall. I do am not into this whole “trend” of doing full walls etc.. but your partial ship lap is EVERYTHING!! I love the charm it adds without overtaking the whole space!!! Gorgeous!
Paige.Rose
from
http://www.TheQuaintSanctuary.blogspot.com
This is a great idea, it makes much more impact than a whole wall would
Love this! Perfect, too, for small spaces, to bring almost like a spotlight, without the light, lol! I love that it’s on the wall, but framed! Great job!
But, I actually first stopped at this post, while scrolling, to see what that wreath was! It pops right up off the background, and just made me stop, and back up! I’m dying to know if you made it, and if so.. How?! I’m going to take a look in your posts to see if you already posted something about it,esp where I’m not even sure you’ll see this… But, I hope so! Anyway, love that wreath, and excellent job on the wall, it’d even make a really nice headboard look, if you prefer not to use an actual headboard, or even above your headboard! Thanks!
Hi! Thank you so much! It’s actually from Target! I tried looking for it, but I can’t find it anymore. :(
Next project! How did you hang the banner from the sides?
Is there a way to create this where it is removable not attached to wall ?
I love the look but live in a rental house would love to take with me in the next move