• Skip to primary navigation
  • Skip to main content
  • Skip to primary sidebar
  • Skip to footer
  • Home
  • About
  • Contact
  • Partner with Taryn

Taryn Whiteaker Designs

DIY and Interior Blog

  • Our Dallas Home Tour
  • Shop My Pics
  • Home Styling
    • Room Reveals
      • Our Current Home
      • Our First Home
    • Seasonal Home Tours
  • DIY Projects
    • DIY Home Decor
    • Crafts & Sewing
    • Before and Afters
    • Before and Afters
    • Furniture Builds and Makeovers
  • Seasonal Decor
    • Christmas
    • Easter
    • Fall
    • Fourth of July
    • Halloween
    • Spring
    • Valentine’s Day
  • Printables
  • Entertaining
    • Parties
    • Tablescapes
  • Fashion
  • Travel

August 18, 2024

Installing Thin Brick Tiles

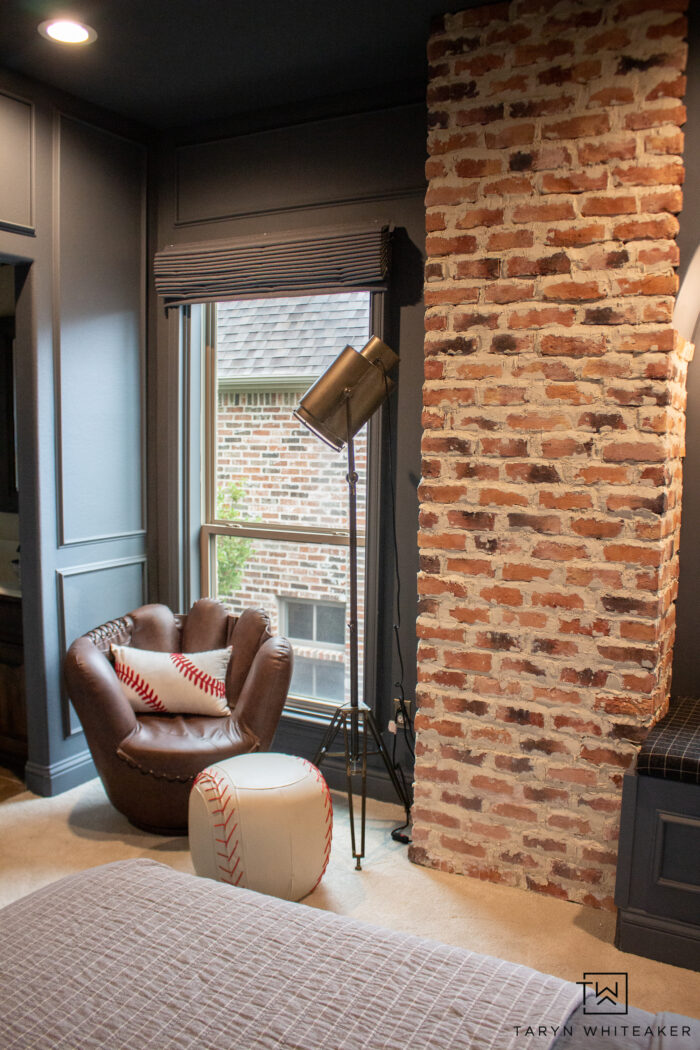
One of the finishing touches on my son’s sports themed bedroom was the brick chimney. I want to call it a faux chimney, but it really IS a chimney for the fireplace downstairs. Now it just actually looks like one! To create this look that mimicked the real brick facade of the fireplace in our dining room and on our exterior, I used thin brick tiles that were MUCH easier to install than regular solid bricks. These tiles are easy to install, even more simple than tiling, and can add so much texture to your space. I think these would also look great as an accent wall or backsplash. So let’s dive into what I learned installing thin brick tiles.

Installing Thin Brick Tiles

INSTALLING THIN BRICK TILES

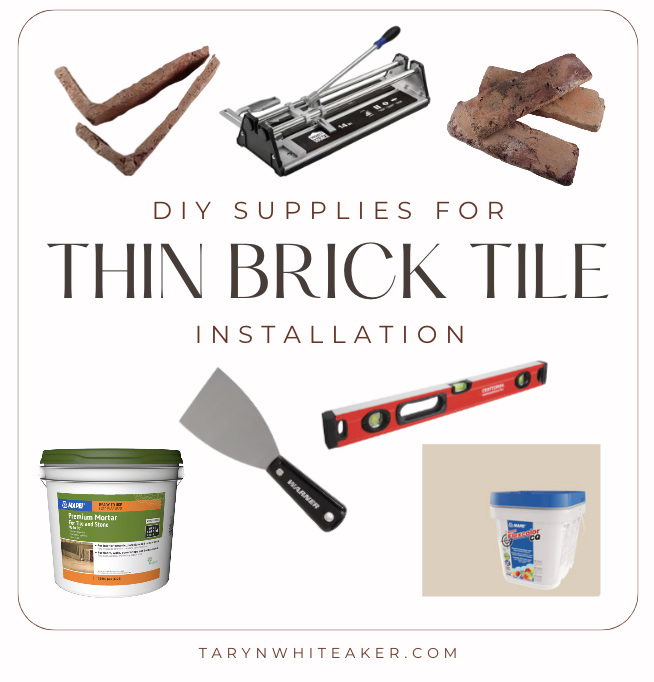
Supplies For Brick Tile Accents

  • Old Chicago Rosse 8.20 in. x 2.50 in. Thin Brick Flats
  • Old Chicago Rosse Thing Brick Corners
  • Mortar For Stone
  • Light Almond Grout
  • Putty Knife
  • Tile Snapper
  • Level

How To Install Thin Brick Tiles

Mussle Bound Versus Mortar

First you want to prep your walls. The same way you would before any tiling project. Sand down any rough spots and make sure your walls are dust free. Here are all my fails and what worked best for me.

I have used mussel bound product before, it’s a great alternative to mortar for the right project. This wasn’t it. I used it for tiling our niche in the hallway and that was a perfect place for it. It’s mess free, extremely adhesive and a lot easier if you have ever tiled before. However, I tried it and the tiles just fell off. I think it was because the brick tiles are uneven and so rough, there just wasn’t enough adhere. So you definitely want to use a mortar for natural stone.

I started by applying the mortar directly to the wall like you would in most tile applications, but I realized that yet again due to the rough and uneven surface on the back of the tiles, that they weren’t sticking as well.

So I decided to apply the mortar directly onto the back of the brick tiles, where I could fill in mortar where it was needed. This worked perfectly.

Cutting Brick Tiles

I used the corner pieces for the corners and then the flat pieces in between. Because this is a small space, I had to trim down the flat bricks by about an inch or so, so I could fit 3 in a row. Since the bricks are not all the same size anyway, they are very organic and natural looking, I didn’t have to be as precise.

To cut the tiles, all I used was my Tile Snapper . I didn’t have to bring out my wet saw for this since it was all straight cuts.

The spacing of your bricks can vary. I wanted it to look as close to our current brick as possible, so I spaced mine out a little further with a thicker grout line. I also used a Level throughout the process to make sure my rows were straight.

Grouting Brick Tiles

Once I was done installing the tile, I waited 24 hours and then started grouting. Except, this didn’t go quite as planned and was a learning experience as well. With normal tiling, you apply the grout and then smooth it out with a sponge and remove the excess. Except this isn’t normal tile and it didn’t wash off the bricks. Plus, the grout lines in our home are rougher, not polished and did not appear to have been sponged over. So this wasn’t the right technique. I actually had to bristle brush off the entire section and scraped out all the grout.

Also, during this time I played around with grout color. I tried an off white and it was too stark, so I went with this light almond grout which was perfect. It gave it almost an antique, vintage look. It really complimented the color of the brick.

To apply, I used a gallon bag and turned it into a piping bag. I applied a first coat of squeezing it into all the cracks to fill them.

I let this dry and then then squeezed in a second coat. I played around with doing the piping bag and then applying it directly with the putty knife and spread it out. I spread it out flat and allowed it to go over the brick a little bit. This would be considered a German Schmear brick.

That’s it. It’s actually a pretty simple process and technique.

Thin Brick Tile Accent Wall

You can tour more of this room here!
About Taryn Whiteaker

Hi! I’m Taryn! The voice behind Taryn Whiteaker Designs. I launched this brand over 11 years ago when I became a stay-at-home mom. What started as a small craft and mom blog eventually grew into a full time design and DIY site. My goal has always been to inspire others (especially women!) with design ideas, DIY tutorials, entertaining ideas and give you the tools you need to complete them yourself!

Filed Under: ALL POSTS, Before and Afters, Dallas Home Projects, DIY Home Decor, DIY Projects, home decor

Reader Interactions

Comments

  1. Scarlet says

    August 28, 2024 at 11:40 am

    Wow, I love the texture and colors the brick tiles brought to the bedroom. It looks really great and provides a natural, lightening effect!

    Reply
  2. Lori Keller says

    October 7, 2024 at 12:47 pm

    Hi Taryn. This looks amazing…the entire room is so good. Question, how many Sq Ft of brick did this project take? Thank you so much!

    Reply
    • Taryn Whiteaker says

      November 24, 2024 at 9:53 am

      Hi! I think I used between 3-4 boxes but that is a combination of corner pieces and flat pieces.

      Reply

Leave a Reply Cancel reply

Your email address will not be published. Required fields are marked *

Primary Sidebar

Looking For Something?

CONNECT

Meet Taryn

Taryn Whiteaker

Hi and welcome! I'm Taryn and the voice of style behind Taryn Whiteaker Designs. Sharing our journey of modernizing our European style home in Dallas. Thanks for stopping by and don't forget to subscribe to my mailing list to get all the latest updates! Read more...

Footer

THIS SITE

  • Home
  • About
  • Contact
  • Partner with Taryn

Privacy Policy

If you are interested in learning more about data that might be collected by this site you are encouraged to read the Privacy Policy

COPYRIGHT POLICY

All images on this site are copyright of Design, Dining and Diapers, LLC. Unless otherwise noted. You may not use these images without written permission. If you would like to feature a project shown on Design, Dining and Diapers you may use a maximum of 2 images and include a visible link back to the project.

More From The Gram

tarynwhiteaker_designs

Taryn Whiteaker Designs
Comment SHOP for our fav family gift! Something ev Comment SHOP for our fav family gift! Something everyone will use! 

#giftidea #amazonfinds #amazonhome
It’s the time of year when most of you are putti It’s the time of year when most of you are putting away your outdoor furniture to prepare for the winter… but this is actually when we use our backyard the most! Hot tub nights, dinner outside, computer days at the table and relaxing on the new U-shaped sectional. These are the most perfect fall days. We leave all our furniture out year round, it’s the only furniture I’ll own, no matter the climate. 

Comment OUTDOOR for all the info on our backyard furniture set up! 

#outdoorfurniture #backyard #backyarddesign #polywood #exteriordecor
We’re ready! 🎃💀👻 Happy Halloween! Have We’re ready! 🎃💀👻 Happy Halloween! Have a safe and fun weekend everyone! 

#happyhalloween #halloweendecor #trickortreat
How I get my luxe look for less! Come shop with me How I get my luxe look for less! Come shop with me at @athomestores , showing you what I found for my bedroom and how I styled it. They have the biggest selection of home accessories. My go-to for final styling pieces. The bedroom mirror was only $59! 

#AtHomePartner #AtHomeStores #bedroomdecor
Watch until you see it all lit up at the end!!! I Watch until you see it all lit up at the end!!! I add a little bit more decor every year and this year all my new Halloween finds are from @grandinroad ! The fun witch legs are my favorite, but I actually love the little skull wreaths so much too. Wait, the light up spider webs on the trees are also the perfect addition. I have to say, this year’s decor definitely takes the win! Almost time for trick or treaters! 

#halloweendecor #halloweendecorations #grandinroad #grandinroadpartner
NEW FLOORING IS IN! #sponsored I’ve dreamt of ha NEW FLOORING IS IN! #sponsored I’ve dreamt of having a hardwood look in our bedroom since we moved in! I went with Windham Shores in color Wren by @karastanflooring . The LuxeCraft Serenity plank has layers of rich texture to look like authentic hardwoods. This is the perfect pet friendly option, our dogs spend a lot of time in our room, and they play hard! Click the link in my bio or visit my blog for more details and pics! #KarastanFlooring #transformation #flooring #renovation
Comment TABLE for a complete shopping list for my Comment TABLE for a complete shopping list for my Halloween tablescape! 🖤 Chic and spooky for this fun time of year. The bleeding candles are my favorite! Almost everything can be found on Amazon!

#diyhomedecor #halloweendecor #tabledecorations
Exterior Update! It’s been a long time coming! W Exterior Update! It’s been a long time coming! We had these custom gas copper lanterns made by @bevolo to bring the perfect blend of timeless craftsmanship and character to our beautiful stone and brick exterior. 🤎 they are exactly what we envisioned! STUNNING. From the custom design to the warm, flickering glow after dark, every detail works together to create a look that feels both elevated and inviting. 

We couldn’t be happier with how our custom lanterns turned out. They bring the perfect finish touches to our exterior. My favorite part of our house just got even better. The happiness I feel every time I see them flickering in the night ❤️

#Bevolo #partner #CustomGasLanterns #CopperLanterns #ExteriorDesign
#sponsored Bedroom progress! Walking you through t #sponsored Bedroom progress! Walking you through the process of picking out our new flooring. I’m narrowing in on the Luxecraft Serenity line by @karastanflooring - a durable, pet friendly option that will add so much warmth and texture to this space. Click the link in my bio for more info! #KarastanFlooring #bedroomprogress #renovation
Follow on Instagram

Copyright© 2026 · Brunch Pro Theme by Shay Bocks · Hosting by 3116 Digital