This post is a collaboration with 3M™ TEKK Protection™ Brand, but all words and opinions are my own.
50 hours later, two shattered iPhones and a lot of sore muscles, and our new 230 square foot stone patio is finally complete! My husband has wanted to build a new patio and outdoor living space since we’ve been married, but I have shot him down for the last 5 years because there always seems to be a higher priority DIY project to work on. Well, he finally got his wish and I couldn’t be happier with the result, I am SO glad we took the plunge (I should have listened to him a long time ago). I’m happy to say our backyard is finally taking shape thanks to some great team work, a lot of long days and dedication. Even though it took us about 4 times longer than we expected, I am so in love with how it turned out. So worth it. So here are my tips on how to install a stone patio!
Tips for Installing A Stone Patio
This may be the longest post you’ve read here on DDD, but I’m here to tell you all about how to install a stone patio and a few tips from our experience. If you are willing to spend the time and get your hands dirty, go for it.
So what do you think?!
When we were preparing to take on this project, we did A LOT of research. Neither of us had done anything like this before and we wanted to make sure we did it right (you can view some of our research on Pinterest here). Almost every tutorial and article we read estimated that the project would take us 8-10 hours or a full weekend max. I wish that were the case. Maybe for a professional with a team of 5 men. Not for an average couple who likes to take on new DIY projects.
May be it was because we are amateurs or maybe it was because we are perfectionists, but this took roughly 40-50 hours between the two of us. We felt like it was never going to end. There are definitely ways we could have saved time (more on that below) but if you are looking into putting in your own stone patio, allow for a lot of time, patience and ask for help! Don’t get me wrong, every single hour we put it into it was worth it because we are so in love with the final result, BUT it is a very long and tedious process.
Here is what we started with.

Our backyard had a very basic builder’s grade ‘patio’ when my husband bought the house. I wouldn’t even call it a patio though, it was more of a cement slab that wasn’t even big enough for a BBQ and a small table and chairs (barely). And it sank in the center, which caused water to pool and it would leave a huge rusty spot every winter. It was time for an upgrade.
Full disclosure here, we are not professionals, this is simply how we decided to go about the project and what worked for us!
DIY Stone Patio Supply List
Safety Gear

1. Digital WorkTunes™ Hearing Protector and AM/FM Stereo Radio 2.Holmes Workwear™ Premium Safety Eyewear 3.Valved Respirator Mask 4. Gloves 5. Holmes Workwear™ Safety Eyewear with CCS Technology 6. More from 3M TEKK Protection Line
Tools and Supplies 
1. Chalk 2. hammer
3. >Rubber Mallet
4.>Square Point Shovel
5.Round Point Shovel
6.>Rake
7. >Brush Works
8. >Mason Line
9. >Line Level
10. >Wooden Stakes
11. Beam Level
12. Scotch Pro Strength Duct Tape
13. Wheelbarrow
14. Jack Hammer
15. Plate Compactor
16. Ryobi Angle Grinder
with diamond blade
*These are not the exact tools we used for the project, rather examples.
Steps For Building Your Own Stone Patio

To start the process, we needed to remove our current ‘patio’. Believe it or not, this was the easiest part of the entire project! To prepare the space, we taped up tarps around all of the windows to prevent any stray rocks from hitting them and cleared the space.
Removing Your Old Patio

We don’t own a jack hammer so we rented one for a few hours. Some people will tell you that you can use a sledge hammer to take out the patio, but in our opinion that is just a waste of time and energy. We spent $90 on the jack hammer rental and it only took my husband 3 hours to rip it out. We chose to keep our current step because it was still in good shape and it would save us from building a new one.
And since we are working with power tools, you’ll see he is wearing the appropriate protection including the 3M TEKK Protection Digital WorkTunes which are soundproof and have a AM/FM radio built in. My hubby could listen to the Mariner game while working and he was pretty excited about that. He is also wearing safety glasses and gloves.
Tip: When disposing of your cement, look into a local top soils place instead of paying the dumping fee. It only cost us $20 to dispose all of our cement compared to paying a couple of hundred at the dump

Once the area is cleared, it’s time to plan out your patio. Do you want it to be square, rounded, curved. There are so many options. We went with a more rounded look to keep it organic. Once we decided on the shape, we used a marker (you can use spray paint, chalk, etc) and drew a rough outline on the grass to give us an idea of where to start digging.
You will want to dig out somewhere between 7-10″, depending on what layers you decide on. We went with a 10″ depth to allow for more drainage since we live in a rainy part of the country.
Tip: After going through this process, we suggest setting up your lines (see below) before you start digging to help you dig evenly throughout the area. We discovered that a few areas in the middle were 12″+ because we were just estimating as we went along, so we had to fill more later and level it all out.
Leveling Your New Patio

Now here comes one of the most important parts of the entire process. Laying your strings for leveling. This whole process deals with a lot of math (not my strong point) so it took us a little while to get it right. It wasn’t until my father-in-law stopped by one night and helped us set ours up that it actually made sense to me (Looking back, I suggest doing this before you start digging).
I could write a whole post on the process, but here is a quick overview. The strings are basically a way of keeping your patio level. Our yard, like most in of yours too, is not level in the least bit, but the patio needs to be. Therefore you can’t follow the grass line or else you’ll have a slanted patio.
Start by setting up a few stakes along the side of your house and mark them at the height that you want your patio (make sure they are all the same height by using a leveler). Then put additional stakes on the opposite side of the patio and connect them with a tight string. The more strings you put up, the easier it will be to keep the patio level. Using a string leveler, adjust the string on the stake on the opposite side of the house until it is completely level with the stake near the house. Now, in order to help the water drain from your patio you need to angle your patio 1/2″ for every 8 ft. So for us, our patio needed to slope an entire inch away from the house. So once you find your slope, move your string down 1″ (that’s what worked for us) on the stakes opposite of the house. The strings won’t be level any more, but will now be a guide to keeping your patio level with the appropriate slant.
Now it’s time to start your layers.

We started the process by putting down landscape fabric specifically designed to help prevent weeds from growing under patios.

Next, comes to the crushed gravel. We bought enough to have a 3″ layer of gravel, but we think the place must have given us some extra because we ended up with 5″ of gravel. Which worked in our favor since we dug a little deeper than expected.
You’ll need to use a plate compactor to level each layer. We did this for every 1-2″ of gravel and it helped keep the surface compact and level. Some tutorials say you can use a hand tamper, but that would take FOREVER so we rented a plate compactor. Each level only took 10 minutes to compact, well worth the money in my mind. After each level, measure the base of the patio to the strings, it should be the same distance from the gravel to the strings the entire way around the patio, so in order to make your slope you’ll need to fill some areas more than others.
Tip: We thought we were saving money by making several trips to the top soils place instead of paying the delivery charge. However, little did we know a standard truck only holds about 1/2 cubic yard of gravel so my husband had to take about 8 trips to the top soils place, shovel each load onto the driveway and then start again. This literally took an entire day. We could have saved a day by just paying the delivery fee and they would have dumped it on our drive way for us and we could have kept working.

The next layer is the sand. We put in about 3-5″ depending on the area.

And like the previous step, compact after each 1-2″ and measure the distance from the strings to the base to make sure everything is equal distance.

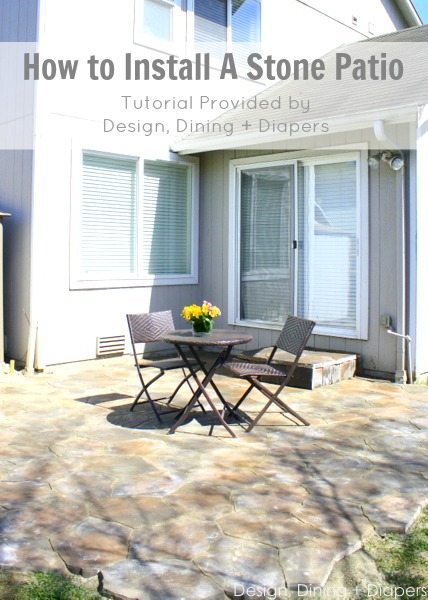
Now the fun part, laying the stone.

We chose a pre-cut Arcadian Portage Patio Paver Stone found at Lowes. I liked the color and loved the fact that each piece fit perfectly together in a pattern, which saves time on installation.


You start by laying three pieces together right in the middle. This creates the pattern and then it spreads out from there. We thought this part would go by quickly considering we just had to piece them together, but each piece took anywhere from 5-20 minutes because we had to make sure each piece was level and secure. So 15 minutes X 160 stones, yeah you do the math. Even though we compacted the sand the best we could, there were still areas that were uneven, so we had to move some sand around as we went. For this you’ll need a leveler and a mallet to gently tap each stone in place.

After you have all of the solid pieces in place, it’s time to cut the edge pieces and tiny pieces to fit against the house. To do this, we laid the pieces in place (the best we could) and then marked the area we wanted to cut with chalk. I wanted the patio to have a real organic and natural look, versus being completely squared off, so we chose to cut the pieces at a angle.

To cut each piece, my husband suited up in his 3M™ TEKK Protection™ gear and used a Hand Grinder with a Diamond Blade. It worked like a charm.


Once all of the pieces are in place, the final step is to fill the cracks with sand. While most people will tell you you can use left over base layer sand, we chose to upgrade to Polymeric Sand which is supposed to help prevent weeds and it also hardens to help keep the stones in place. In just 24 hours we’ve noticed a HUGE different. The sand is hardening and the rocks are really secure. We honestly don’t think it would be this secure if we used regular sand. Two thumbs up.

The last step for us was to cover our existing patio step with the stone. We mortared over the cement to secure the stone and then comes the grout, which I’m still deciding on!

Oh what a different a new patio makes! I’m SO excited for BBQ’s this summer!

And now comes the fun part, turning this patio into a real outdoor living space. We have several more big projects planned for this space and our backyard, I never thought I would see this all come together. Now…. I think it’s time we reward ourselves and purchase some new patio furniture!
So what do you think, was it worth the work?! :)
So there you have it. Are you ready to start your own patio? If you are, then don’t forget to start with the proper safety gear. You can learn more about the 3M™ TEKK Protection™ line and also follow 3M DIY on Facebook and 3M DIY on Twitter
 .
.
This post is a collaboration with 3M™ TEKK Protection™ Brand, but all words and opinions are my own.

About Taryn Whiteaker
Hi! I’m Taryn! The voice behind Taryn Whiteaker Designs. I launched this brand over 11 years ago when I became a stay-at-home mom. What started as a small craft and mom blog eventually grew into a full time design and DIY site. My goal has always been to inspire others (especially women!) with design ideas, DIY tutorials, entertaining ideas and give you the tools you need to complete them yourself!


GORGEOUS Taryn- love how it turned out. Must feel nice to have more space there too.
Looks great Taryn!!
That looks so much better! Love it! xo Kristin
Your patio looks amazing! Looks like it was a lot of hard work, but well worth it! Happy Patio-ing! ;)
We put a patio in at our first house…it took all summer and then we found out that we were moving (because of our family doubling) and had to say goodbye to that beautiful patio. It is truly the one thing that I miss from our old house and I don’t know if I have the stamina to try creating one again so soon. :-) Filling the sand in the cracks was my favorite part! You guys did a GREAT job! I can tell how much hard work went into it and the beauty shows!
~Sarah
Wow – what an undertaking! A true DIY! You guys will LOVE having more outdoor space because seriously around these parts, even though it’s not sunny all that often, when it is, you best be outside! It looks awesome!
It looks awesome!! I’m totally inspired to do ours now :). Great job!!
We just had my BIL tear out our old BROWN (bleh) deck and put in a patio last Fall! We are finally enjoying it this Spring! It really does make such a huge difference, I can’t wait to decorate the space now!
Wow what a beautiful work, looks really nice, now all you need to do is grab a drink and enjoy the new patio : )
Cheers!
That looks fantastic! The hard work pays off!
It looks amazing, T! I can imagine it was really hard work but it looks like it was definitely worth it! You enjoy those summer bbqs :)
Looks amazing! Such a great transformation :) Great post girly! xx Liz Marie
You should be so proud! It looks fantastic!
This looks AMAZING Taryn!! You guys did a fantastic job!! Thanks for the awesome tutorial!
How beautiful! We need to do something about our back porch…this is great inspiration!!! XO, Aimee
This looks fabulous, Taryn!!!! I love your choice of stone and it is definitely a BIG improvement from the before photo. Great job!
xo, Jennifer
It looks fabulous Taryn! Hope your dog likes it as much as you do! ;)
Jenn
you guys did great! love the look and the feel. well done
Holy heck! What a GREAT tutorial! My sister in law and brother just did a paver patio and had all kinds of problems with it… wish they could’ve waited and read this first!!
This. Is. Fabulous. ! You two did a wonderful job- and you’re going to love spending time outside! :)
Looks amazing! I want to do something similar and have been putting it off because of the cost. Can you share an estimate on how much you spent?
Hey Shauna!
It cost us right around $1,500, but that included all tool rentals, new tool purchases, a truck rental for a day and stuff like that. The actual stone only costs us $570, we lucked out by getting it 20% at Lowes and saved about $150. So if you have tools and own a truck, you may be able to do it for cheaper.
Hope that helps!
Taryn
Thank you so much, that does help!
This looks AMAZING girl! Such hard work too…I’m totally impressed! Definitely pinning this fabulous tutorial for future reference!
Looks amazing! We need our entire patio to be reset so I read through this post…this was a great tutorial, but super intimidating!!! I’m going to share with my hubs and see if he’s up for the challenge!
It looks great!!
Wow.. The stone patio looks beautiful.. I can’t wait to see your next patio project. :)
Your patio looks amazing! Just think of all the fun you’ll have enjoying the new space this summer! I know it was a lot of hard work, but it certainly paid off!
Wow, what a amazing difference. It looks wonderful. Found you on Show me what Ya got! You can find me painting, decorating and baking on HickoryTrail
It turned out beautiful! All that hard work really paid off! Enjoy your new outdoor space.
Doing things the right way takes so much longer but it totally worth it. It looks stunning! I can’t wait to see how you decorate :)
YOur new patio is fabulous and what a great tutorial and job. So nice to have enough space to really enjoy and entertain. Beautiful Amazing finish. I have a weekly party called Inspire Me and it goes lives every Monday evening. I would so love for you to link this or any other project to my party. http://www.astrollthrulife.net
Hope to see you there. Hugs, Marty
How awesome is that!!! I really need to do that in my backyard too!
This turned out great! Nicely done :) Pinned to the better homes and gardens board
Hello! I love the final product!!! We just bought our first home. We want to do a patio like yours. Our budget is about $1800, how much did you guys spend? Thank you
WOW it is gorgeous! Lots of work and so worth it!
XO
Kristin
this is amazing… I need to do it!
The patio is beautiful, Taryn. I’m impressed with all of the the hard work y’all have put into. It will be well worth it when you’re relaxing in your new outdoor space this summer.
Wow, what a job! It sure looks great though, sooo much better!
WOW, this is super impressive Taryn. What a fantastic job. I have always wanted to lay a stone patio, but was clueless at how to do it. This is such a great tutorial. Sharing it later today. xo Jenna
I love it. We have been talking about pulling up the concrete pad and laying tiles of some sort or just putting them on top. Yours looks great!
I love the idea and the tutorial. However, I am responding due to your name… Taryn. My daughter also named Taryn, was born in 1986. At that time, I had only heard of one other child with that name. I saw the name in a Parent’s Magazine at one of my OB appointments and instantly fell in love with it. My daughter was murdered, along with her fiancé, in 2008, leaving 2 small children. I know you didn’t pick your name and I am curious where your parents may have seen or heard of it since it is so unique. Even 30 years, later, the name is more common, but still very unique. I wish you peace and happiness in your endeavors. Monday, March 28, was my daughter’s birthday. We released purple balloons to celebrate her life with us.
Hi Shelly, thank you so much for your note. I am so incredibly sorry to hear about the loss of your daughter. As a parent, I cannot even begin to imagine what you have been through. My deepest condolences. My mom heard the name Taryn on TV. She was watching a talk show when she was pregnant with my oldest brother and the famous movie star Tyrone Powers was on, he mentioned he was naming his daughter Taryn. My maiden name starts with a P and my mom thought it was a great fit. She waited 8 years after that to have a girl and name her Taryn (I have two older brothers). So that is how I got my name :)
You and your husband did an excellent job. I love that you increased the size of your patio. the overall results are fabulous.