• Skip to primary navigation
  • Skip to main content
  • Skip to primary sidebar
  • Skip to footer
  • Home
  • About
  • Contact
  • Partner with Taryn

Taryn Whiteaker Designs

DIY and Interior Blog

  • Our Dallas Home Tour
  • Shop My Pics
  • Home Styling
    • Room Reveals
      • Our Current Home
      • Our First Home
    • Seasonal Home Tours
  • DIY Projects
    • DIY Home Decor
    • Crafts & Sewing
    • Before and Afters
    • Before and Afters
    • Furniture Builds and Makeovers
  • Seasonal Decor
    • Christmas
    • Easter
    • Fall
    • Fourth of July
    • Halloween
    • Spring
    • Valentine’s Day
  • Printables
  • Entertaining
    • Parties
    • Tablescapes
  • Fashion
  • Travel

June 29, 2018

DIY Rit Dye Pillows

Hello friends! Earlier this week I posted about the Fourth of July decor we added to our outdoor living space and today I’ve got the tutorials for the DIY Rit Dye Pillows you saw in the post! My original inspiration for this project were all the beautiful Shibori pillows I keep seeing pop up in stores and online, but Shibori is really just a fancy work for Tye Dye in my opinion! I wanted to create a unique look so I picked up some Rit Dye at my local JOANN store and played around. Today I’m going to give you an overview of how I made the pillows and also share some tips on what I would do differently too!
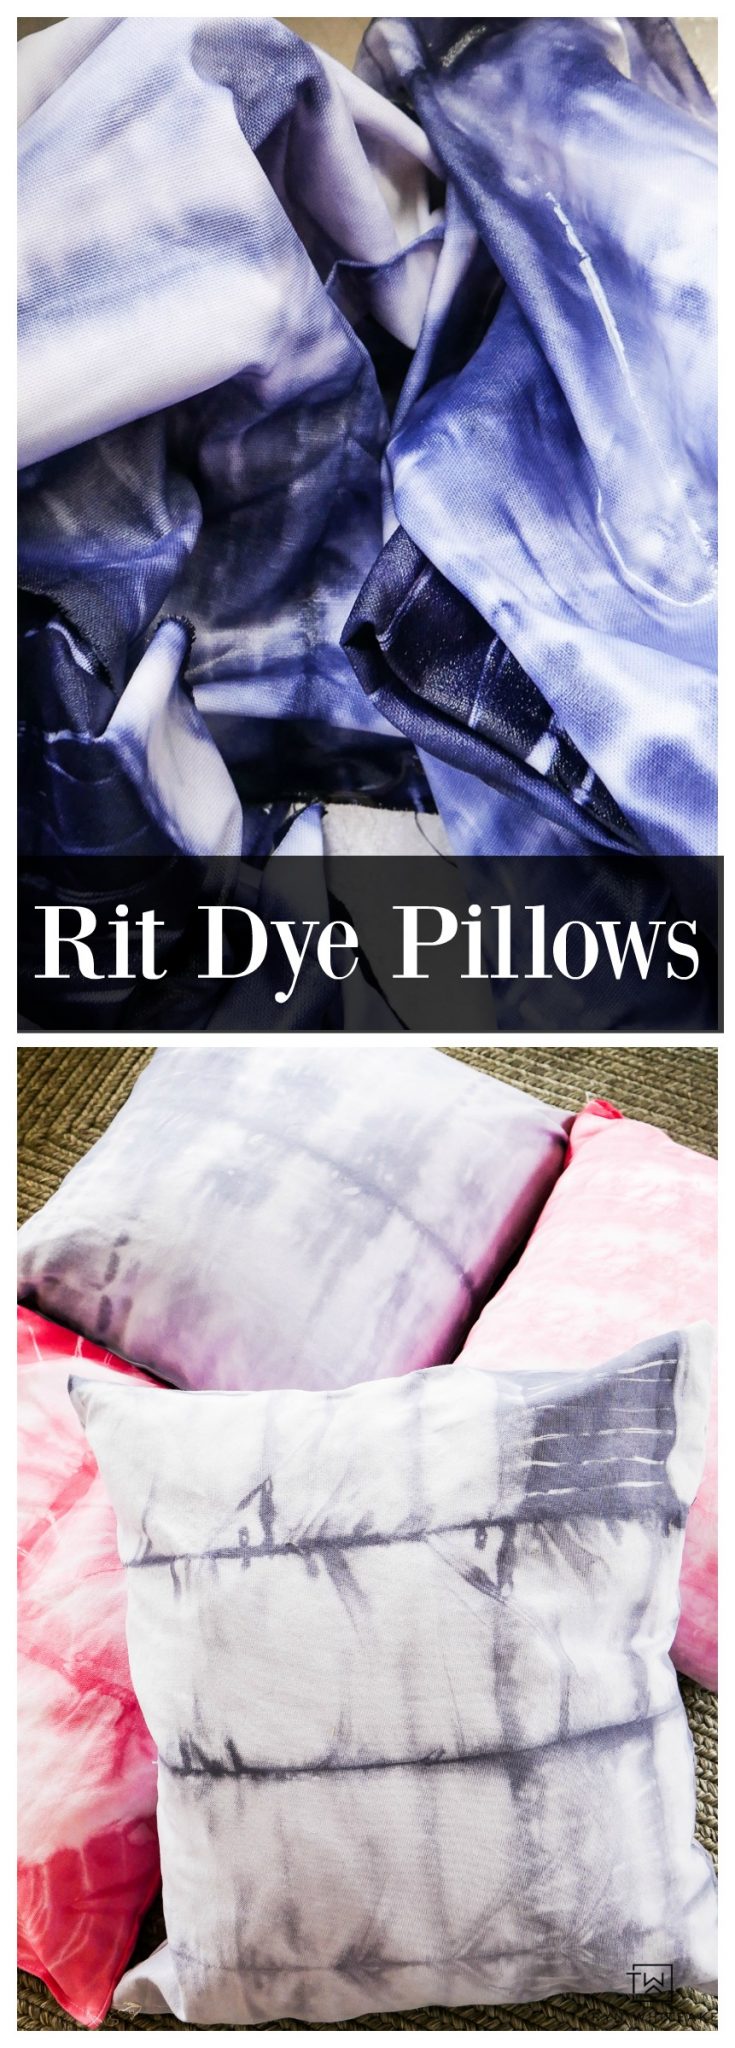
DIY Rit Dye PillowsAdd these DIY Shibori pillows to your space! Click for a great tutorial on how to make these DIY Rit Dye Pillows and create your own patterns.

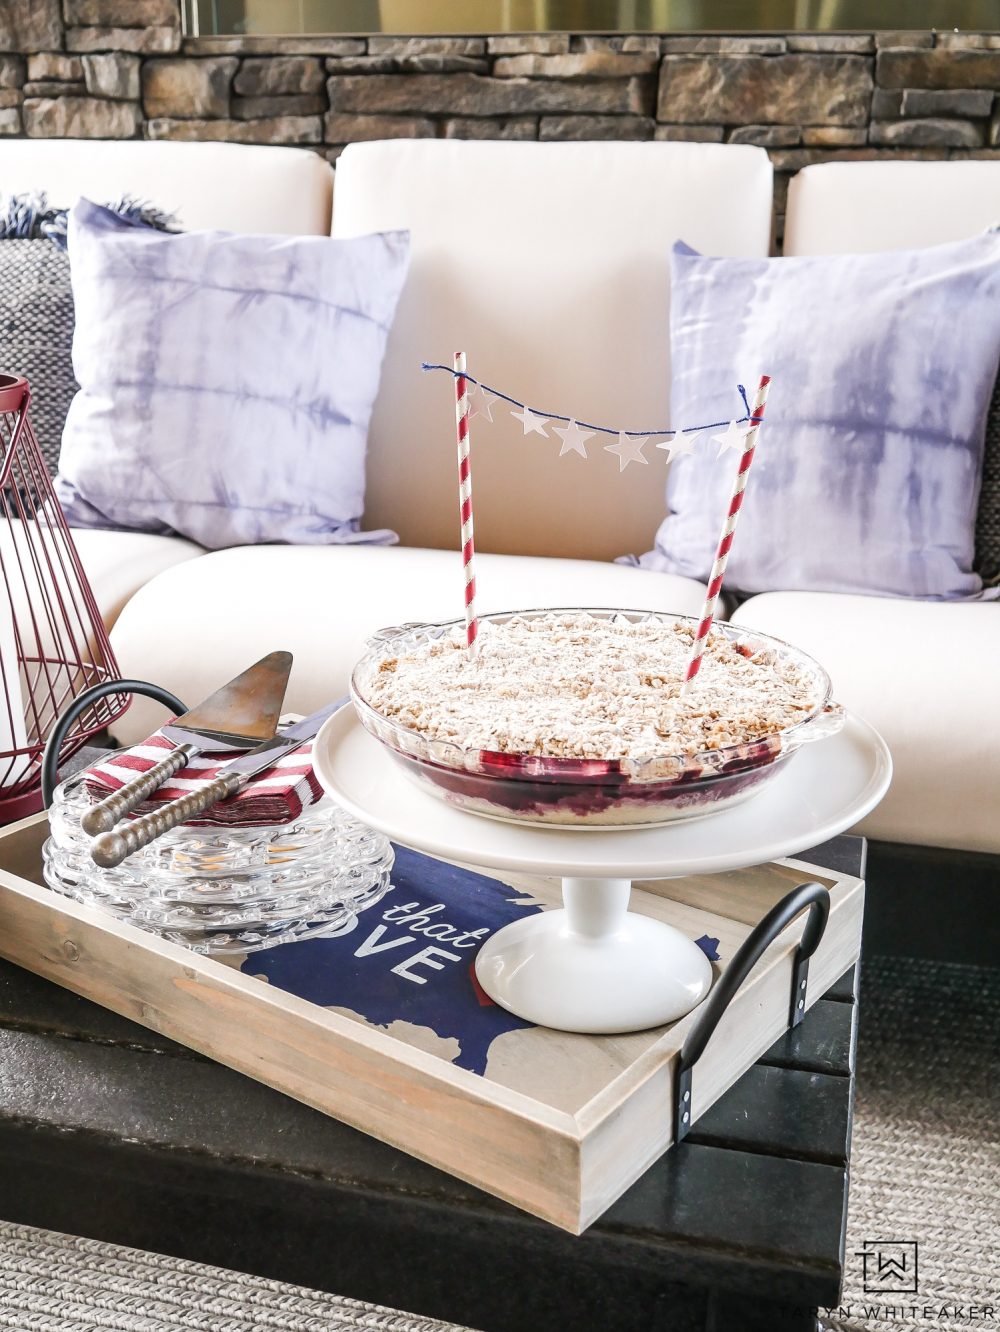
How To Make Shibori Pillows
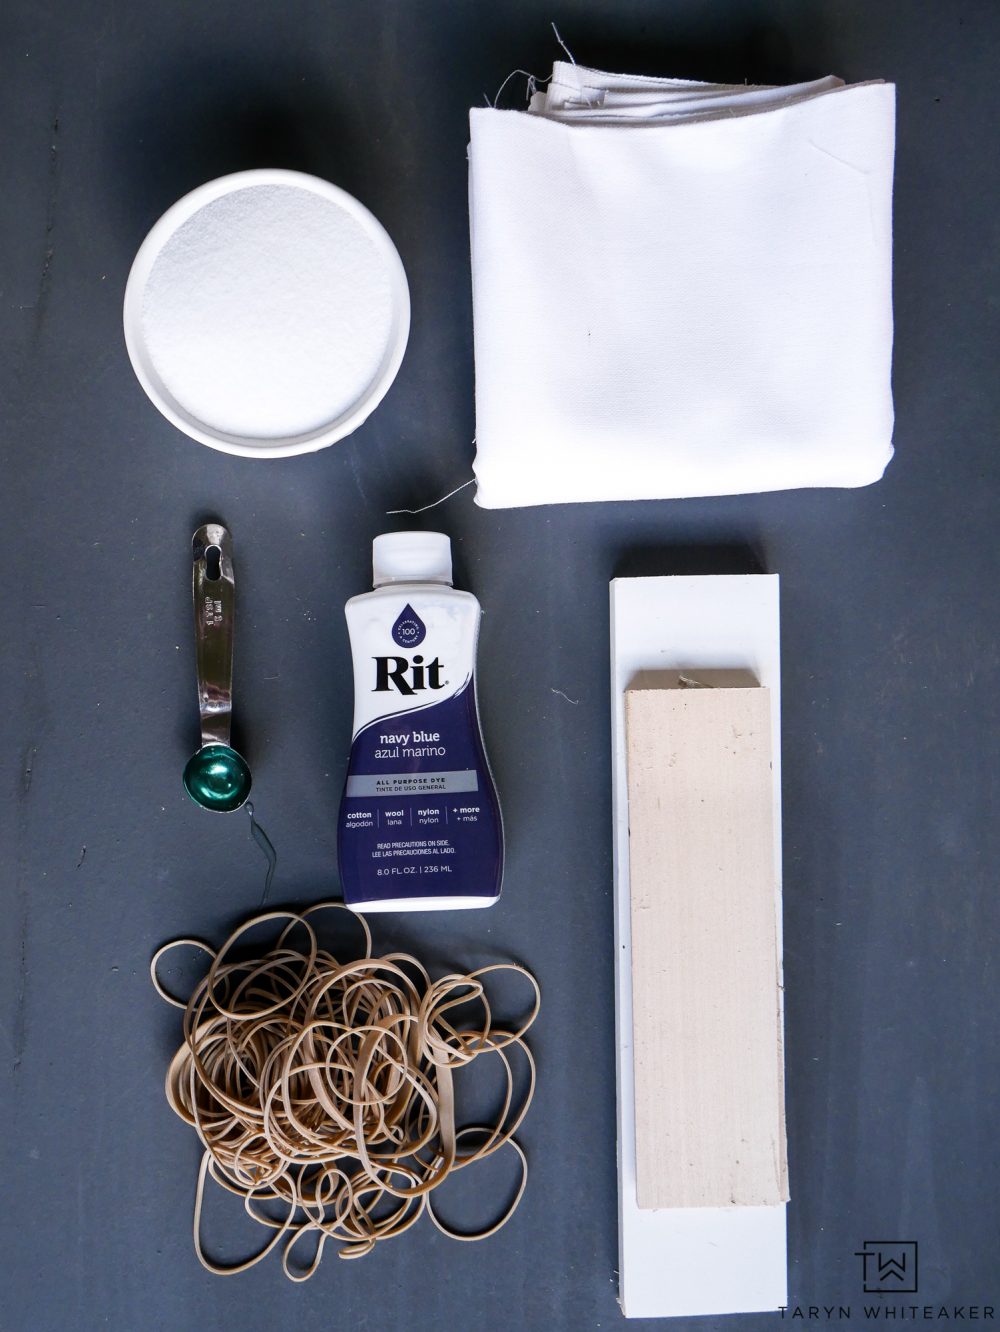
SUPPLIES:

  • 22″ X 22″ piece of 100% cotton (1 per pillow)
  • 1 Cup of Salt
  • 1 Teaspon of Dish Soap
  • Navy Blue Rit Dye
  • Scrap pieces wood
  • Rubber Bands

The amazing thing about dying fabric is that every piece turns out completely unique. No two pieces are alike, you can come up with a million different patterns and techniques and that is the fun part of the art form. To give you an idea of how I achieved the patterns on my pillows, I’m going to walk you through the techniques I used when dying my fabric.

Fabric Dying Process

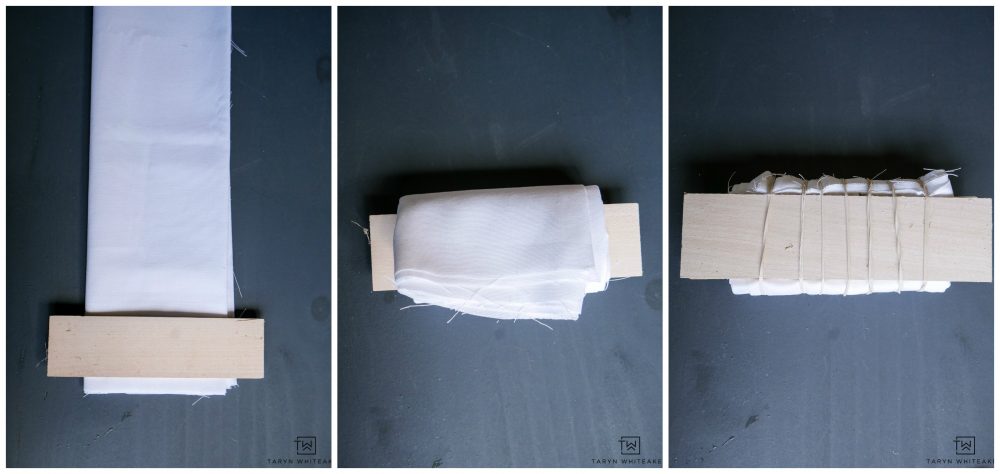
For the first look, I simply folded my square pillow fabric in quarters, then rolled it up around a piece of wood. Then I placed a second piece of wood on the top and rubber banded it together. For the second look, I folded my pillow square in half, placed a piece of 2.5″ wood at the bottom and then rolled it up! I rubber banded it together. 

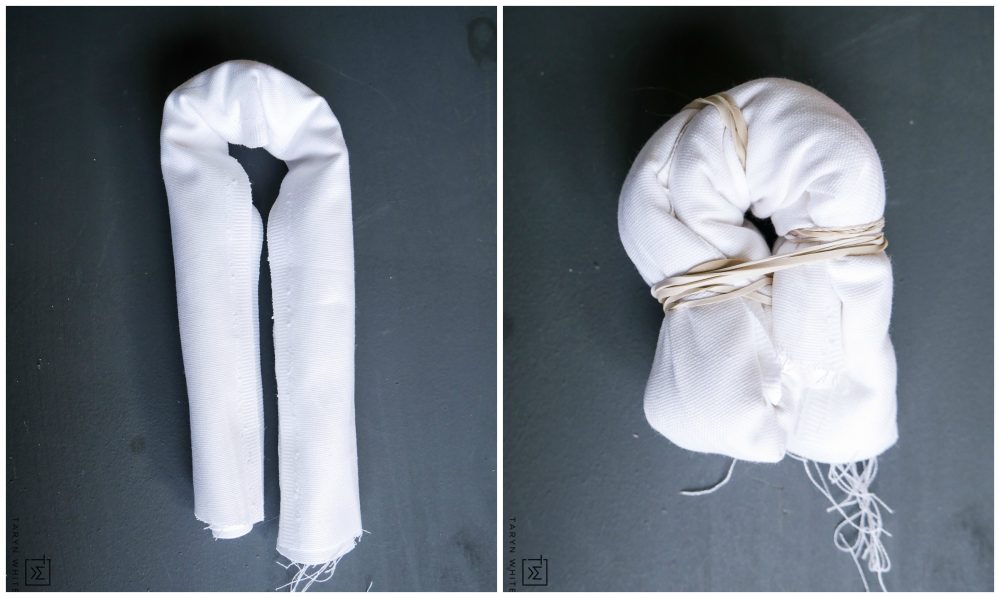
For this look, I took the pillow square, folded it in half and then rolled it up. Then I scrunched it into a smaller ball and wrapped it several times with rubber bands. 
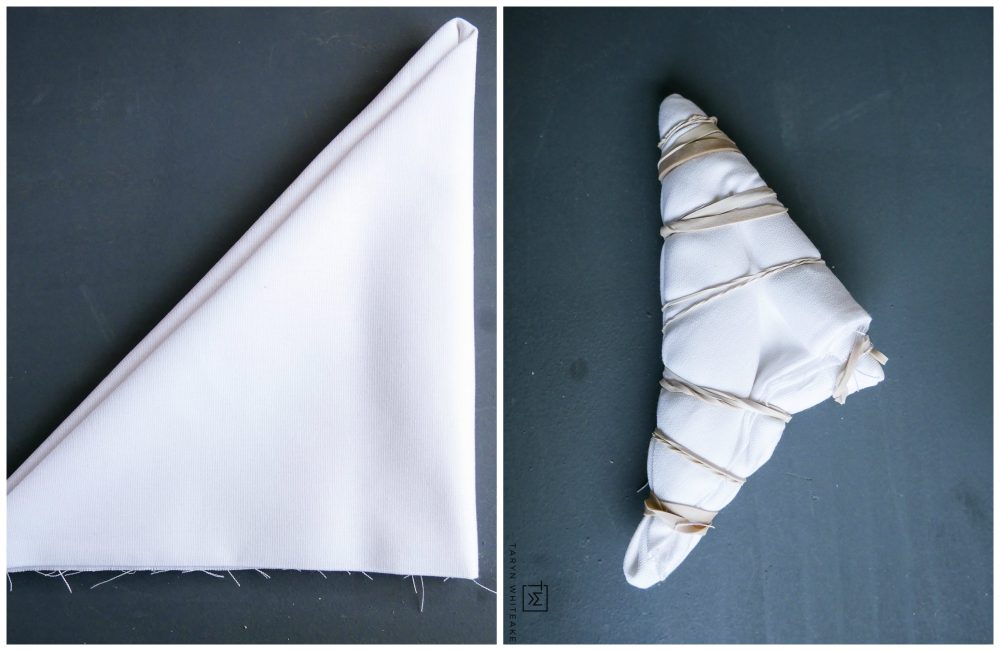
And the last look turned out to be my favorite pattern. I simply folded it into a square and then into smaller triangles and rubber banded it together. 

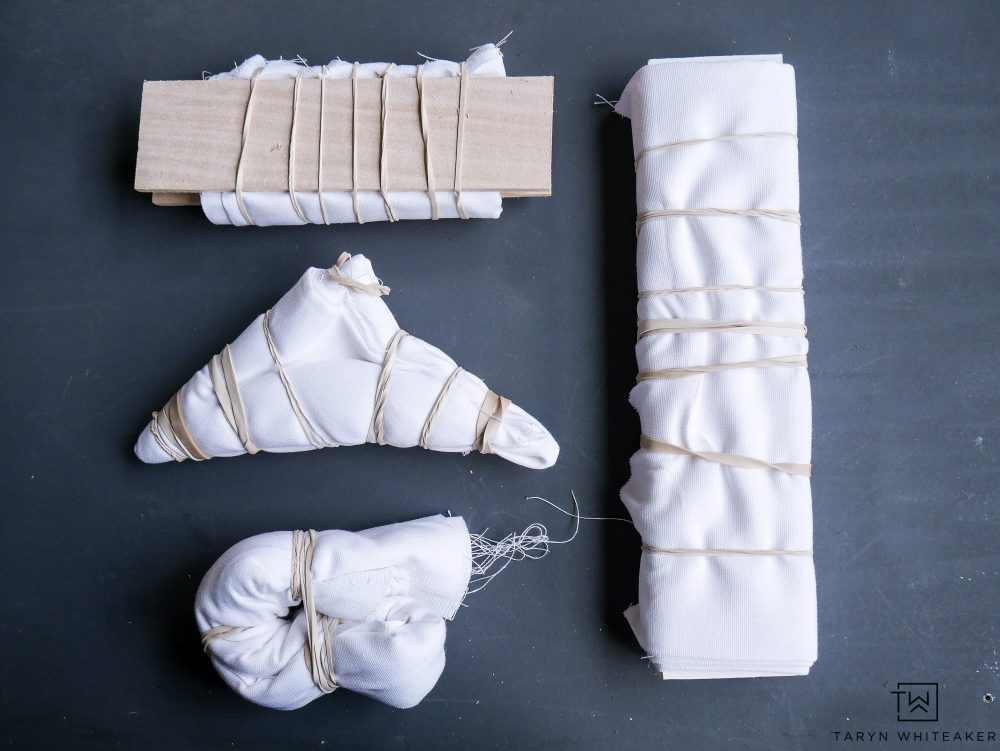
Here are how all my pillow squares looked before I dyed them! 
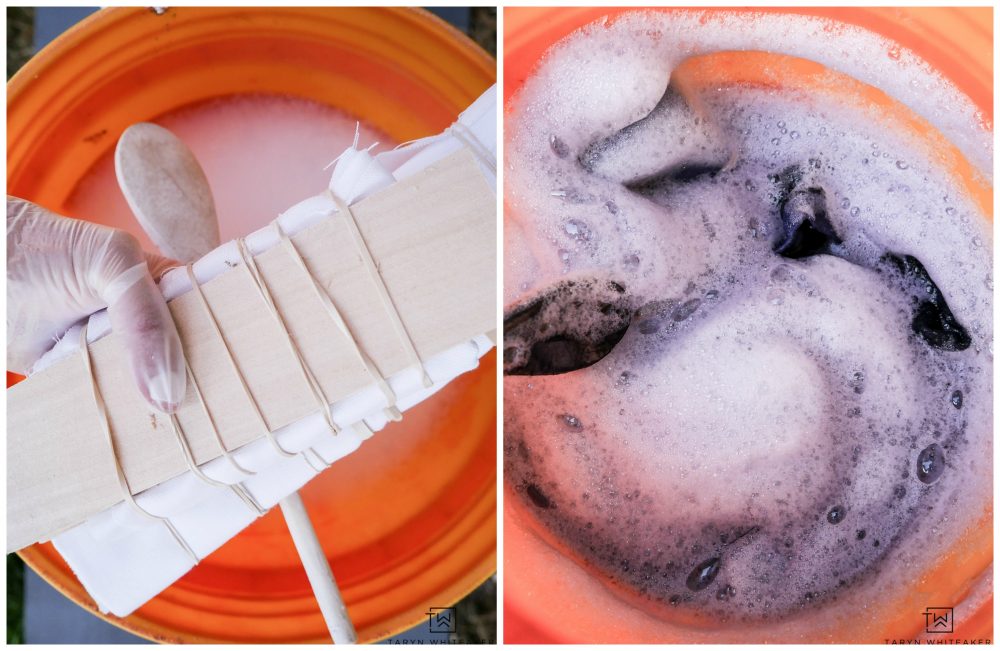
For this project, I followed the directions on the back of the Rit Dye bottle. I used 100% cotton fabric, so in my bucket I filled it about 3/4 of the way with hot water, 1 tsp. of dish soap, about 1/2 bottle of Rit Dye and 1 cup of salt. I did two pillows in blue and let them sit for about 45 minutes in the mixture. 
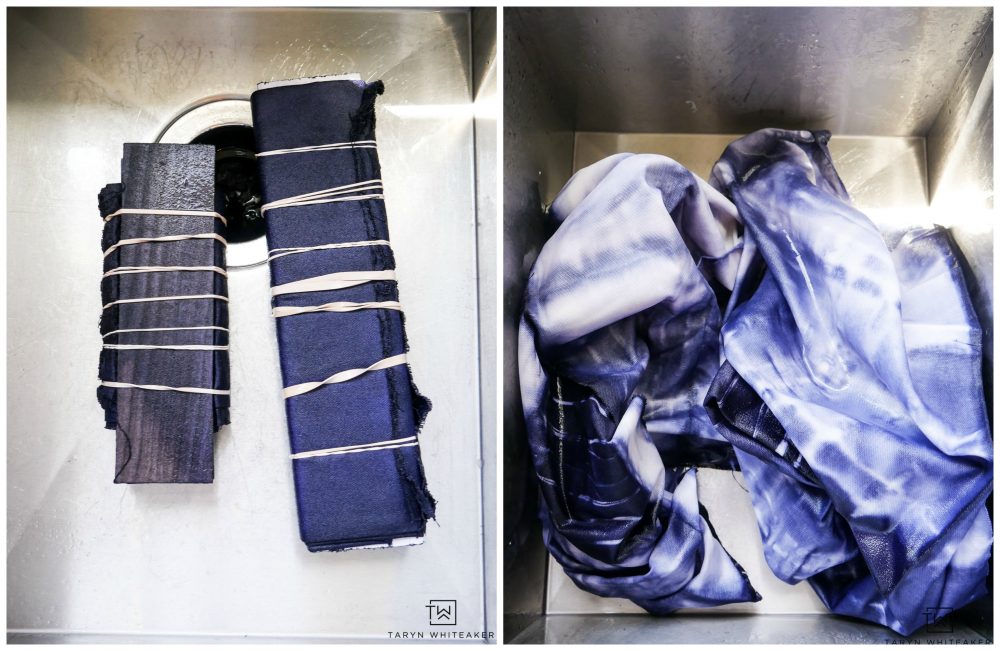
Then you want to carefully take them out, rinse them off until the water runs clear and then unwrap them! This is how vibrant the colors were after I opened up each piece of fabric. To finish them off, you will want to machine wash them.  I LOVED this deep color and was a little disappointed that it faded so much once I washed the fabric in the machine. But I still like the more muted tone as well. 

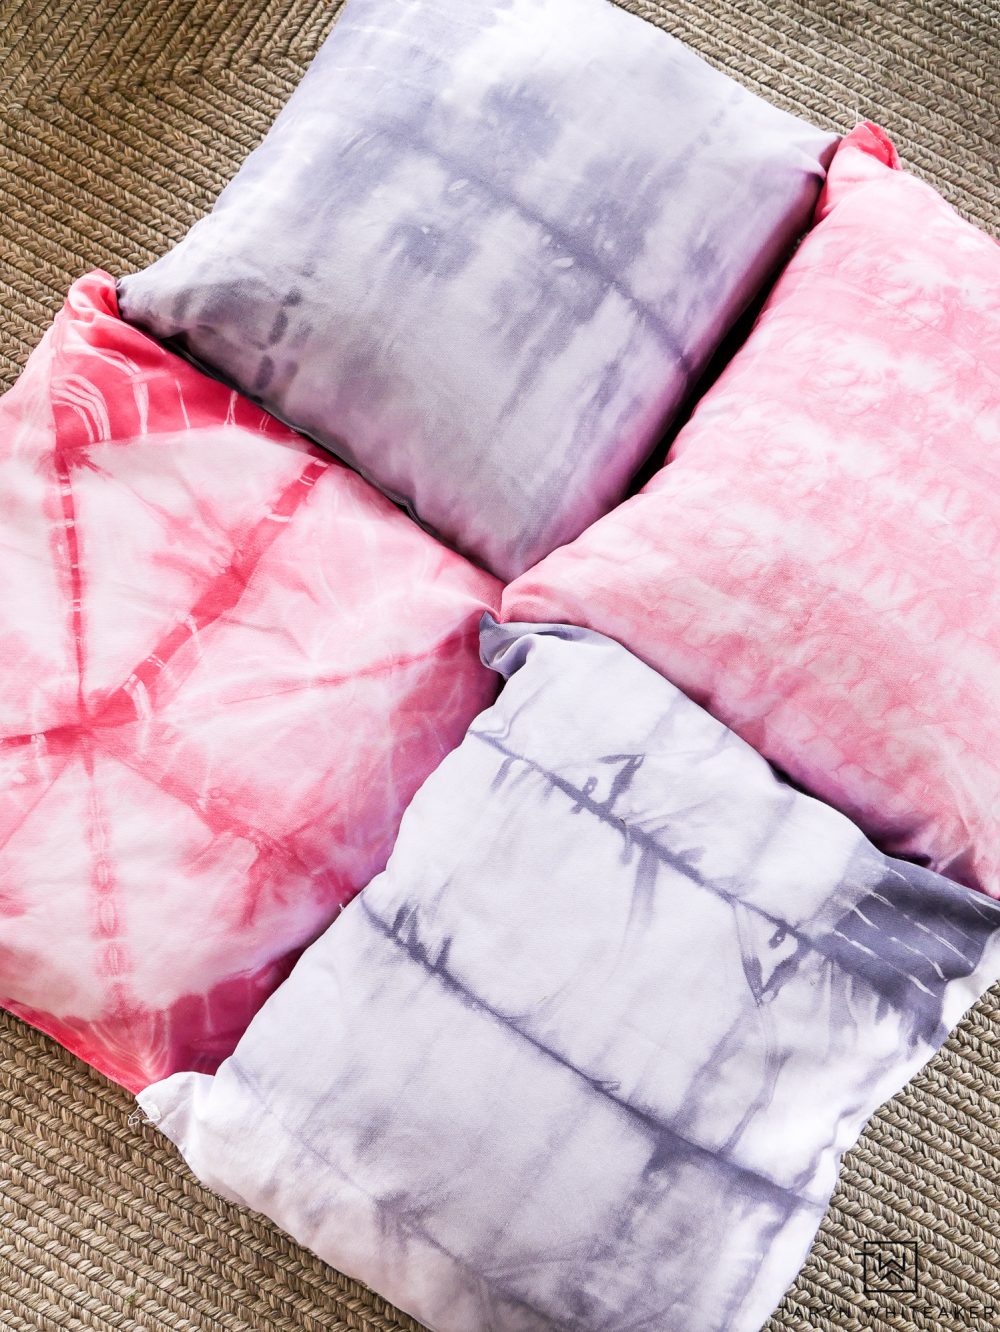
I repeated the process using the cherry red Rit Dye for a little more pop of color!

They add such a fun look to our little Fourth of July patio decor!

If you are looking for more red, white and blue to add to your home, click here to download my brand new set of Fourth of July Printables!

PIN FOR LATER!

Learn how to make these DIY Rit Dye Pillows inspired by the trendy Shibori Pillows! Follow this tutorial on how to make your own dye patterns.

SaveSave

About Taryn Whiteaker

Hi! I’m Taryn! The voice behind Taryn Whiteaker Designs. I launched this brand over 11 years ago when I became a stay-at-home mom. What started as a small craft and mom blog eventually grew into a full time design and DIY site. My goal has always been to inspire others (especially women!) with design ideas, DIY tutorials, entertaining ideas and give you the tools you need to complete them yourself!

You May Also Like:

  • Screen-Shot-2024-04-16-at-10.21.46-PM
    Neutral Throw Pillows
  • Holiday Pillows-4
    THE BEST AMAZON CHRISTMAS PILLOWS

Filed Under: ALL POSTS, Crafts & Sewing, DIY Home Decor, DIY Projects, Sponsored

Reader Interactions

Leave a Reply Cancel reply

Your email address will not be published. Required fields are marked *

Primary Sidebar

Looking For Something?

CONNECT

Meet Taryn

Taryn Whiteaker

Hi and welcome! I'm Taryn and the voice of style behind Taryn Whiteaker Designs. Sharing our journey of modernizing our European style home in Dallas. Thanks for stopping by and don't forget to subscribe to my mailing list to get all the latest updates! Read more...

Footer

THIS SITE

  • Home
  • About
  • Contact
  • Partner with Taryn

Privacy Policy

If you are interested in learning more about data that might be collected by this site you are encouraged to read the Privacy Policy

COPYRIGHT POLICY

All images on this site are copyright of Design, Dining and Diapers, LLC. Unless otherwise noted. You may not use these images without written permission. If you would like to feature a project shown on Design, Dining and Diapers you may use a maximum of 2 images and include a visible link back to the project.

More From The Gram

tarynwhiteaker_designs

Taryn Whiteaker Designs
Current snap shot of our main family room! We will Current snap shot of our main family room! We will be starting phase 1 in here later this year and I wanted to capture it as it stands now. Almost everything in here was either brought from our Washington home 3 years ago or bought second hand! Piece by piece this room has become a cozy space for our family over the last 3 years. The new stairs are staying and will work into the new design, I love them so much. 

#neutral #neutralhomeedit #homedecorating #homedesign #cozyhome #interiorideas #interiordesign #neutraldecorstyles #neutralhomedecor #dallashome
Part 1 reveal of my tween son’s bold sports bedr Part 1 reveal of my tween son’s bold sports bedroom!  It took an awhile to get the perfect purple for this look, you can swipe to see my initial fail. It was tricky. But I’m glad we kept going because the look is everything we envisioned and exactly what my son wanted. I still have lots more to do in here, it’s not even close to being finished. But I’m sure loving the dramatic before and after so far. Linking all sources. 

Comment SHOP below to receive a DM with the link to this post on my LTK ⬇ https://liketk.it/5dqhy #ltkhome #ltkfamily #ltkkids #boysbedroom #boysroom #kidsbedroom #kidsroom #potterybarnteen #lovemypbteen #football #sportsroom
I’ve been looking for the perfect accent chairs I’ve been looking for the perfect accent chairs for our family room for years! Any time we have guests over, or our whole family wants to hang out together, it always feels like we could use a few more seats to spread out and get comfy. I have had my eye on these gorgeous Vail accent chairs from @denvermodern and they didn’t disappoint. The leather is soft and high quality, they are wide and comfortable and the brass accents are chef’s kiss. They are perfection. 

Comment CHAIR and and I’ll send you the link!

#ad #denvermodern #homedecor #accentchairs #homedecor #neutraldecor
Learn something new every project! This was the be Learn something new every project! This was the best solution to this problem, framing over the bullnose corners to create an updated look and making it a straight edge to end the paneling. If you have an exposed open way like this, save it! 

#homedecor #diy #diyhomedecor #homestyle #homedesign #homedecor #remodel #dallasblogger #diyprojects
Comment SHOP and I’ll send you a link with all o Comment SHOP and I’ll send you a link with all of last month’s top neutral home sellers. 

#neutralhomedecor #neutralhomeedit #homestyle #homedetails #diy #homeimprovement #homedecorideas #neutralhome #dallasblogger #neutraldecor #diyhomedecor
Didn’t think it would take me two months to get Didn’t think it would take me two months to get past Phase 1 but here we are! My son’s room is officially prepped for paint with new reeded paneling, trim work and freshly smooth walls. Next week we PAINT! So stay tune for more. 

Comment Paneling and I’ll send you the link. 

#diy #diyersofinstagram #diyprojects #homerenovation #homedesign #homedetails #homerenovationideas #bedroomideas
Art doesn’t have to break the bank! I’m sharin Art doesn’t have to break the bank! I’m sharing my favorite places to look for affordable art and my top modern and vintage art finds. If you search hard enough, you can find pieces that still look high end on a budget. 

Comment ART and I’ll send you all the links and my cheat sheet. 

#artwork #affordablehomedecor #homestyle #homedetails #homeaccessories #artcollection #ltkhomedecor #amazonfinds #amazonhome #minted
Comment SHOP for the latest top Amazon finds! The Comment SHOP for the latest top Amazon finds! The weighted vest trend is one of my favs and the glow in the dark Easter eggs are a must for older kids! 

#amazonfinds #amazonhomefinds #easterideas #diy #diyhomedecor #latestfinds
Comment LINKS for all the top home sellers from la Comment LINKS for all the top home sellers from last month! 

#neutralhome #diyhomedecor #homedecor #dallasblogger #neutraldecor #homedesign #diyprojects #diyprojects #neutralstyle
Follow on Instagram

Copyright© 2025 · Brunch Pro Theme by Shay Bocks · Hosting by 3116 Digital