I kicked off the holiday season yesterday with the Michaels Dream Tree Challenge Reveal. I have always been the type to wait until Thanksgiving to decorate for Christmas, but the past few years I’ve had to start earlier and you know what? I really enjoy having all the rooms so cozy and sparkly for more than just a few weeks!
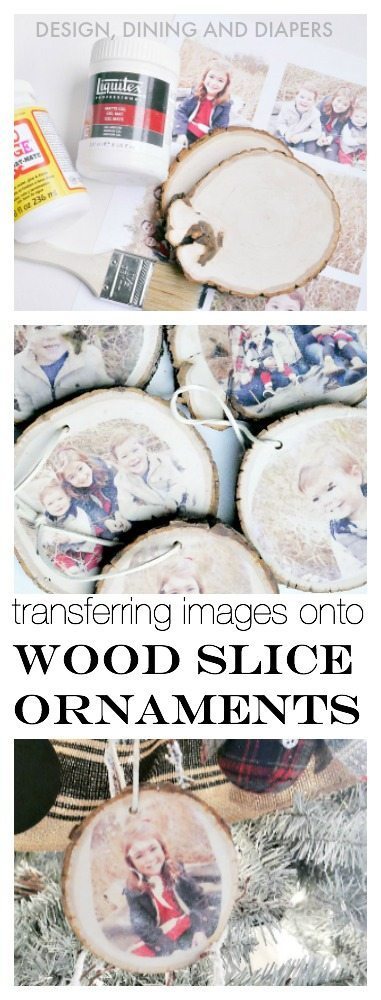
Anyway, the tree I put up yesterday is in our playroom and I wanted to add a few personalized touches to it for the kids. With the rustic woodland theme, I made a set of Wood Slice Ornaments and put their pictures onto them. Today, I am going to chat about Transferring Images Onto Wood and how easy it is!
WOOD SLICE ORNAMENTS
DIY ORNAMENTS
In the spring I started experimenting with transferring images onto wood and I sorta fell in love with it. I love the rustic, antique look it brings to the piece and the possibilities really are endless.
There are so many different tutorials out there, I read a lot of them but the basics are the same. So I’m going to tell you what I used and how it worked for me.

Transferring Images Onto Wood
- Gel Medium
- Satin Mod Podge
- Brush
- Scissors
- Pictures printed on laser paper (reversed)
- Wash cloth
- Wood Slices

The first thing you want to do is reverse all the images you want to use and then print them out on a laser printer. I used PicMonkey to reverse all my images and then had them sent to Staples to be printed.

I cut my pictures out in rugged circles to sorta match the lines of the tree slices. I didn’t want them to be really uniform. Keep in mind that when transferring images onto wood, even the white from the paper will transfer.
You will want to apply one layer of gel medium directly onto the picture. Make sure it is evenly spread on the full image. Then, place it face down onto the wood and press firmly so there are no air bubbles. If you see an air bubble, the image won’t transfer in that spot.
Let the images sit for at least 8-10 hours while they dry.

No it’s time to reveal the image! Using a wet wash cloth, rub the paper until it all peels off. This can take a little bit of time. Once the image dries, you may find that you need to rub off a little more residue from the paper.
*Note, it is possible to rub too hard and your image will start to rub off. So just be careful and watch the image as you remove the paper.
At this point you can seal the images using Satin Mod Podge .
You can keep them as coasters, or take a few more steps to turn them into ornaments.

I drilled a little hole at the top of mine and then added a leather string.
How fun are they?! I love having personalized ornaments on the tree.
About Taryn Whiteaker
Hi! I’m Taryn! The voice behind Taryn Whiteaker Designs. I launched this brand over 11 years ago when I became a stay-at-home mom. What started as a small craft and mom blog eventually grew into a full time design and DIY site. My goal has always been to inspire others (especially women!) with design ideas, DIY tutorials, entertaining ideas and give you the tools you need to complete them yourself!


Genius, I luv these!
Thank you!
Why do you need a reversed image? Does it not work on a certain side of the laser paper?
Hi Lucy! You need to reverse the image before printing it, because when you place the paper face down onto the wood, the reverse of the image on the paper is what transfers. When you wipe off the paper, the reverse of the image is what is left on the wood. I hope that makes sense?
Does it need to be on photo paper or plain paper ?
Thank you for sharing this! Great tutorial. Fan as always sharing!
I love these ornaments! Thanks for sharing at the Monday Funday Party. – Emily
Question for you: did you use photo paper of regular printer paper?
I had mine printed at Staples, you just need to make sure the pictures are printed from a laser printer. My regular printer at home wouldn’t have worked.
I used an inkjet and they still turned out, I just let them dry good before applying modge podge
Good to hear!
What size did you print your photos. Did you use the app to do the photos on one page? Thank you im making these this year and want yhem to be awesome.
You can insert all of the pictures into a Word Doc and then have them printed on one page!
You have satin mod podge listed, but matte pictured. Which one did you use?
HI Marci! I would use the Matte, sorry for the confusion!
Hey there!! I’m trying this method to make ornaments. Do I need a thick layer of the medium on top of the picture to where you can’t see the picture or should I do a thin layer?
Great question and I now realize I didn’t really address that in the post. You will want to apply a pretty tick layer and make sure it’s even spread :)
These are fabulous. I love this idea of turning them into Christmas ornaments. Happy Holiday’s
I was wondering where you bought the wood slices? Did you sand them smooth or did you buy them like that? Thanks.
Hi! I bought them like this. You can find this small size rounds at most craft stores in the wood section.