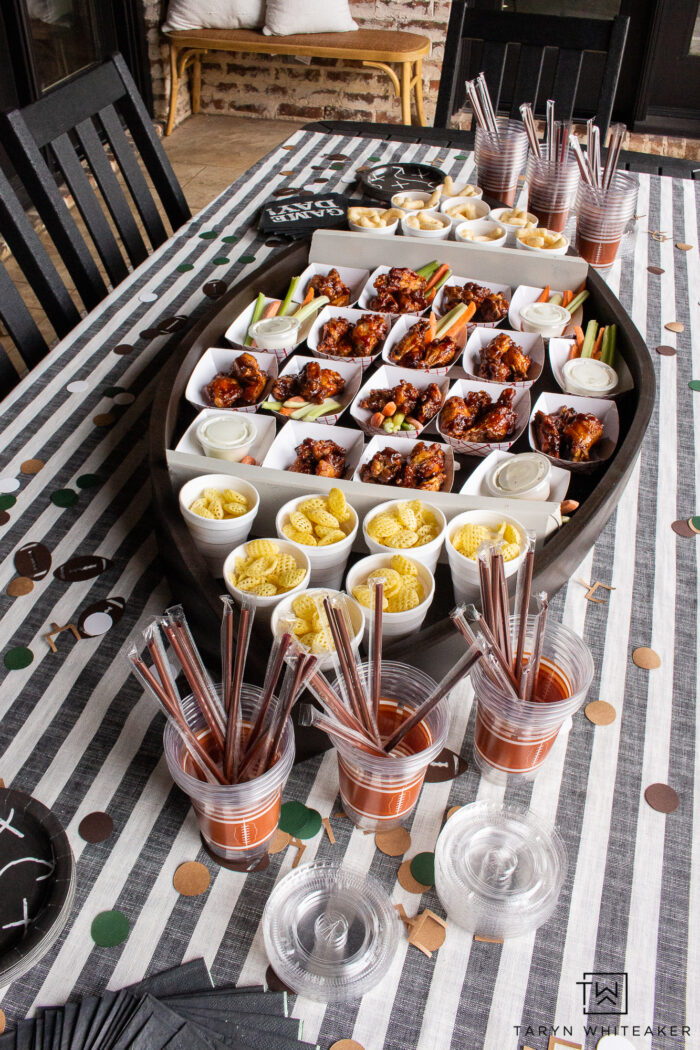
Who is readyyyy to partyyyy!?!?! Football season is coming to an end but the biggest games and gatherings are still ahead. Between our kid’s own football team parties and our love for all college and NFL teams, we pretty much talk about football 12 months out of the year around here. We also LOVE hosting football parties. I was thinking of more fun activities for our next big party and decided to try and make the ultimate large scale DIY football party tray to use as a big centerpiece. I had no idea if this was going to work, but I’m here to say it turned out even better than I expected!
DIY Football Party Tray

This DIY is fairly easy and I’ve broken it alllll down for you below. It’s something you can bring out year after year, fill with different fun foods and let it serve as a piece of decor as well! PLUS no one else will have it!

DIY Football Party Tray Supplies
- Brad Nailer
- JigSaw
- Miter Saw
- Flex Trim
- Plywood 2 X 4′ Piece
- Wood Glue
- Caulk
- Matte Coffee Bean Primer/Spray Paint
- White Paint
- Food Safe Sealer (optional)
How To Make A Large Scale Football Tray
Step 1: Draw Your Football Template & Cut It Out

I started with a piece of 2 x 4′ piece of plywood. There are SO many different kinds of plywood, I suggest picking out one with a smoother finish. I decided to hand draw my football, but it was slightly uneven. I definitely suggest measuring a little more accurately, regardless mine still worked out! My football base measures approximately 27 1/2″ wide by 47″ long.
*I also would make the ends of my football come to a point. I rounded mine to look like an actual football but the flex trim couldn’t bend around those. If I did again, I would make them come to a full point.

I used my JigSaw to cut out the shape of the football. If you don’t have one of these tools GET ONE NOW! Being able to cut out odd shapes, intricate designs etc is SO much easier with a Jigsaw. It’s one of my favorite tools and I use one in almost every project I do.
Step 2: Add Flex Trim Moulding

This is where we start to get a little creative and “think outside the box” on this project. I have seem people use Flex Trim before on rounded walls and I knew it was bendable. I ordered mine from Amazon and gave it a go. My hope was that I could bend it around the edges of the football to create a tray. IT WORKED!

I used my Miter Saw to cut the edges at the appropriate angles to meet at the edges. You cut the flex trim just like you would regular moulding. It’s just quite a bit thicker. I added wood glue along the edge and secure it using my Brad Nailer.

There were some gaps along the seams, so I just used a line of caulk around the whole parameter and smoothed it out. It worked perfect and polished everything up.

Let it dry over night!
Step 3: Paint Your Tray

You now have the base mould of your tray created, now it’s time to make it look like an official football! I painted my tray Matte Coffee Bean by Krylon. I only needed one can for the whole tray. I did two light coats and let it dry.

After it was dry, I hand painted on the football ties using white paint. I also used left over flex trim, cut it down to size and painted it white to create the white bands on the football, but they also serve as dividers for different foot sections!
Football Party Centerpiece

If you want to put food directly into the tray, you can apply a coat of Food Safe Sealer. I opted to just use food trays and fill them with personal serving sizes! It’s easy for guests to just grab and go and it can be refilled.

You can view more of my backyard football decor here!


Leave a Reply