• Skip to primary navigation
  • Skip to main content
  • Skip to primary sidebar
  • Skip to footer
  • Home
  • About
  • Contact
  • Partner with Taryn

Taryn Whiteaker Designs

DIY and Interior Blog

  • Our Dallas Home Tour
  • Shop My Pics
  • Home Styling
    • Room Reveals
      • Our Current Home
      • Our First Home
    • Seasonal Home Tours
  • DIY Projects
    • DIY Home Decor
    • Crafts & Sewing
    • Before and Afters
    • Before and Afters
    • Furniture Builds and Makeovers
  • Seasonal Decor
    • Christmas
    • Easter
    • Fall
    • Fourth of July
    • Halloween
    • Spring
    • Valentine’s Day
  • Printables
  • Entertaining
    • Parties
    • Tablescapes
  • Fashion
  • Travel

February 11, 2012

Day 11: Paper Rose Wreath with House of Hepworths

Hey everyone! I’m Allison from House of Hepworths. I’m so excited that Taryn invited me to be a part of this fun 14 Days of Love Valentine’s series!

Today I’m going to show you how to make the cutest Paper Rose Wreath. Red Roses are symbolic of LOVE, so this wreath is perfect for Valentine’s Day.

rosette_wreath_paper_hoh_09

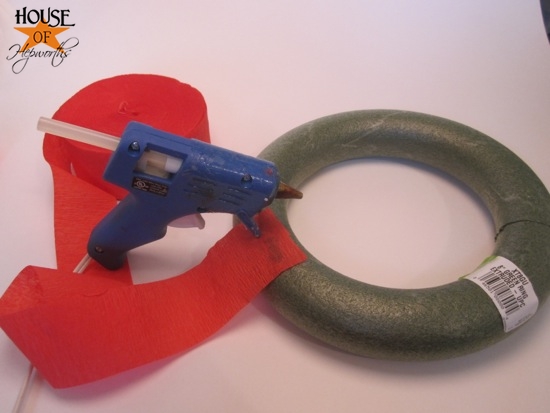
To make this wreath, you will need:

*8 inch wreath form
* red crepe paper
* 13 sheets of 12″x12″ red cardstock
* hot glue
* scissors

Start by gluing the end of your crepe paper to your wreath form.

rosette_wreath_paper_hoh_01

Wrap the crepe paper around and around the form, until the wreath form is completely covered.

rosette_wreath_paper_hoh_02

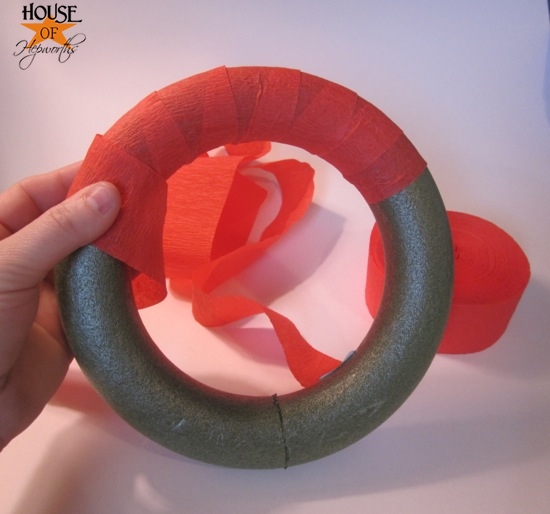
I wrapped my wreath twice so none of the green wreath showed through. To times around with the crepe paper gave it nice coverage.

rosette_wreath_paper_hoh_03

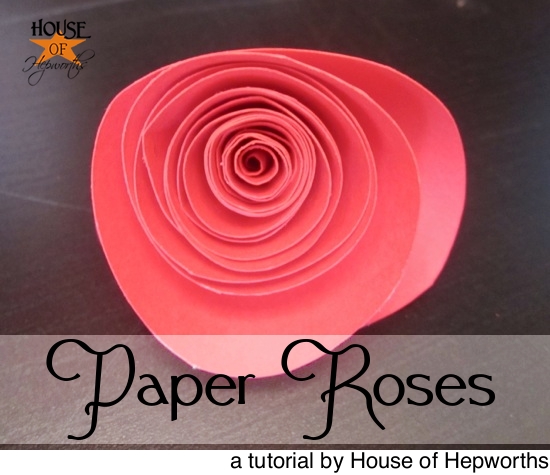
Once your wreath form is wrapped, it’s time to start making your roses. Each 12″x12″ cardstock will make 4 flowers, and you will need approximately 13 pieces of cardstock worth (52 roses).

To make the Paper Roses, I’ve given a really detailed tutorial over on my blog.


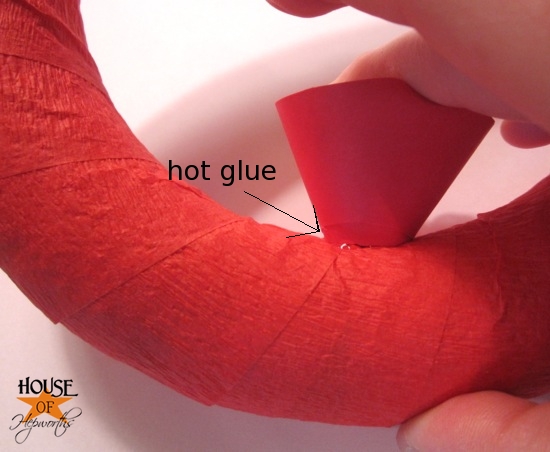
Once your roses are assembled, start gluing them to your wreath using Hot Glue.

rosette_wreath_paper_hoh_04

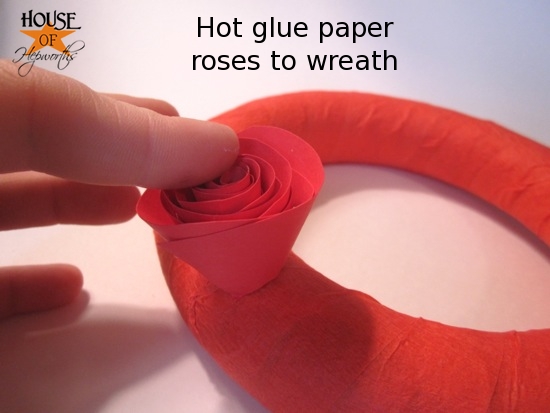
Use a liberal amount of hot glue, and hold each flower for several seconds to make sure the glue dries before you let go.

rosette_wreath_paper_hoh_05

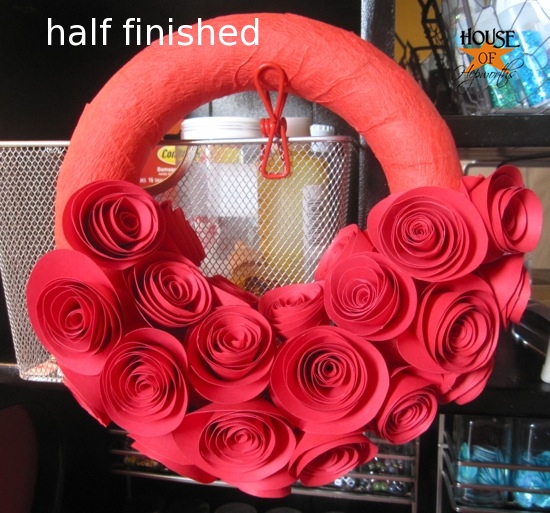
Put the roses close together. Work your way around the wreath. Here’s what it should look like when you are half way done.

rosette_wreath_paper_hoh_06

After lots of gluing, you will end up with a beautiful wreath!

rosette_wreath_paper_hoh_08

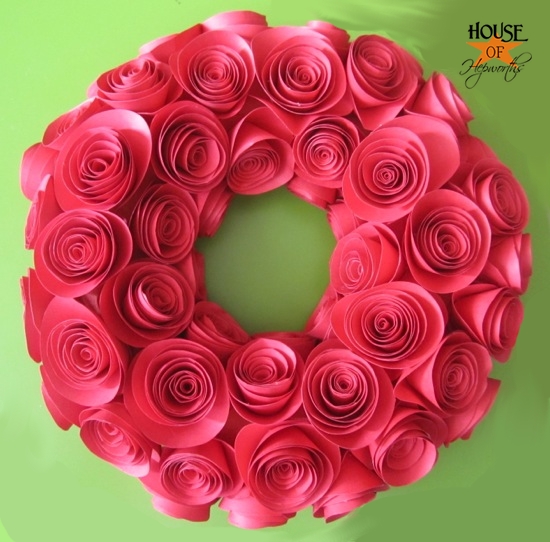
I LOVE how the shadows inside the roses really add depth to the wreath and give it a rich feel.

rosette_wreath_paper_hoh_07

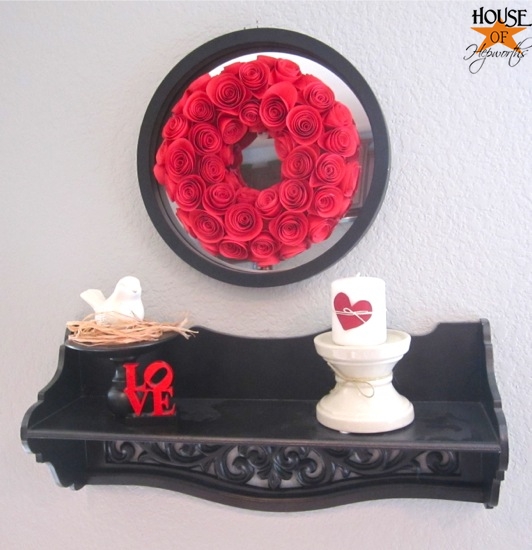
I hung the wreath inside a round mirror. Decorated around it is a simple pretty little Valentine’s vignette.

rosette_wreath_paper_hoh_10

Now you can make your own Paper Rose Valentine’s Day wreath, for only a few dollars! I made mine for FREE because I had all the supplies on hand already. Double bonus!

rosette_wreath_paper_hoh_09

Thanks again Taryn for inviting me to be a part of your sweet series. I had such a great time creating this project for Design, Dining, + Diapers!

Stop by House of Hepworths for even more crafty projects and tons of DIY tutorials.

Isn’t this gorgeous?! It really spices up the space and for FREE! Thanks Allison for sharing this detailed tutorial with us! Be sure to hop over to House of Hepworths and say Hi, you can also connect on Facebook and Twitter!


About Taryn Whiteaker

Hi! I’m Taryn! The voice behind Taryn Whiteaker Designs. I launched this brand over 11 years ago when I became a stay-at-home mom. What started as a small craft and mom blog eventually grew into a full time design and DIY site. My goal has always been to inspire others (especially women!) with design ideas, DIY tutorials, entertaining ideas and give you the tools you need to complete them yourself!

You May Also Like:

  • TarynWhiteakerDesigns_NewHomeTour-11
    2026 House Project Plans

Filed Under: Default Tagged With: 14 Days of Love, Guest Post, Valentine's Day

Reader Interactions

Comments

  1. Shirlley Lupton says

    February 11, 2012 at 1:58 pm

    This is so pretty. Thanks for posting.

    Reply
  2. Madge @ The View From Right Here says

    February 11, 2012 at 4:57 pm

    Lovely craft… one that I could do!

    Reply
  3. Shasta Farrar says

    February 11, 2012 at 6:23 pm

    So pretty! I found your blog through the Linky Followers Blog Hop. I’m following you now and I hope you will come visit my blog at http://intheoldroad.blogspot.com/

    Shasta

    Reply
  4. momto8blog says

    February 12, 2012 at 7:55 am

    that wreath is really beautiful!! the roses are soo pretty!
    I am your newest follower..pls follow back if you can.

    Reply

Leave a Reply Cancel reply

Your email address will not be published. Required fields are marked *

Primary Sidebar

Looking For Something?

CONNECT

Meet Taryn

Taryn Whiteaker

Hi and welcome! I'm Taryn and the voice of style behind Taryn Whiteaker Designs. Sharing our journey of modernizing our European style home in Dallas. Thanks for stopping by and don't forget to subscribe to my mailing list to get all the latest updates! Read more...

Footer

THIS SITE

  • Home
  • About
  • Contact
  • Partner with Taryn

Privacy Policy

If you are interested in learning more about data that might be collected by this site you are encouraged to read the Privacy Policy

COPYRIGHT POLICY

All images on this site are copyright of Design, Dining and Diapers, LLC. Unless otherwise noted. You may not use these images without written permission. If you would like to feature a project shown on Design, Dining and Diapers you may use a maximum of 2 images and include a visible link back to the project.

More From The Gram

tarynwhiteaker_designs

Taryn Whiteaker Designs
POV: working with what you have and creating somet POV: working with what you have and creating something completely new! I kept all the original flooring, cabinets, backsplash and fixtures and did only cosmetic updates to update this space. I wanted to add more contrast, character, warmth and texture. By smoothing out the texture of the walls it instantly gave it an updated look, the new paint color added contrast, the wood ceiling added warmth and texture and all the antiques and vintage pieces gave it the charm. 🖤

#diyhomedecor #neutralhome #diyprojects #laundryroommakeover #transitionalstyle
LAUNDRY ROOM IS DONE ! This was a true example of LAUNDRY ROOM IS DONE ! This was a true example of working with what we have, turning something with great bones into something that is unique, custom and full of character. (Swipe for the before) It now feels like my own little escape to the French countryside every time I do laundry, and I’m not mad about it. 

Comment LAUNDRY for all the details and links! 

Paint color: BM Cromwall Gray 

#diy #laundryroom #homerenovationideas #interiordesign #roommakeover
I finally have a drying rack! Here’s how I built I finally have a drying rack! Here’s how I built the custom drying rack for our laundry room to make it more functional. My @worxtools Switch Driver and Impact Driver were the real MVP’s of this project! Saving me time and energy. I love how it now doubles as a shelf to display antiques I’ve collected throughout the years and also helps me keep this place organized! 

Comment SUPPLIES for everything I used to build this piece! 

#worxtools #partner #dıy #diyhomedecor #homerenovation
Comment SHOP for all these pieces! What every 40-s Comment SHOP for all these pieces! What every 40-something girl is looking for this summer: cute, comfy, and sweat ready outfits for summer travels! I picked up these cute items from @halara_official to mix and match and I am obsessed with the material. Most of the items are made out of athletic material and are so soft. Perfect travel outfits, you still feel cute but very easy fabrics.

The price points are 👌🏼, almost everything is under $50! 

Use my code taryn2:for 20% OFF full-price items or Super code taryn26 : Spend $120 → 10% OFF / Spend $150 → 12% OFF
#halara #over40outfits #travelfit #traveloutfits #partner
Almost done! Since we vetoed the wallpaper on the Almost done! Since we vetoed the wallpaper on the ceiling, I still wanted a pop of pattern and decided to go with a little peel of a mural behind the washer and dryer! Just what it needed! 

Comment LAUNDRY to shop this space so far! 

#homedecor #diyhomedecor #wallmural #laundryroommakeover
It all started as a vision… comment REVEAL for a It all started as a vision… comment REVEAL for all the details on this bold, teen sports bedroom! 

#homedecor #diyhomedecor #kidsbedroom #sportsroom #beforeandafter
For the record he was very nice and helpful, but h For the record he was very nice and helpful, but had very little faith in me. 😉

PS. Happy Mother’s Day to all the strong, loving and beautiful mommas ❤️ 💪🏼 . 

#diyhomedecor #homedecor #renovation #laundryroommakeover
One of my favorite places to be. After 4 years in One of my favorite places to be. After 4 years in this house the porch swing is still in perfect condition, just time to replace the cushion and add some fresh outdoor pillows! 

Comment SWING for all the sources! 

#homedecor #exteriordecor #outdoorprojects #potterybarn #ballarddesigns
Still one of my favorite transformations to date…. 

Comment BEDROOM for all the sources. 

#homedecor #diyhomedecor #boysbedroom #kidsroom #homedesign
Follow on Instagram

Copyright© 2026 · Brunch Pro Theme by Shay Bocks · Hosting by 3116 Digital