Disclosure: This post is in partnership with True Value, all opinions are 100% my own.
Organization. I can’t say that it’s something I thrive at. Between my husband and I, I’m the creative/free spirited one who loves to create messes and he is the one who craves organization. But here is the deal, while organization isn’t always the first project on my list, there comes a time when a space gets so cluttered that I find myself saying ” I can’t take it anymore!”. And then I finally get organized :)
A few years ago, I took the plunge and organized the pantry in our previous home. When we moved I just transferred the exact same basket system but it didn’t work as well in our new home. Our new pantry is MUCH larger, gets filled with a variety of things and we are now a family of five versus three. Which means, a lot more food. After two years of living in our new home, I finally reached the point where we needed a Pantry Makeover. You guys, I’m SO excited about it.
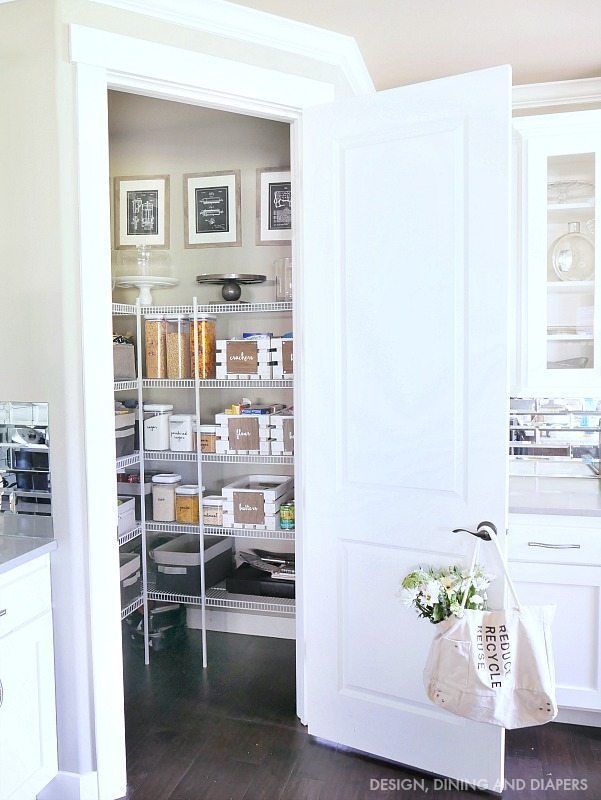 Welcome to my new pantry. I wanted a really clean modern look with farmhouse touches and I think I nailed it. I must say, a little bit of organization never felt so good. This is going to make life so much easier as we transition into a new school year.

Before I dive too much into the details, let’s take a look at what the pantry looked liked before. Yikes. It was bad. It was one of those situations where it just got more and more out of control over time. Not to mention my three year old loves to rummage through everything. We’ve tried child proof locks and no luck. Anyway, I’m really hoping this new pantry system will help solve a lot of problems!
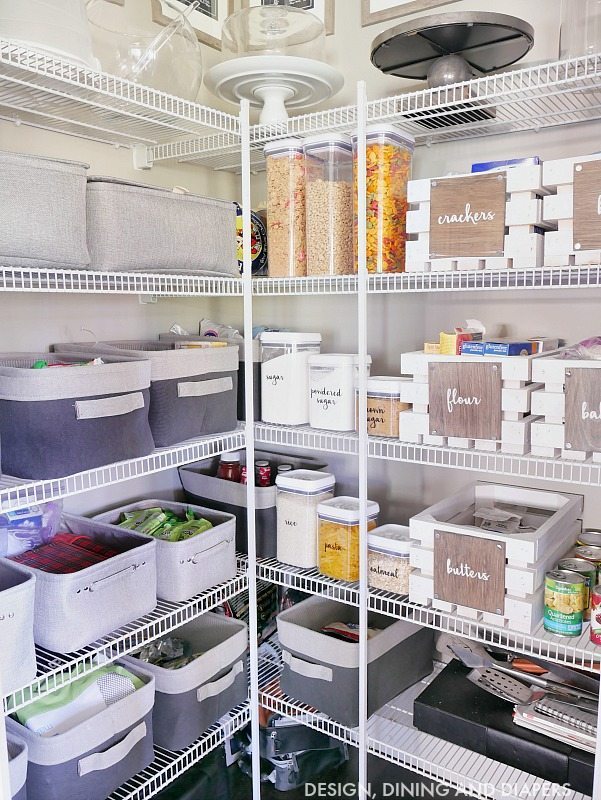
Ok now let’s chat details. The left side of the pantry I placed (mostly) all non-food items. The larger bins on the top hold all of the kids’ craft supplies that we only allow in the kitchen (paint, markers, play-doh, etc). The remaining gray bins are for bags, paper goods, school lunch supplies, and first aid things I want to keep handy. I have one food bin on this side for small snack items that go in school lunches.

The other side of the pantry is for groceries. I love food storage containers, they look pretty and also make it easy to see how much you have left of an item. I organized my shelves based on similar food groups. The top shelf is all about the carbs. I have a few large ones on the top for cereals and bulk snacks and bins for crackers/snacks and bread. The middle shelf is my favorite, baking! I put this shelf up a little higher because I have little kids who love to get into the baking supplies :) I have containers for the main sugars I use for baking, and then a bin for different flours. I’m gluten free so I tend to rack up a lot of different types of flours (almond meal, coconut flour, GF flour, etc.) and the second bin is for decorating (ie. frostings, food colors, flavors, sprinkles, etc).

And the lower shelf is primarily used for cooking items. Rice, pasta, oats, canned foods and yes I have an entire bin dedicated to ‘butters’. Peanut butter, hazelnut butter, almond butter. We are a ‘nutty’ family ;)

You may wonder where a lot of our bulk food items went. I tried really hard to organize them into the food containers, I also utilized the far corners where the shelves meet and you can’t see very well from the front. Foods that I don’t get into often, I tucked back in there.

We have tall ceilings throughout our home and I wanted to take advantage of the extra space at the top, so I hung these vintage patent prints of various kitchen items.
Now, let’s chat about these wooden crates! Yes, they were a DIY project and they were so easy to make I know you can do it too. They were actually very reasonable too.
I know most of us are always looking for new ways to get organized so I thought I’d give you a quick tutorial on how to make these industrial crates yourself.
SUPPLIES
- pre made wooden crates
- white spray paint
- Minwax tinted water-based stain ( I used Onyx)
- 4 X 4 square piece of wood
- 1″ galvanized nails

I picked up these pre made crates, you can find them at a lot of different places and they are very inexpensive.
I found when painting pre made crates spray painting is the best route because it seems to get into the little nooks and crannies easier. I gave them each a coat of this Rust-Oleum 2X Coverage Spray Paint in Flat White.

Next, I found pre-cut wood plaques that I stained using Minwax Water Based Wood Stain in Black Onyx. I gave them each a few coats to get the full coverage. This type of stain you have to get tinted at the hardware store. One of the reasons why I use the water based stain for this project is because I’m using a stencil on top of it. When using oil based stain, the stencils don’t still as well. Water based makes it much easier.

Using my Silhouette, I created these cute labels for each of the crates. I placed the vinyl onto the wood to create a stencil and then painted them white.

After they are dry, drill a small hole in each corner.

Then, secure them onto the front of each crate using 1″ galvanized nails.
That’s it!

Now you can get this organized look in your pantry too!
For more fun DIY ideas check out True Value on Pinterest, Facebook, Twitter and Instagram!
Comments submitted may be displayed on other websites owned by the sponsoring brand.
This is a sponsored conversation written by me on behalf of True Value. The opinions and text are all mine.
About Taryn Whiteaker
Hi! I’m Taryn! The voice behind Taryn Whiteaker Designs. I launched this brand over 11 years ago when I became a stay-at-home mom. What started as a small craft and mom blog eventually grew into a full time design and DIY site. My goal has always been to inspire others (especially women!) with design ideas, DIY tutorials, entertaining ideas and give you the tools you need to complete them yourself!


Great job!
I love the art – what is the source?
Hi! I got them off GroopDealz, they rotate inventory regularly but they were similar to these: http://bit.ly/2cppC6D
love it, wish my pantry was that big! like the prints but i have so much kitchen stuff i’d add more shelves up top
Amazing , and the best part is I have the same pantry shelfs and all. I have wanted to organize for a long time you inspired me to do it sooner than later, thanks for the inspiration, where exactly did you buy the crates? I have been looking at baskets but they are so expensive.
Hi! And thank you! I bought the wood crates at Walmart! They have two different sizes and I think they were only about $10 each.
Hi! Love love love your pantry! Just wondering if you could explain the difference you found with using water based stain instead of oil based with a stencil? I have my own little sign business but hadn’t heard this before. Love learning new things and how to get better! Thanks!
Hi Courtnay! When working with oil based stains, I found that the vinyl didn’t stick as well to the wood, making it harder for the stencil to get a good grip because of the oils on the surface. I always have a hard time transferring the vinyl using oil based stains. When working with water based stains you don’t have that residue on the surface so the vinyl transfers easier and sticks better.
Thanks for your reply! That’s really interesting! I’ve been using oil based stain and finding the vinyl often sticking too well! Even to the point of pulling up some of the wood grain (despite me sanding it smooth). Which has been super frustrating! Maybe different vinyls?