• Skip to primary navigation
  • Skip to main content
  • Skip to primary sidebar
  • Skip to footer
  • Home
  • About
  • Contact
  • Partner with Taryn

Taryn Whiteaker

Taryn Whiteaker - Lifestyle and Design Blog

  • My Home Tour
  • Home Styling
    • Room Reveals
      • Our Current Home
      • Our First Home
    • Seasonal Home Tours
  • DIY Projects
    • DIY Home Decor
    • Crafts & Sewing
    • Before and Afters
    • Before and Afters
    • Furniture Builds and Makeovers
  • Seasonal Decor
    • Christmas
    • Easter
    • Fall
    • Fourth of July
    • Halloween
    • Spring
    • Valentine’s Day
  • Printables
  • Entertaining
    • Parties
    • Tablescapes
  • Fashion
  • Travel
  • Recipes

March 2, 2018

DIY Sandbox With Cover

Sharing is caring!

  • Share
  • Tweet

Disclosure: This post is in partnership with True Value. 

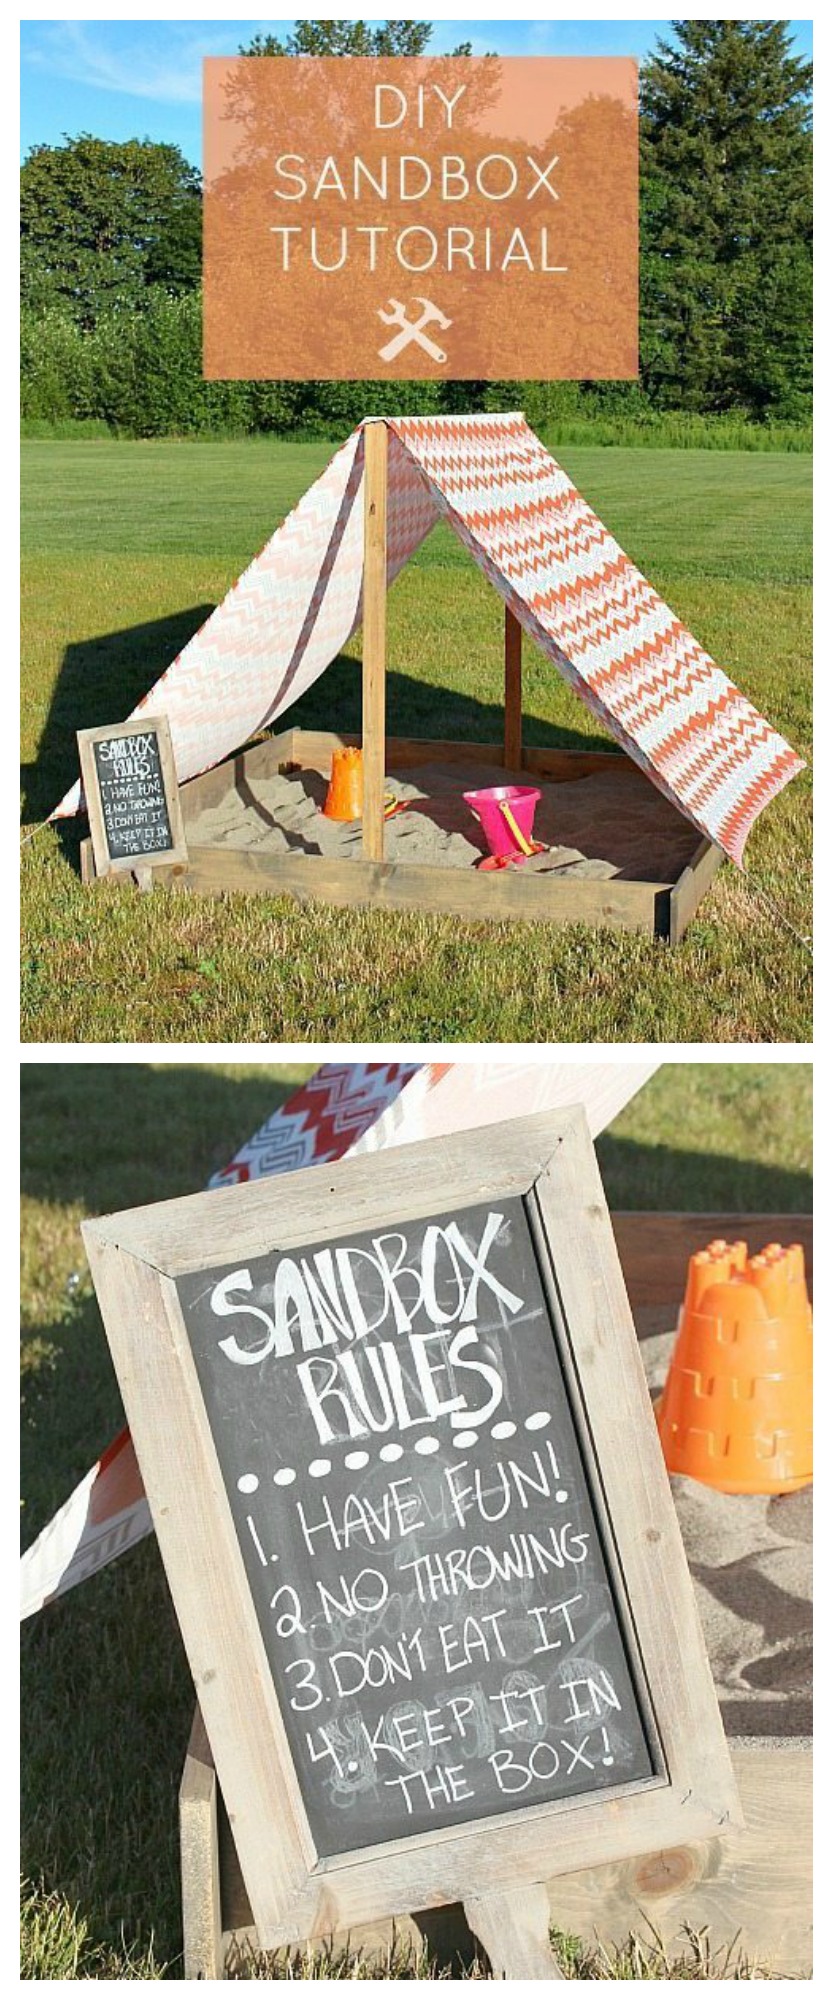
One of the things our kids have been asking for lately is a sandbox for our backyard! It was one of my favorite things to play with growing up and I’m excited for our kids to build their own memories. With all the nice weather we’ve been having I finally got around to building their DIY Sandbox With Cover and they are so excited with how it turned out! And so are we.

Learn how to build this easy Sandbox With Cover ! This is a great DIY Summer project for the kiddos.

BUILDING A SANDBOX WITH COVER

I chose to build a pretty basic sandbox and then added my own spin to it. You can find a basic build over on the True Value DIY Site. This has great tips for getting ready to build your own. I originally started to build a 4X4 box, but then realized how small that really is and both my kid’s wouldn’t fit happily in there (I don’t need any sand fights, ha)! So I started over and went with a 6X6 and it’s perfect!

Sandbox with Tent - Great summer DIY Project to keep the kids entertained and protect them from the sun!

Our backyard is a big open field and the sun just beats down on it all day. We have zero shade on our property and it gets hot. Knowing the kiddos will be playing in there during peak sun times, I wanted to provide some sort of shade. I decided on making a tent-like canopy to help block the sun and cool it down. The fabric I chose is made for the outdoors and has UV protection, and if it gets wet, it won’t mildew. This was really important for me, especially since we live in Seattle and tend to get unexpected drizzles throughout the summer.

Sandbox Rules Sign ! Let the kids have fun but know the rules.

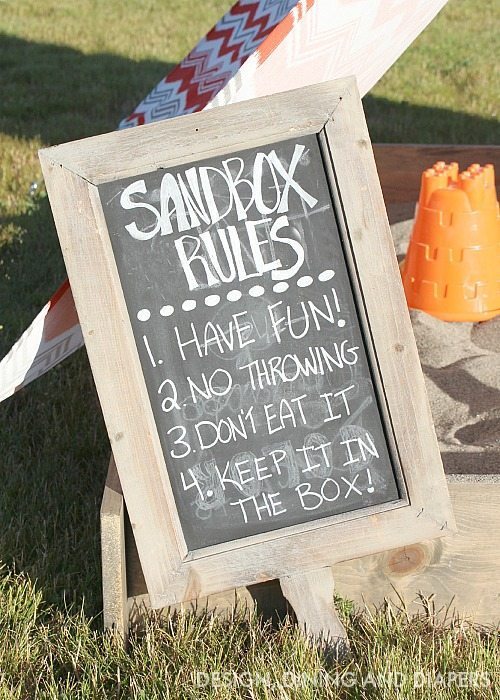
To keep the fort fun and adventurous I added a little chalkboard sign with a few Sandbox Rules. For those of you with little kids, you know how easily any of these things can happen :)

DIY SANDBOX TUTORIAL

– (4) 1 X 8 X 6 Pieces of Wood

– (2) 1 X 3 X 5 Pieces of Wood

– (1) 1 1/4″ Dowel

– Weed barrier

– (20) 1 1/2″ Wood screws

– Minwax Dark Walnut Stain & Classic Gray Stain (Optional)

– Polycrylic

– Industrial Tape

– (15) 50 lb bags of Play Sand (or more depending on how full you want it)

For Tent: 

– 64″ X 136″ Piece of Fabric (allow a little extra for hem)

– (4) 4″ Loop Hooks

– Nylon Rope

Tools:

– Power Drill

– Staple Gun

– Circular Saw

– Level

– Sewing Machine (for tent)

Sandbox Dimensions

To build the frame, I started used the 1 X 8 X 6″ pieces of wood and screwed them together using wood screws. I put three screws at each joint. You can see in the pic that I placed the boards 2 3/4″ from the outside. There are so many different ways to join together the corners, this worked for us and the look we wanted.Finding the perfect gray stain! This is a great mixture for finding a warm gray color. I wanted the wood to match our outdoor table and patio, so I gave it a coat of my favorite stain mix, using Minwax Classic Gray and Dark Walnut. Jus keep in mind this ratio will look different on different types of wood depending on how porous they are. Sometimes I have to use a little more gray and a little less brown. Just test a small pieces first. You will also want to give it a protective coat of polycrylic.

Installing Week BarrierOnce you have your box frame built and stained, line the bottom with weed barrier. We did this to prevent weeds from growing through and moles from popping up. 

Sandbox Base

At this point, we put the sandbox right where we wanted it and got started on the final steps. Also of note, because I used a 3′ roll of weed barrier, I had to do two layers. Just to be safe, I added a strip of industrial tape to hold the seam.

Leveling and Installing Posts

If you want to add the tent portion, keep on reading. I secured two pieces of wood at the halfway point on the sandbox base. Make sure to use a level to keep the posts straight. I secured the screws on the inside to make it look a little nicer on the outside.

Building a Sandbox With A Cover

Then, add the dowel in-between the posts. To fill the sandbox, I picked up (15) 50 lb bags of Play Sand. This sand has already been washed and treated and is perfect for a sandbox. 15 bags filled it about halfway, I think we could definitely add more but this works just fine for now.

DIY Sandbox With Cover Tutorial

I made the tent using UV/Outdoor fabric. I wanted quality sun/weather protection so I chose to spend the extra money. This specific fabric cost me $13/yard but having the added protection was worth it for me. The tent is simply one large rectangle. It measures 65″ wide by 136″ long. When making yours, be sure to factor in a couple of extra inches on either side for the seam. The outdoor fabric I bought was 52″ wide, so I had to add another foot to the width to cover the dowel.

Tent Hooks

Much like you would with a camping tent, I tied nylon rope onto each corner (about 8″) and attached it to a  4″ loop hook. I simply pulled each corner tight and hammered each corner into the ground.

Sandbox with Tent

I love how it turned out and so do the kids. They love that it’s a little fort. It’s cute and practical and will provide hours of fun! (every mom’s dream)

I was one of the bloggers selected by True Value to work on the DIY Squad. I have been compensated for my time commitment to the program as well as writing about my experience. I have also been compensated for the materials needed for my DIY project. However, my opinions are entirely my own and I have not been paid to publish positive comments.


OTHER OUTDOOR ACTIVITIES YOU MIGHT LIKE

  • Outdoor Tic Tac Toe Game
  • Outdoor Summer Table
  • DIY Hanging Backyard Lights 
  • DIY Outdoor Picnic Table

Learn how to make this easy DIY Sandbox With Cover ! Protect your kids from the sun while they have hours of backyard entertainment.

SaveSave

About Taryn Whiteaker

Taryn Whiteaker is the voice of style behind TarynWhiteaker.com (formerly Design, Dining and Diapers) ! Taryn is a previous PR/Marketing professional who got back to her creative roots after becoming a mom and now shares her passion for home decor and design for the world to see. Taryn lives in the greater Seattle area with her husband and three kids and loves coffee, the outdoors, and exploring with her family.

Filed Under: ALL POSTS, DIY Home Decor, DIY Projects, Furniture Builds and Makeovers, Sponsored

Reader Interactions

Comments

  1. Ashley @ Simply Designing says

    July 3, 2015 at 8:28 am

    What a great idea! And I love that you mixed the stain to get a warmer grey! So pretty!

    Reply
  2. Emily says

    July 3, 2015 at 4:35 pm

    this is such a great idea! Perfect for hot days and yards with no shade!

    Reply
  3. Jenna says

    July 30, 2015 at 5:51 pm

    We don’t get any shade in our yard either and I’m loving this whole idea. What a cute project!

    Reply
  4. pankajt says

    August 9, 2018 at 7:25 am

    Would sand wash away in the heavy rain/ snow? Do I need to refill the sand every year before summer?

    Reply
    • Taryn Whiteaker says

      August 9, 2018 at 7:28 am

      Hi! We’ve had it for a few years now and added more sand a few times. It could definitely use a bag or two each summer, mainly because I think my kids transport it to other parts of the yard lol

      Reply

Leave a Reply Cancel reply

Your email address will not be published. Required fields are marked *

Primary Sidebar

Looking For Something?

CONNECT

EXPLORE

Meet Taryn

Taryn Whiteaker

Hi and welcome! I'm Taryn and the voice of style behind Taryn Whiteaker Designs. I'm a wife, mom of three, and coffee lover, living in the Pacific Northwest! This is where I share my love for design, whether it's decorating our own home, tackling big DIY projects, creating inviting tablescapes, or sharing my personal style. Thanks for stopping by and don't forget to subscribe to my mailing list to get all the latest updates! Read more...

Search This Site

Taryn On TV

Seattle King 5 NewDay Northwest Talk Show Tablescapes

CLICK HERE TO WATCH

Seattle King 5 NewDay Northwest Talk Show

CLICK HERE TO WATCH

The Rachael Ray Show

CLICK HERE TO WATCH

Join The Mailing List!

Follow On Instagram!

Well, I think I just added a new project to my lis Well, I think I just added a new project to my list! After many years of doing this job full time, my “office” has typically been the living room couch and the kitchen counter... but that isn’t really sustainable anymore (not a bad thing!), so my husband and I talked about turning his home office into a shared office space soon! Honestly, I don’t know why it took us so long to do this, maybe because it hasn’t really been as much of an issue until now, but I’ve got some ideas for my new office space in here! I won’t change a whole lot, but I think it’s going to be simple and perfect! Do you and your spouse share an office space?!
.
.
.
 @liketoknow.it #liketkit http://liketk.it/36n0B @liketoknow.it.home #StayHomeWithLTK #LTKhome #homeoffice #officespace #diyoffice #diyprojects #diydecor #accentwall #stikwood #interiors #interiordesign #doingneutralright #showemyourstyled #smmakelifebeautiful #thedelightofdecor #ispyraddesign #heyhomehey #currenthomeview #ispymoderndiy #myhousebeautiful #thedecorsocial
I finally found THE piece for above the mantel! We I finally found THE piece for above the mantel! We officially took down the TV and moved it to the wall. I was looking for either a modern artwork piece or mirror and I am in love with this one! It’s the perfect mix of simple and modern with subtle mid-century modern lines. I’m sharing more angles on the blog today with links. 
.
.
.
 @liketoknow.it #liketkit http://liketk.it/36cVG @liketoknow.it.home #StayHomeWithLTK #LTKstyletip #LTKhome #midcenturymodern #midmod #fireplacedecor #fireplacemantel #manteldecor #fireplacemakeover #mirrorpics #crateandbarrel #diyhomedecor #diyrightnow #interiors #interiordesign #doingneutralright #showemyourstyled #smmakelifebeautiful #thedelightofdecor #ispyraddesign #heyhomehey #currenthomeview #ispymoderndiy #myhousebeautiful
Happy Friday! A few common questions that have com Happy Friday! A few common questions that have come up about the staircase gallery wall this week... 1) the wall color is called Rebel by Kilz 2) the print size is 16 x 20 and 3) I have two full blog posts dedicated to how I picked the prints and links to the frames and also another one on building out the wall. Hope that helps! 
.
.
.
.
#gallerywall #accentwall #staircase #diyprojects #diyhomedecor #diylookforless #diyrightnow #thedecorsocial #artwork #interiors #interiordesign #doingneutralright #showemyourstyled #smmakelifebeautiful #thedelightofdecor #ispyraddesign #heyhomehey #currenthomeview #ispymoderndiy #myhousebeautiful
Would you believe this brick wall is just removabl Would you believe this brick wall is just removable wallpaper?! It’s simple things like this that can completely change a space. It’s great for rentals or apartments because it won’t ruin the walls when you take it down! I’ve used it in a few rooms of our home and I’m a big fan. 
.
.
.
#bedroomdecor #wallpaper #walldecor #accentwall #masterbedroom #canopybed #rusticmodern #bedroomdesign #interiordecorating #decoratingideas 
#interiors #interiordesign #doingneutralright #showemyourstyled #smmakelifebeautiful #thedelightofdecor #ispyraddesign #heyhomehey #currenthomeview #ispymoderndiy #myhousebeautiful
Less is more. . . . @liketoknow.it #liketkit htt Less is more. 
.
.
.
 @liketoknow.it #liketkit http://liketk.it/35FT2 #LTKstyletip #LTKhome @liketoknow.it.home #entrywaydecor #entryway #rusticmodern #arhausinmyhouse #amazonhome #vintagestyle #thedecorsocial #interiors #interiordesign #doingneutralright #showemyourstyled #smmakelifebeautiful #thedelightofdecor #ispyraddesign #heyhomehey #currenthomeview #ispymoderndiy #myhousebeautiful
Putting in our home gym this spring was one of the Putting in our home gym this spring was one of the best decisions of the year! I had a few requests for more pics of this space recently, so you can swipe through to see more and the before pic. We use this space so much (even the kids set up courses in here), and we have plans to finish more of the garage space this year. You can view more details on the blog by searching “home gym”. 
.
.
.
#homegym #gym #diyprojects #diyhomedecor #crossfit #crossfitgym #homeworkout #homesweethome #concreate #roguefitness #thedecorsocial #interiors #interiordesign #doingneutralright #showemyourstyled #smmakelifebeautiful #thedelightofdecor #ispyraddesign #heyhomehey #currenthomeview #ispymoderndiy #myhousebeautiful
I’ve got bathrooms on my mind! Here is our kids’ shared jack-n-Jill bathroom that I did a few years back. I still love the design and so glad I went with a pop of blue in here! I’ve started the planning process for our other upstairs bathroom and went searching for tile today (see stories)! I am getting so excited for this project, I’ve been gathering tons of inspiration photos and I’ll share them this week! 
.
.
.
 @liketoknow.it #liketkit http://liketk.it/35zWq @liketoknow.it.home #LTKhome #LTKkids #kidsbathroom #bathrommakeover #bathroomdesign #bathroomdecor #hexagontiles #bathroomrenovation #diyprojects #diyhomedecor #diyrightnow #interiors #interiordesign #doingneutralright #showemyourstyled #smmakelifebeautiful #thedelightofdecor #ispyraddesign #heyhomehey #currenthomeview #ispymoderndiy #myhousebeautiful
I know you all have been super bummed that the sof I know you all have been super bummed that the sofa in our bonus room has been sold out for months, so I decided to round up 13 other mid-century modern leather sofas super similar to this one! You can find the full list on the blog today with links, they vary in price range and shape but I believe there is an option for everyone! Click the link in my bio! 
.
.
.
 @liketoknow.it #liketkit http://liketk.it/35rV2 #LTKstyletip #LTKhome @liketoknow.it.home #midmod #midcenturymodernfurniture #midcenturymodern #bonusroom #movieroom #sofadesign #leathersofa #darkwalls #diyprojects #diyhomedecor 
#interiors #interiordesign #doingneutralright #showemyourstyled #smmakelifebeautiful #thedelightofdecor #ispyraddesign #heyhomehey #currenthomeview #ispymoderndiy #myhousebeautiful
What do all these spaces have in common? They are What do all these spaces have in common? They are all unfinished and or/getting makeovers this year! On the blog today I’m listing out my home projects and goals for this year! Swipe through to see some of the top projects: 
1) painting our exterior dark!
2) adding built ins to the bonus room
3) finishing the family room
4) gutting the upstairs bathroom 
5) refreshing the downstairs bathroom 
.
.
.
You can head to the blog to see the full list of spaces for this year, I also shared a few tours of the spaces on stories today. I can’t wait to share design plans! 
.
.
#designplans #homeprojects #exteriorpainting #homeplans #beforepics #planningahead #projectplanning #interiors #interiordesign #doingneutralright #showemyourstyled #smmakelifebeautiful #thedelightofdecor #ispyraddesign #heyhomehey #currenthomeview #ispymoderndiy #myhousebeautiful

Footer

THIS SITE

  • Home
  • About
  • Contact
  • Partner with Taryn

Privacy Policy

If you are interested in learning more about data that might be collected by this site you are encouraged to read the Privacy Policy and Cookie Policy for TarynWhiteaker.com 

COPYRIGHT POLICY

All images on this site are copyright of Design, Dining and Diapers, LLC. Unless otherwise noted. You may not use these images without written permission. If you would like to feature a project shown on Design, Dining and Diapers you may use a maximum of 2 images and include a visible link back to the project.

Copyright© 2021 · Brunch Pro Theme by Shay Bocks · Hosting by 3116 Digital

This site uses cookies: Find out more.