• Skip to primary navigation
  • Skip to main content
  • Skip to primary sidebar
  • Skip to footer
  • Home
  • About
  • Contact
  • Partner with Taryn

Taryn Whiteaker Designs

DIY and Interior Blog

  • Our Dallas Home Tour
  • Shop My Pics
  • Home Styling
    • Room Reveals
      • Our Current Home
      • Our First Home
    • Seasonal Home Tours
  • DIY Projects
    • DIY Home Decor
    • Crafts & Sewing
    • Before and Afters
    • Before and Afters
    • Furniture Builds and Makeovers
  • Seasonal Decor
    • Christmas
    • Easter
    • Fall
    • Fourth of July
    • Halloween
    • Spring
    • Valentine’s Day
  • Printables
  • Entertaining
    • Parties
    • Tablescapes
  • Fashion
  • Travel

October 30, 2020

DIY Resin Canvas Artwork

Disclosure: This post is in partnership with WORX Tools. All opinions are 100% my own.

Are you ready to add a new DIY project to your list? I stumbled across this cool DIY Resin Canvas Artwork on YouTube and was completely blown away by the unique and modern artwork you can create using resin and canvas and a little paint. I decided to give it a try. I completely failed the first time around, but the second attempt went MUCH better!

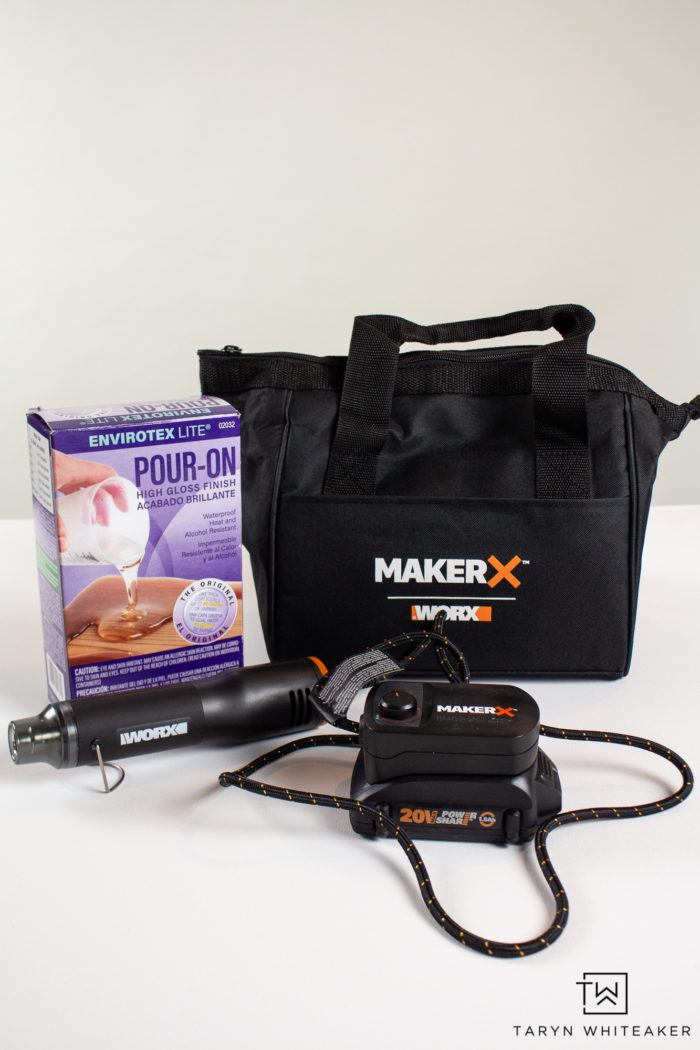
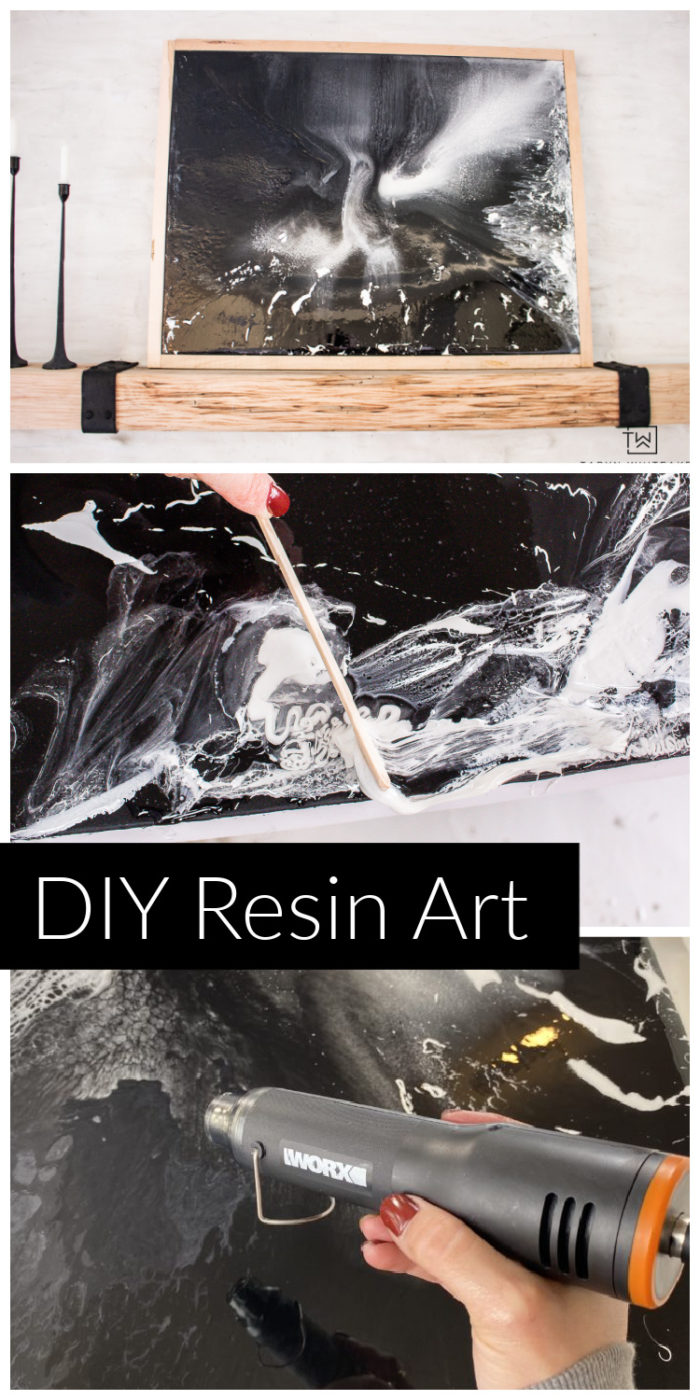
For this project you need a heat gun, which I’ve never used before and was excited to try out the latest crafting tool from WORX Tools. They just launched their MakerX Crafting Tool and it is SO cool! I have been playing around with it for the past few weeks and I can’t wait to show you all the features. Today, I’m going to use the Heat Gun Attachment to make some cool modern art. You guys are going to love this look!

DIY Resin Canvas Artwork

Learn how to make your own DIY Resin Canvas Artwork ! Choose your own colors and create your own DIY modern art for your home.

Resin Artwork Supplies

  • Canvas (in desired size)
  • WORX MAKERX + Heat Gun Tool
  • WORX Pagesus Work Table
  • Resin Mix
  • Acrylic paint
  • Plastic Cups
  • Popsicle Sticks
  • Gloves + Mask (this stuff is stinky!)

For Frame (Optional)

  • WORX Gauge Nail + Staple Gun
  • 1 X 1 wood trim

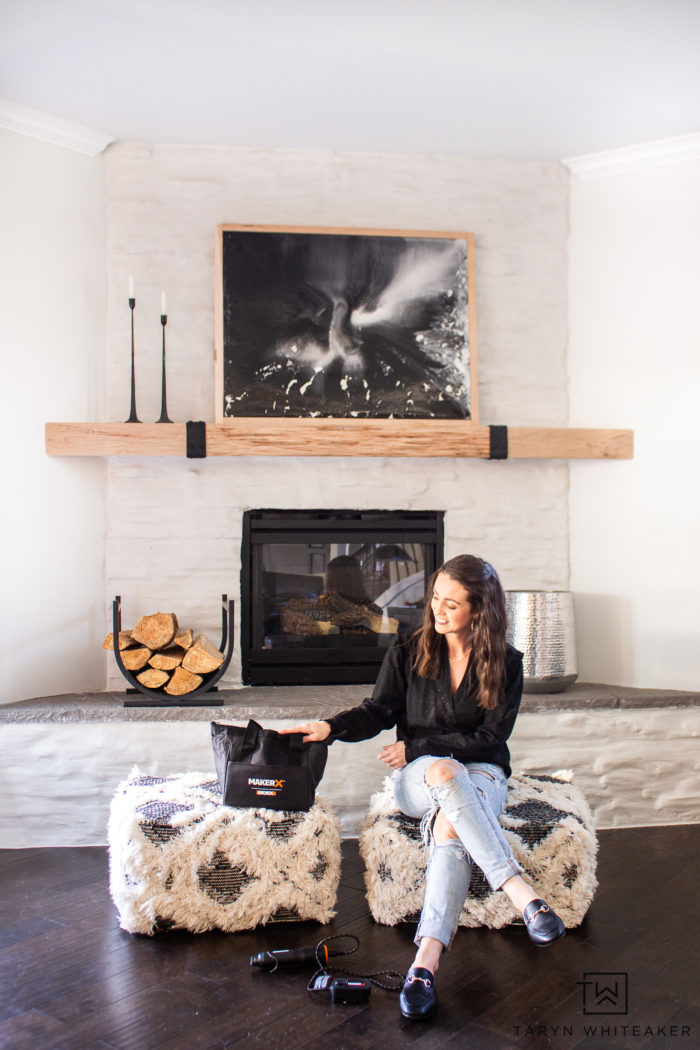
WORX MakerX Crafting Tool

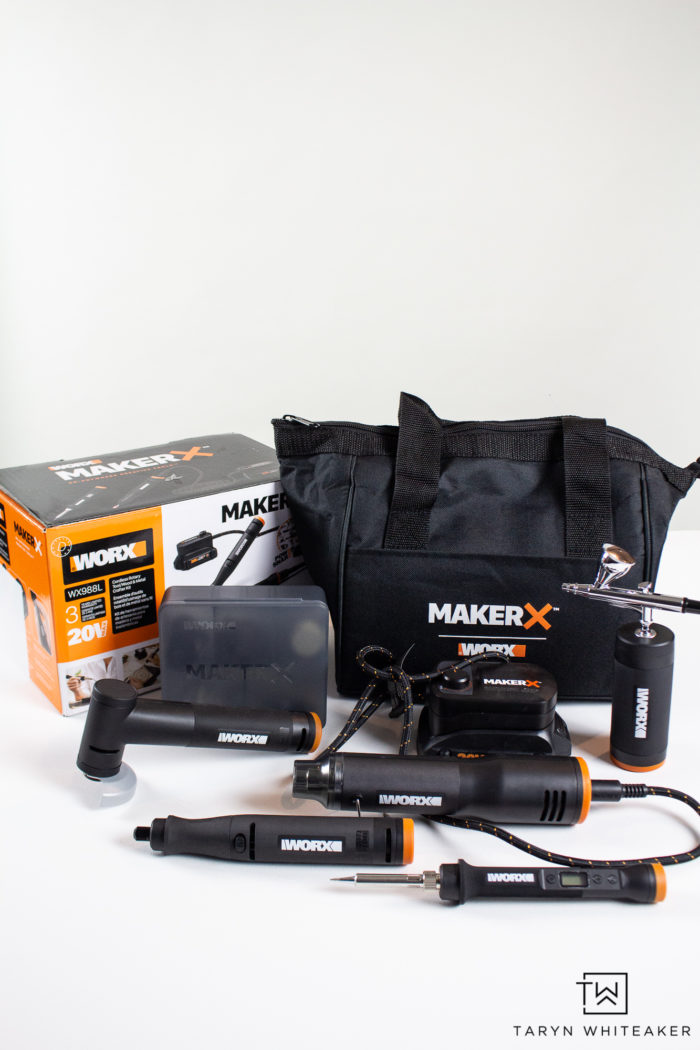
WORX just released a brand new tool called the MakerX, it’s essentially a cordless rotary tool that has TONS of additional accessories to play with! The base includes a battery, making it portable for all projects.

The MAKERX Ultimate Combo Kit includes the rotary tool, angle grinder, air brush, mini heat gun and the wood & metal crafting tool. There are SO many projects you can do with these tools, I have a list of things I want to make!

If you are a crafter or DIYer who likes to make your own artwork, I definitely recommend this kit. Put it on your Christmas list or give it to someone who wants to up their crafting game!

How To Make Resin Artwork

After a failed first attempt at this, I decided to do something completely differently the second time around. It was a learning experience for sure and I honestly can’t wait to do another one!

Paint Your Canvas

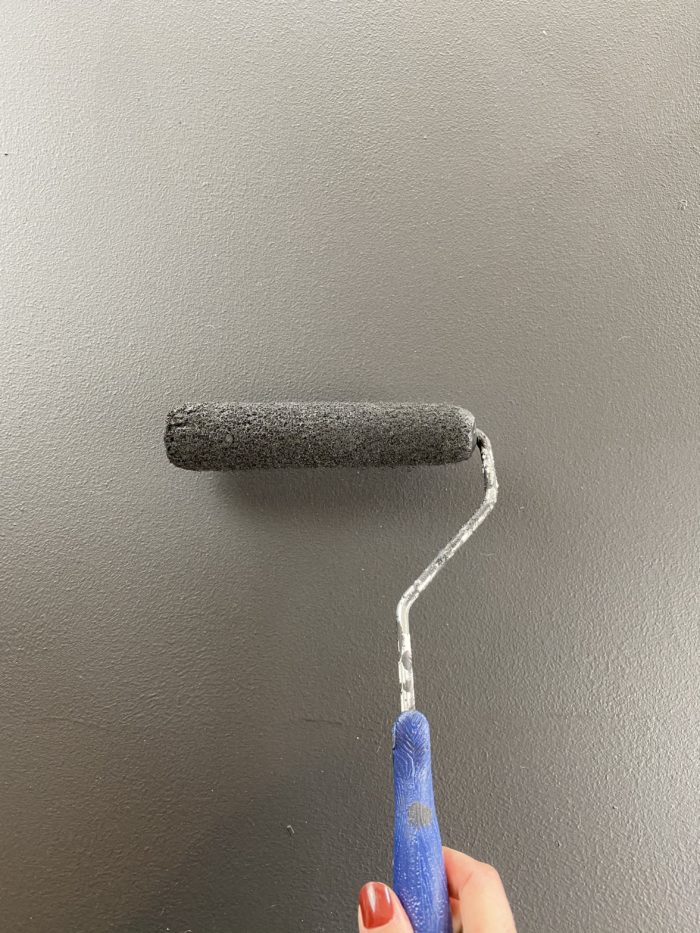
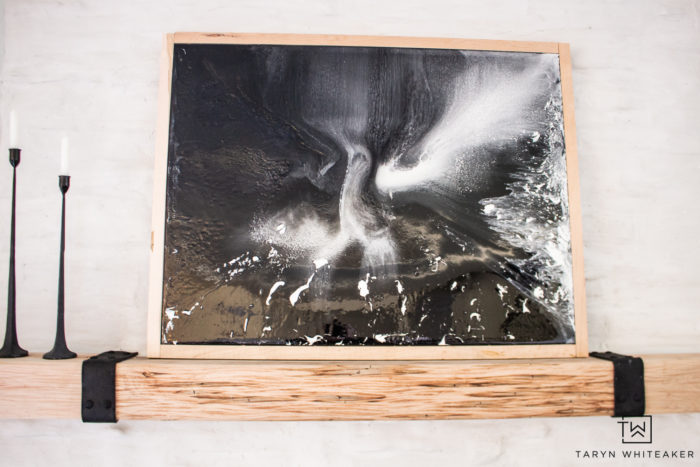
First, I decided to paint my canvas black to give it a moody and bold look, but you could also keep yours white and add your own colors to it.

Let me start off by saying that his project is MESSY. I’m all about getting messy and creative, but you should note that this one is extremely messy and sticky. You definitely want to cover the floor and wear clothes you don’t mind ruining. In fact, pretty much everything that touches this project will be messy, so keep that in mind!

Mix Your Resin

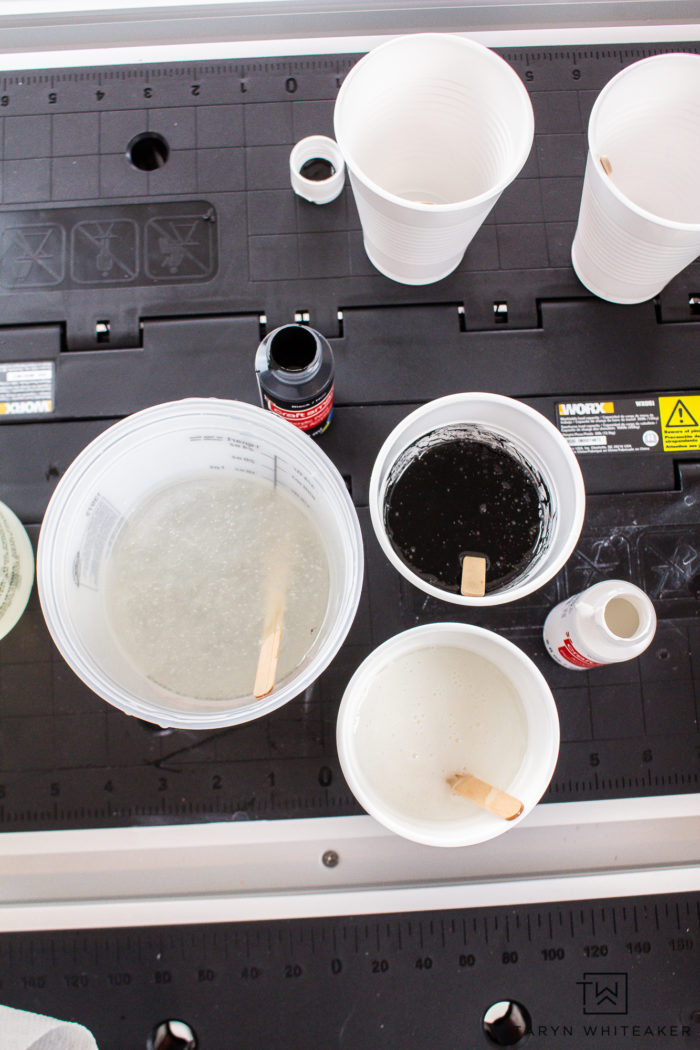
Start by mixing your resin according to the package. Be sure to get enough to cover the square footage of your canvas.

Pour about half of the mixture into separate plastic cups for your colors. I added white and black paint to the containers. Mix thoroughly, very very thoroughly. At least 2-3 minutes, yet set a timer. I didn’t mix enough apparently and had a few sticky spots and it was because I didn’t mix enough.

Pour Your Paint On The Canvas

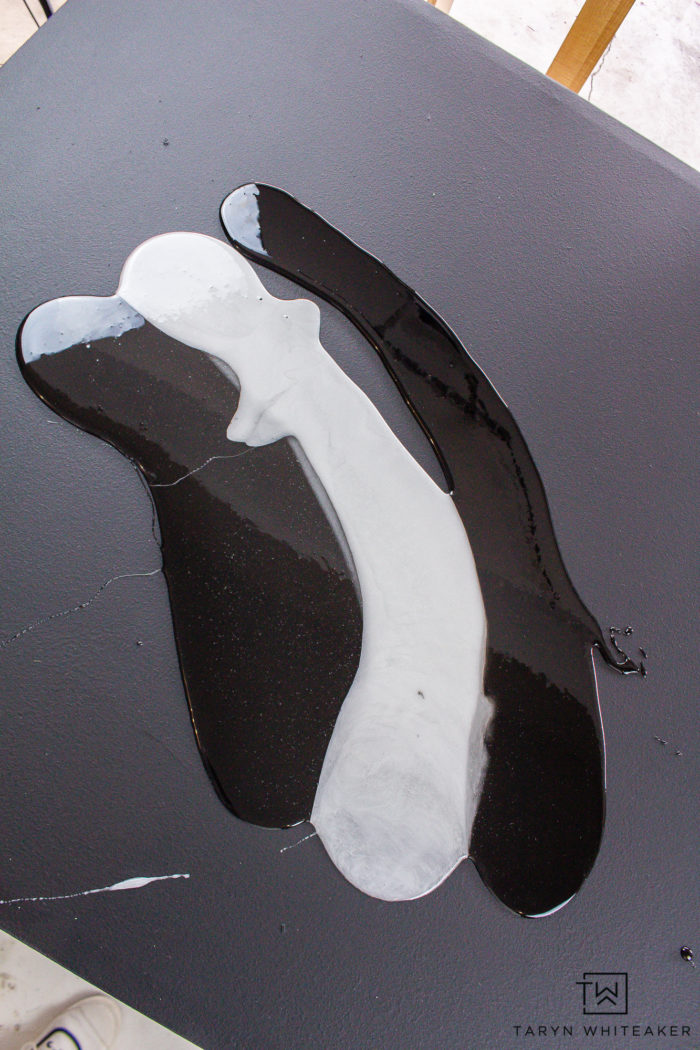
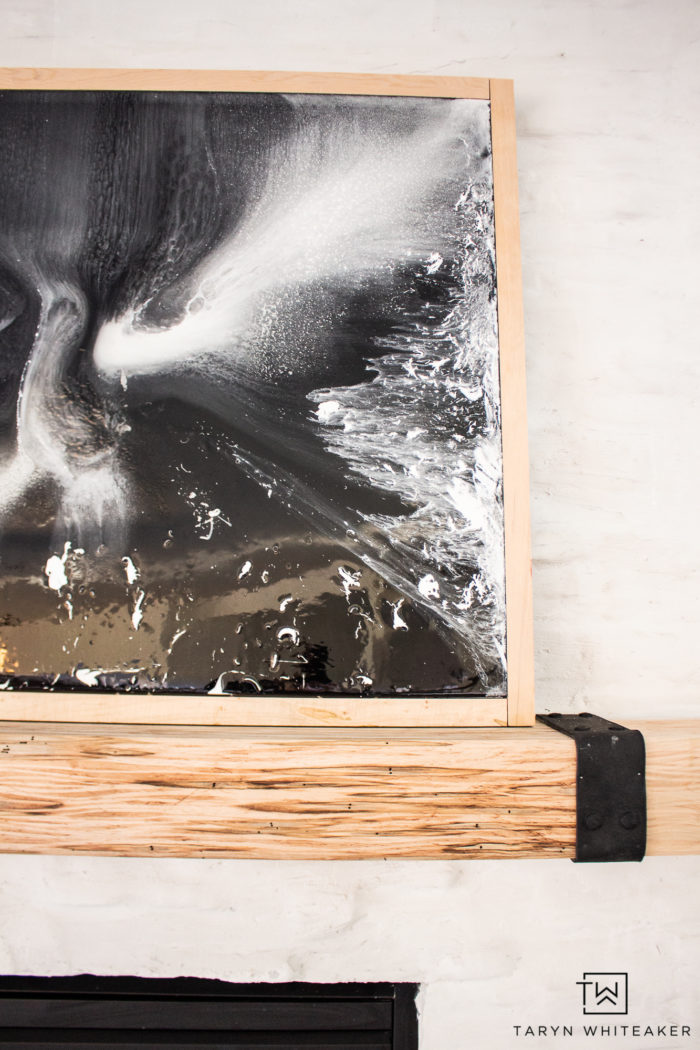
Time to get creative! I used a combination of clear resin, black and white mixture. I started by pouring the clear, then white and then black next to each other.

Tilt Your Canvas and Let It Spread

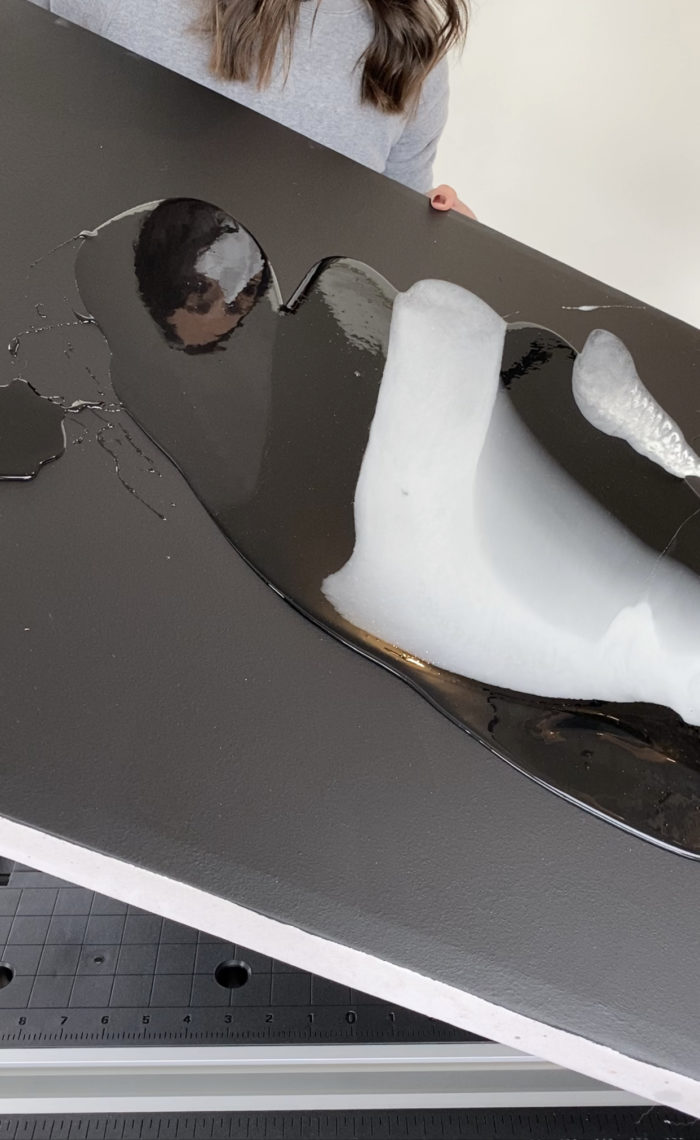
Then lift up the canvas and let the colors slide across from one direction to the other, slowly coating the canvas in the resin. You can keep moving the paint around to get the design you want. The resin will drip off the canvas, be prepared!

NOTE: Keep spreading the resin until it is evenly coated, or try not to add too much! I ended up with a little pool of resin in the middle of my canvas because I added too much and it settled there, so I had to remove some.

Pour Some More!

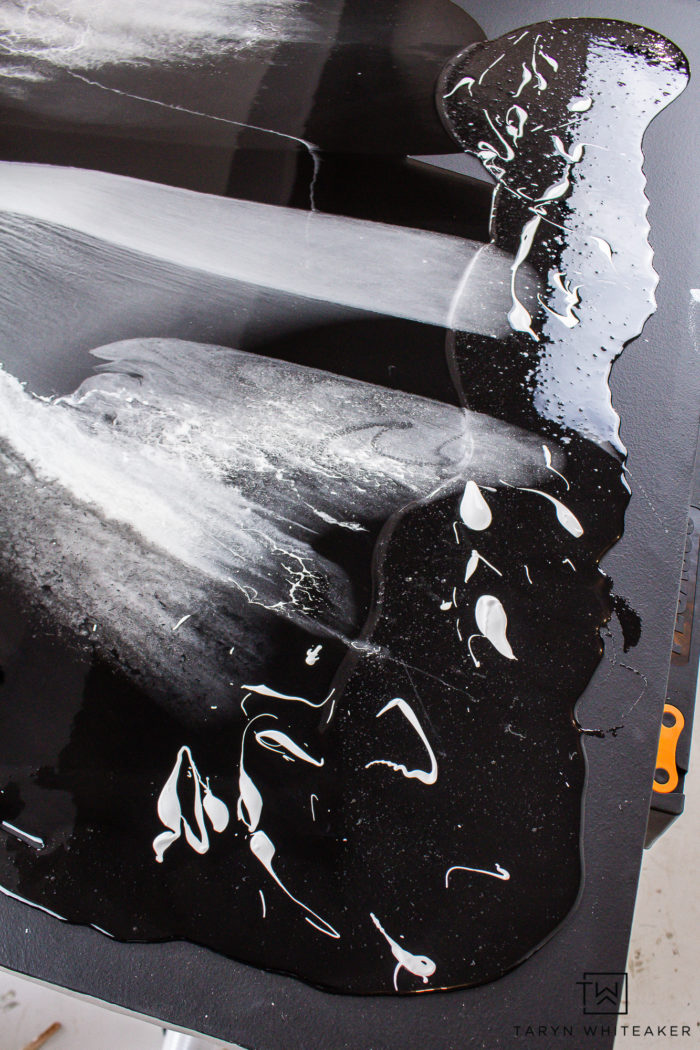
Once you have spread it enough, you can add more to coat the edges that are still bare. I decided to use a little bit of a different technique and pour clear resin, and then drip white paint directly on top for this one. Versus mixing it together. It create a completely different look this time and I loved how it turned out!

Spread it all the way to the edges to make sure the resin fully coats the canvas. If it gets rough in any places, don’t worry it will settle over time.

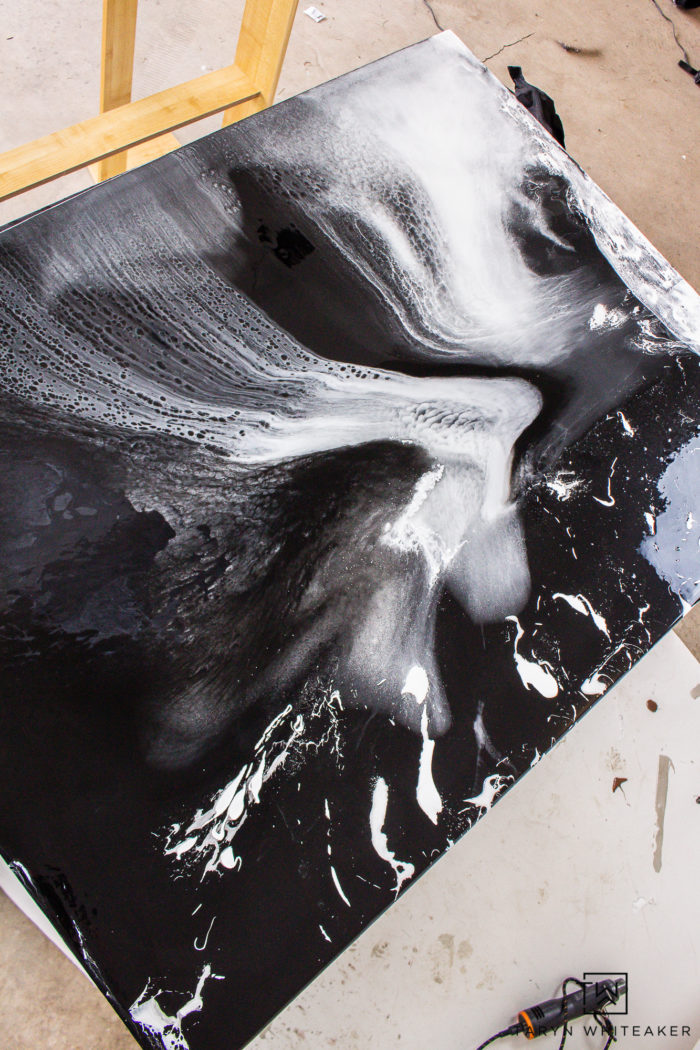
Now that the canvas is covered in resin and you have achieved your desired design, it’s time for the finishing touches!

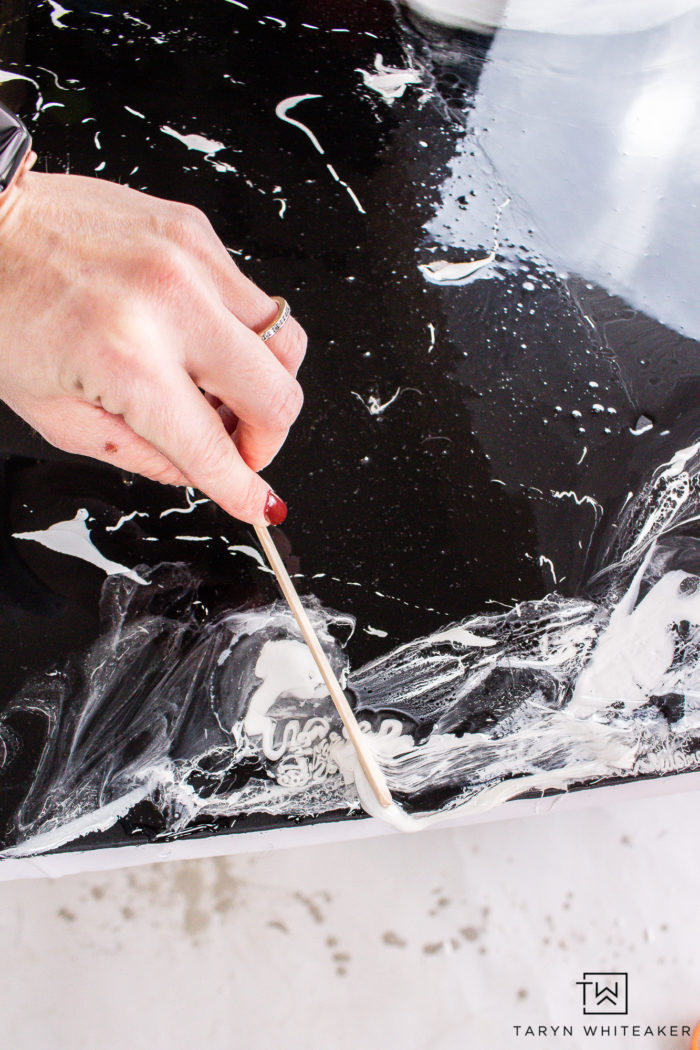
Use Your Heat Gun To Get Bubbles Out

Learn how to make your own DIY Resin Canvas Artwork ! Choose your own colors and create your own DIY modern art for your home.

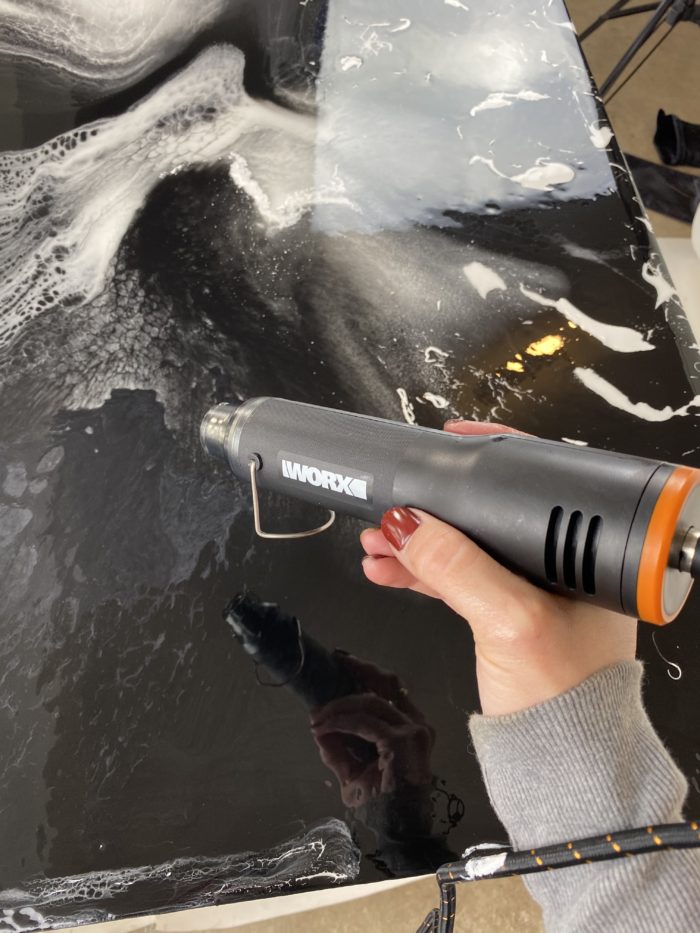
First, you want to use your WORX MAKERX + Heat Gun Tool to go over the entire piece. The heat from the gun will remove all of the air bubbles from the resin and help smooth out the piece. It will also help it cure faster.

You can also use the heat gun to move some of the paint lines around. As you put the heat gun on it, it will spread the paint around if you get close enough. So if you want to change up your design a little and keep playing, now is the time!

The piece will take about 72 hours to fully dry, so be patient!
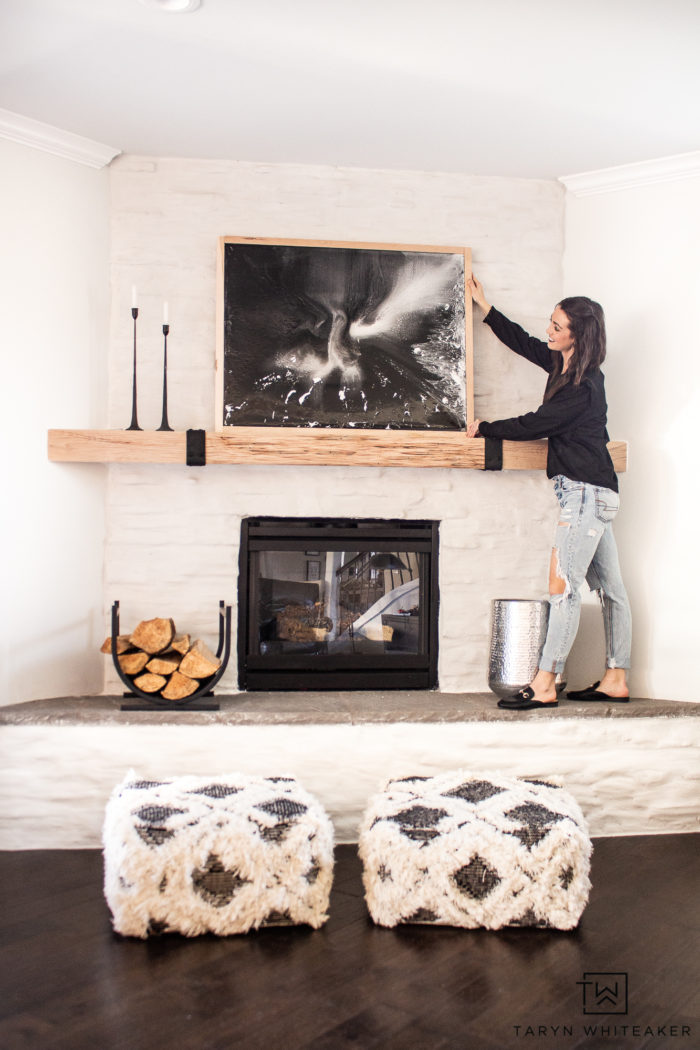
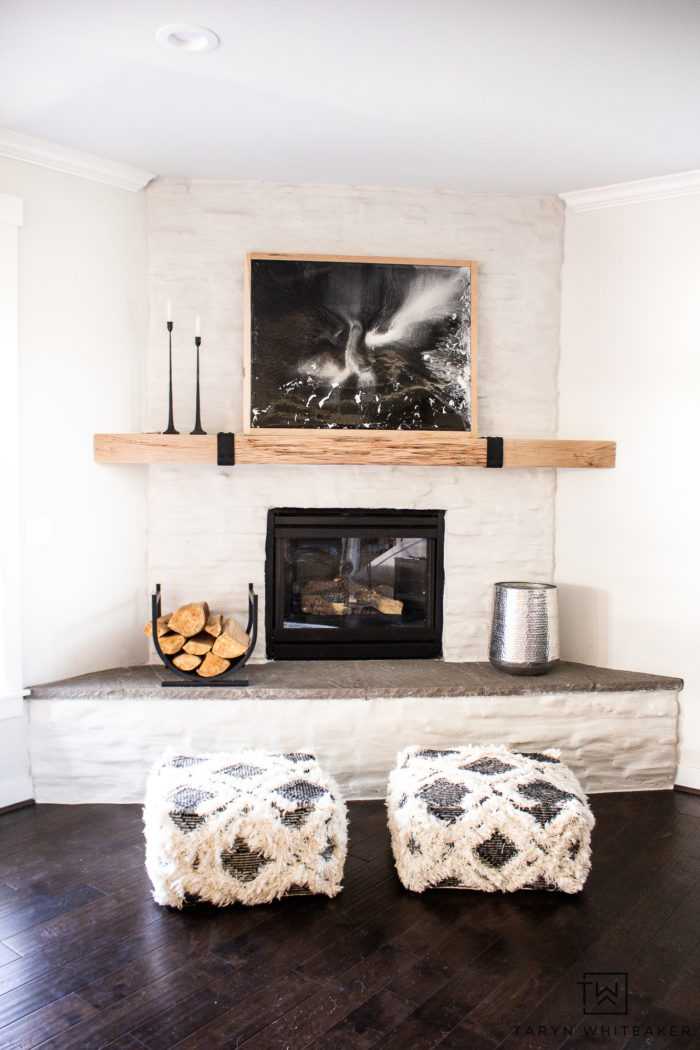
Add Your Frame

Learn how to make your own DIY Resin Canvas Artwork ! Choose your own colors and create your own DIY modern art for your home.

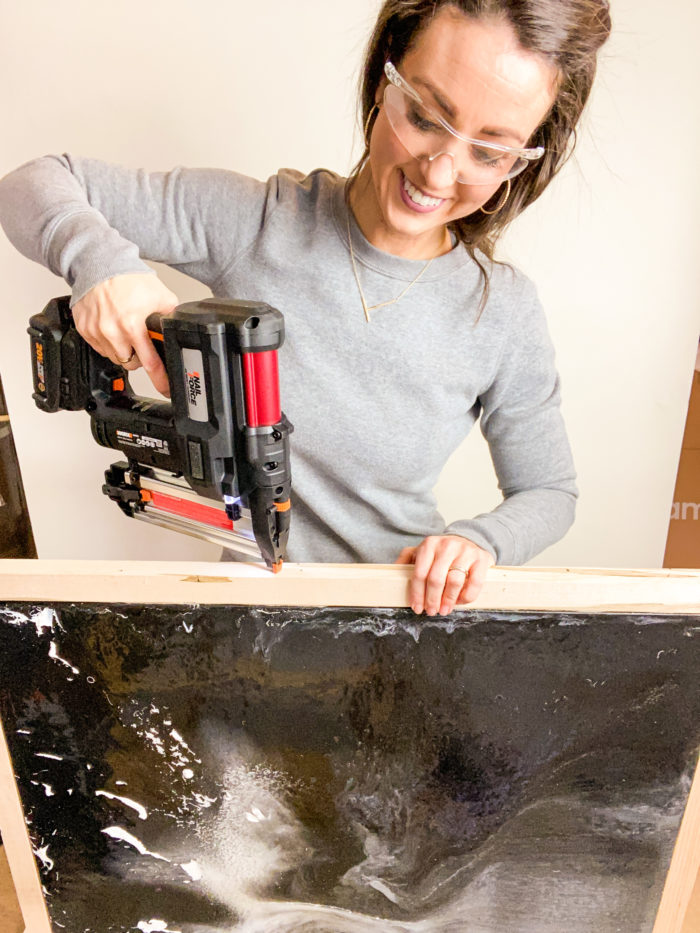
Once it is cured, time to make the frame. I cut my wood to size and then used my WORX Gauge Nail + Staple Gun to secure it to the canvas, creating a simple natural wood border.

DIY Resin Artwork

Learn how to make your own DIY Resin Canvas Artwork ! Choose your own colors and create your own DIY modern art for your home.

I can’t wait to keep playing around with my MAKERX, I have a few more projects in mind for it!

Resin Art Canvas Using Heat Gun

You can watch this short video to help you get a better idea of how to do this project!

Pin For Later!

Learn how to make your own DIY Resin Canvas Artwork ! Choose your own colors and create your own DIY modern art for your home.

About Taryn Whiteaker

Hi! I’m Taryn! The voice behind Taryn Whiteaker Designs. I launched this brand over 11 years ago when I became a stay-at-home mom. What started as a small craft and mom blog eventually grew into a full time design and DIY site. My goal has always been to inspire others (especially women!) with design ideas, DIY tutorials, entertaining ideas and give you the tools you need to complete them yourself!

Filed Under: ALL POSTS, Crafts & Sewing, DIY Home Decor, DIY Projects, Sponsored

Reader Interactions

Leave a Reply Cancel reply

Your email address will not be published. Required fields are marked *

Primary Sidebar

Looking For Something?

CONNECT

Meet Taryn

Taryn Whiteaker

Hi and welcome! I'm Taryn and the voice of style behind Taryn Whiteaker Designs. Sharing our journey of modernizing our European style home in Dallas. Thanks for stopping by and don't forget to subscribe to my mailing list to get all the latest updates! Read more...

Footer

THIS SITE

  • Home
  • About
  • Contact
  • Partner with Taryn

Privacy Policy

If you are interested in learning more about data that might be collected by this site you are encouraged to read the Privacy Policy

COPYRIGHT POLICY

All images on this site are copyright of Design, Dining and Diapers, LLC. Unless otherwise noted. You may not use these images without written permission. If you would like to feature a project shown on Design, Dining and Diapers you may use a maximum of 2 images and include a visible link back to the project.

More From The Gram

tarynwhiteaker_designs

Taryn Whiteaker Designs
Solving this design dilemma! This large light swit Solving this design dilemma! This large light switch in the middle of the wall has been tricky to decorate around, so I decided to decorate with it, incorporating it into the gallery wall. 

All the prints are purchased from Etsy!  Most frames are from Target. 

#homedecor #neutralhome #diyhomedecor #transitionaldesign #arches
My goal with every room is to make it feel warm, i My goal with every room is to make it feel warm, inviting and extra cozy. It’s often the final finishing touches that truly transform the vibe of a room. I picked up some final styling pieces from @wayfair , I am obsessed with both side tables. They are both statement pieces. And the personal photos, candle, heart trays and leather pillows are why bring the warmth and personal touches into this space. 

Comment SHOP for everything I added in here! 

#wayfaircreator #wayfair #ad #valentinesday #wayfairpicks
I finally found the perfect family and pet-friendl I finally found the perfect family and pet-friendly sofa that passes the designer test! This is the 5-Seat Modular Corner Sectional from @7thavenueco in the color Oatmeal Beige. We ordered it in the extra-deep seat option for ultimate coziness. The material is water-repellent, stain-resistant and you can also throw all covers in the wash!

We cannot say enough great things about this sofa, we all love it and just sink into it. It definitely passes the family test. Plus, it truly is gorgeous. It looks very chic. 

Comment SOFA and I’ll send you the link to this exact one! 

#familyroomdecor #partner #homedecor #neutralhomedecor #interiordecorating
If you are looking for another family trip this wi If you are looking for another family trip this winter, we loved our time at @bigcedarlodge ! There is so much to do in winter, and it was fun to see pics of all the snow over the past week! Here are a few notes that we took away from our 3 nights earlier this month! Save this post for your next trip…

#bigcedarlodge #ozarks #bransonmo #familytravel 

(Hosted)
Snow days in Dallas. ❄️ #dallaska #snowdays Snow days in Dallas. ❄️ 

#dallaska #snowdays #snowmuchfun #iceicebaby
What’s on the list for 2026?? Swipe through to s What’s on the list for 2026?? Swipe through to see all the spaces on my list and my initial ideas. Will I get to all of them!? I would love to but I also know I probably won’t, and that’s ok. But here is my lofty goal list. Kicking off the first one this week! 

1. Family room refresh 
2. Laundry Room Makeover
3. Primary Bedroom and attached seating area 
4. Formal Living Room 
5. Cozy Reading Nook in Hallway 
6. Finish the Staircases
Making use of an overlooked spot in our upstairs h Making use of an overlooked spot in our upstairs hallway! Love how this little vignette came together with fun finds from over the years. 

#neutralhome #organicmodern #decorating #neutraldecor
The biggest project we’ve done yet! I still have The biggest project we’ve done yet! I still have two more projects left to do in here to add some more warmth and texture, but the changes made so far are 🙌🏻. Classic, elegant, timeless and feels so fresh. 

So far: 
Replaced railings with custom ones
New carpet runners
Installed Gold Stair Rods 
Swapped out the chandelier for a statement piece 
Had the walls skim coated to level 5 finish and painted!

Sharing more details on the blog! Click the link in my bio. 

#houserenovations #interiordesigns #neutralhomedecor #staircases #renovation
Help me pick a chandelier for our back stairwell! Help me pick a chandelier for our back stairwell! The very last one was my initial pick, but now y’all have me questioning a few others after my stories today…

Comment SHOP if you want links to any of them! 

#interiordesign #homedecor #neutralhome
Follow on Instagram

Copyright© 2026 · Brunch Pro Theme by Shay Bocks · Hosting by 3116 Digital