• Skip to primary navigation
  • Skip to main content
  • Skip to primary sidebar
  • Skip to footer
  • Home
  • About
  • Contact
  • Partner with Taryn

Taryn Whiteaker Designs

DIY and Interior Blog

  • Our Dallas Home Tour
  • Shop My Pics
  • Home Styling
    • Room Reveals
      • Our Current Home
      • Our First Home
    • Seasonal Home Tours
  • DIY Projects
    • DIY Home Decor
    • Crafts & Sewing
    • Before and Afters
    • Before and Afters
    • Furniture Builds and Makeovers
  • Seasonal Decor
    • Christmas
    • Easter
    • Fall
    • Fourth of July
    • Halloween
    • Spring
    • Valentine’s Day
  • Printables
  • Entertaining
    • Parties
    • Tablescapes
  • Fashion
  • Travel

October 3, 2016

DIY Spider Wreath Using Ping Pong Balls

It’s officially October which means Halloween is just around the corner! I don’t typically decorate much for Halloween, but as the kids get older they have been requesting more holiday decor and I can’t turn them down. Today, I’m sharing a super easy DIY project for Halloween that anyone can do! All you have to do is shop around your home and maybe take a quick trip to the store. Would you believe this adorable wreath is made mostly from cardboard, ping pong balls, pipe cleaners and hot glue?

DIY Spider Wreath

diy-spider-wreath-using-ping-pong-balls-so-cute

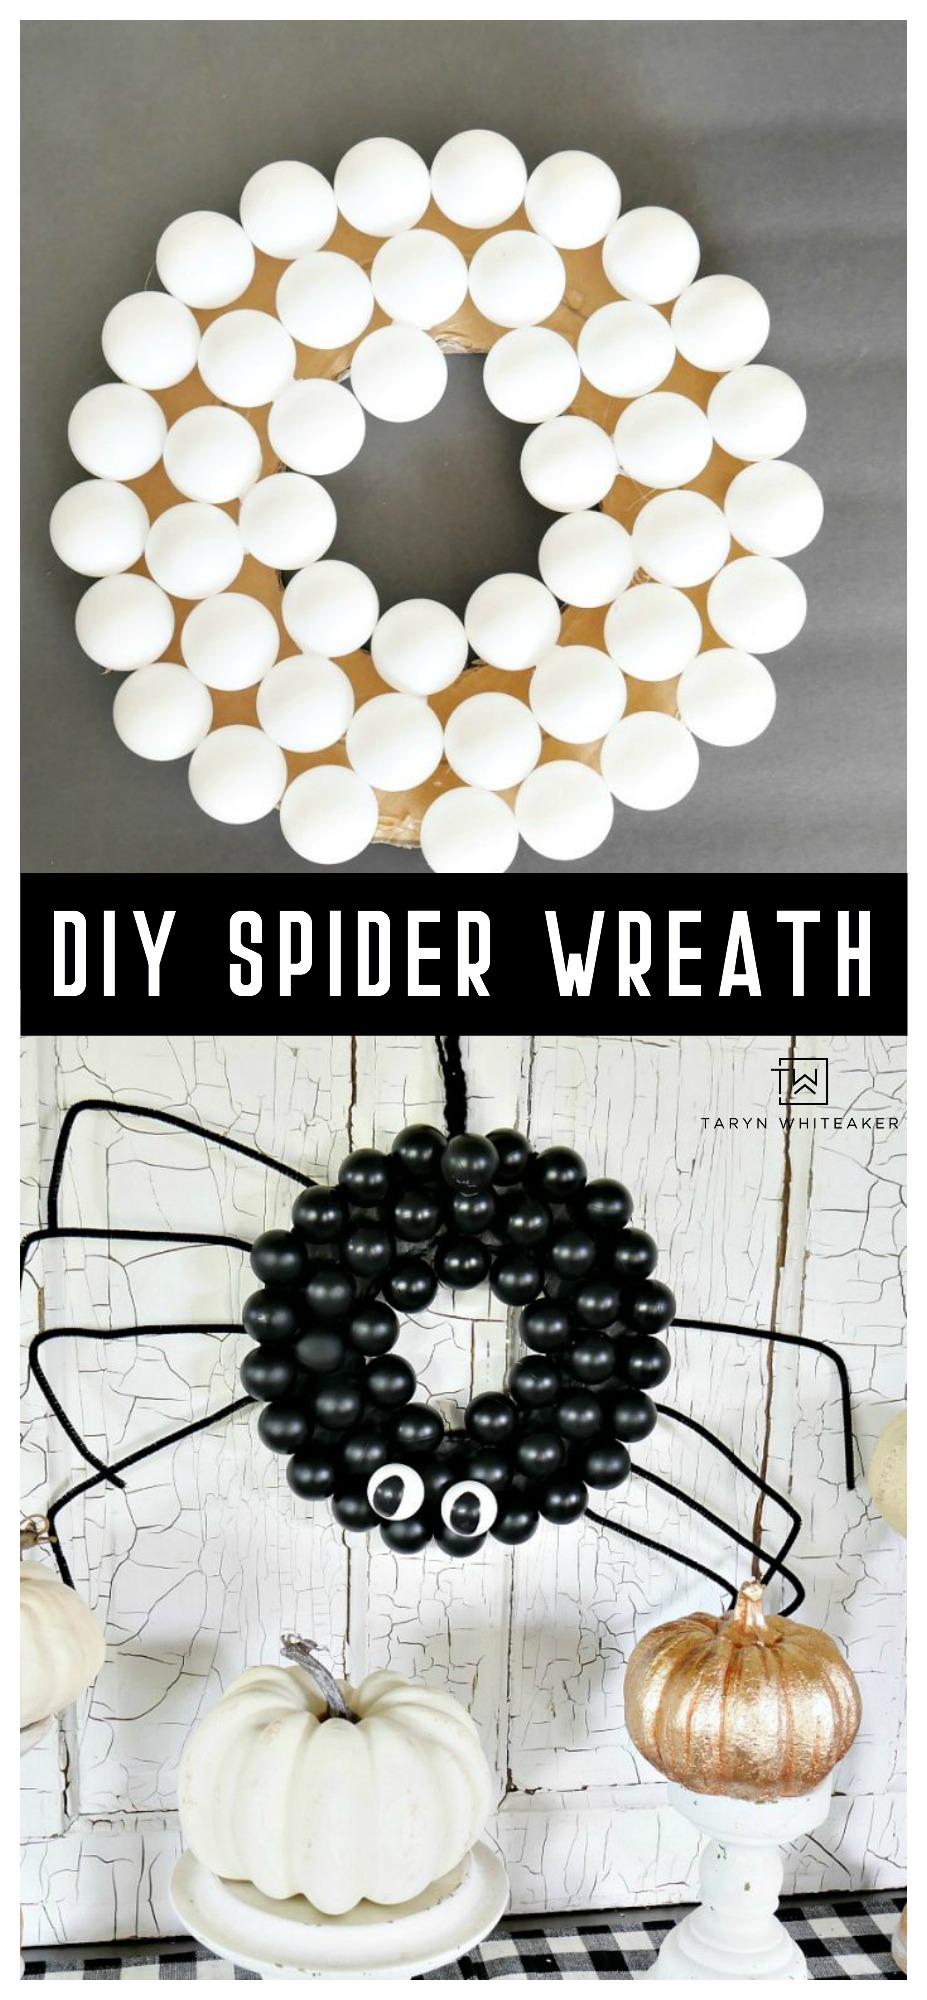
Here is my fun DIY Spider Wreath Using Ping Pong Balls. See, not all spiders are scary! They can be cute too.

DIY Ping Pong Spider Wreath

DIY Ping Pong Wreath Tutorial

Here is a list of supplies you will need to make your own:

  •  cardboard
  • 48 ping pong balls
  • 8 black pipe cleaners
  • black matte spray paint
  • black paint
  • scissors
  • hot glue
  • black ribbon

DIY Spider Wreath

Using a large mixing bowl as a guide, draw a circle onto your cardboard.

DIY Spider Wreath - 2

Using a smaller mixing bowl, draw a second circle inside to use as a guide for the inner circle. Cut out your wreath.

DIY Ping Pong Wreath - 3

You can pick up ping pong balls at most stores, but I found the best deal on Amazon!

DIY Wreath Base

DIY Spider Wreath 4

Start by gluing ping pong balls along the outside edge.

DIY Ping Pong Ball Wreath 5

Then, fill in the rest of the wreath. Make sure to set aside two ping pong balls for the eyes!

DIY Spider Wreath 6

Spray paint the entire wreath using a black matte spray paint, then glue on the remaining two white ping pong balls and paint two eyes.

Making A Spider Wreath

DIY Spider Wreath 8Flip the wreath over and hot glue the black pipe cleaners to the back.

DIY Ping Pong Spider WreathAdd a black ribbon and hang on your door or with a display! See anyone can do it!

Pin For Later!

Learn how to make this cute DIY Spider Wreath out of ping pong balls! Such an easy and cute DIY Halloween Project for your door!


NOTE: This post first appeared on Angie’s List.

SaveSave

About Taryn Whiteaker

Hi! I’m Taryn! The voice behind Taryn Whiteaker Designs. I launched this brand over 11 years ago when I became a stay-at-home mom. What started as a small craft and mom blog eventually grew into a full time design and DIY site. My goal has always been to inspire others (especially women!) with design ideas, DIY tutorials, entertaining ideas and give you the tools you need to complete them yourself!

Filed Under: ALL POSTS, Crafts & Sewing, DIY Projects, Fall, Halloween, Seasonal Decor & Crafts

Reader Interactions

Comments

  1. Valerie says

    October 10, 2016 at 9:53 am

    Such a cute and creative Halloween wreath!

    Reply
  2. Antonella | White House Crafts says

    October 12, 2016 at 6:51 am

    What an original idea! I love your spider. I hope you will share this inspiration with us at The Crafty Corner link party :)

    Reply
  3. Cheryl@That's What Che Said... says

    October 14, 2016 at 6:33 pm

    Absolutely love this Taryn! Thanks for joining us for Monday Funday! I am pinning this adorable spider!

    Reply
  4. Momina says

    October 22, 2016 at 1:59 am

    This is so lovely and adorable!!! thanks for sharing!!!

    Reply

Leave a Reply Cancel reply

Your email address will not be published. Required fields are marked *

Primary Sidebar

Looking For Something?

CONNECT

Meet Taryn

Taryn Whiteaker

Hi and welcome! I'm Taryn and the voice of style behind Taryn Whiteaker Designs. Sharing our journey of modernizing our European style home in Dallas. Thanks for stopping by and don't forget to subscribe to my mailing list to get all the latest updates! Read more...

Footer

THIS SITE

  • Home
  • About
  • Contact
  • Partner with Taryn

Privacy Policy

If you are interested in learning more about data that might be collected by this site you are encouraged to read the Privacy Policy

COPYRIGHT POLICY

All images on this site are copyright of Design, Dining and Diapers, LLC. Unless otherwise noted. You may not use these images without written permission. If you would like to feature a project shown on Design, Dining and Diapers you may use a maximum of 2 images and include a visible link back to the project.

More From The Gram

tarynwhiteaker_designs

Taryn Whiteaker Designs
For the record he was very nice and helpful, but h For the record he was very nice and helpful, but had very little faith in me. 😉

PS. Happy Mother’s Day to all the strong, loving and beautiful mommas ❤️ 💪🏼 . 

#diyhomedecor #homedecor #renovation #laundryroommakeover
One of my favorite places to be. After 4 years in One of my favorite places to be. After 4 years in this house the porch swing is still in perfect condition, just time to replace the cushion and add some fresh outdoor pillows! 

Comment SWING for all the sources! 

#homedecor #exteriordecor #outdoorprojects #potterybarn #ballarddesigns
Still one of my favorite transformations to date…. 

Comment BEDROOM for all the sources. 

#homedecor #diyhomedecor #boysbedroom #kidsroom #homedesign
Comment SPRING and I’ll send you all my fav laye Comment SPRING and I’ll send you all my fav layered looks for spring, all affordable and budget friendly. Pieces I keep wearing over and over this season! 

#amazonfashion #amazonfinds #over40fashion #springoutfit #easyoutfits
Laundry room update number two! Walls have been sk Laundry room update number two! Walls have been skim coated and primed, first coat of paint on walls and trim. Cabinets are off and getting prepped… next up: installing dark wood ceiling, painting cabinets, hanging a surprise wall mural, and building a custom drying rack! 

Paint color: BM Cromwell Gray 

#homedecor #cromwellgray #diyhomedecor #homerenovation #diy
Last weekend we did our annual outdoor cushion cle Last weekend we did our annual outdoor cushion clean-up! Sharing this reel again on how we do it! I’m always shocked how well it works! 

-30 second cleaner 
- Pressure Wash
- Repeat if necessary 

#springcleaning #outdoorliving #neutraldecor #backyarddecor
Comment HOME for the latest trending home finds! N Comment HOME for the latest trending home finds! Neutral chic decor that elevates your home. 

#homedecor #homestyle #homedecorideas #neutral
Comment HOSE for my favorite way to hide our garde Comment HOSE for my favorite way to hide our garden hose and keep it organized! Beautiful and practical. 

#exteriordecor #lovemygarden #grandinroad #homedesign
A little front porch refresh with all new items fr A little front porch refresh with all new items from @grandinroad ! Comment PORCH and I’ll DM you with all my favorite finds! 

They have my absolutely favorite artificial greenery, I’ve been using their outdoor trees for years and they still look perfect! 

#grandinroad #porchdecor #outdoordecor #springrefresh #partner
Follow on Instagram

Copyright© 2026 · Brunch Pro Theme by Shay Bocks · Hosting by 3116 Digital