Disclosure: This post is in partnership with True Value. – DIY AC Unit Cover
I don’t know about you, but I think the outside of your home is just as important as the inside. I’m talking about curb appeal. I feel like I’m still trying to get the inside of our home just right. But when you live in Seattle and it’s actually nice out, you get outside! Now is the time to tackle all of those exterior projects.
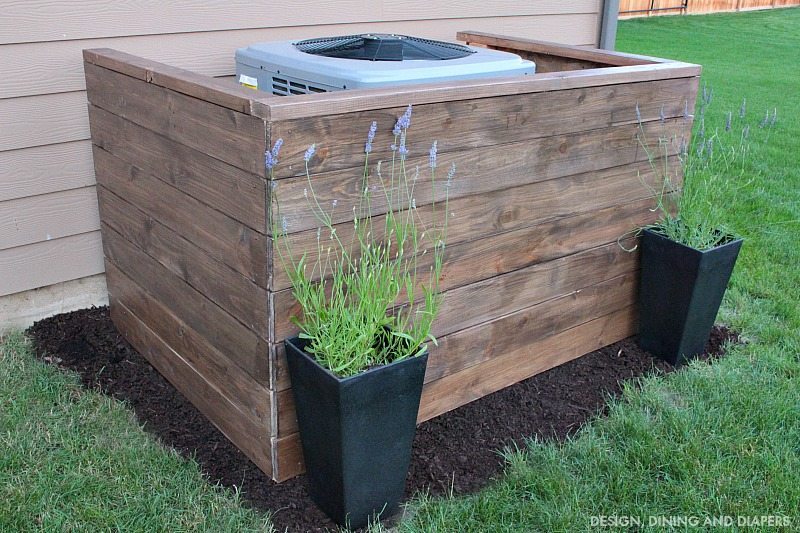
Last spring we installed an HVAC system in our home (Best decision ever. Worth every penny.) We had asked the installer to place it on the side of our home, but somewhere along the line there was a little miscommunication and it got installed off our back patio. Ever since, we have wanted to build a decorative cover around it and not make it such an eye sore. Can anyone else relate?!
Today, I’m showing you how I built our DIY AC Unit Cover and show you how anyone can do it!
UPDATE: Please do your own research before building a fence around your AC unit in terms of the distance around it and ventilation. Before doing this project I did my own research and based the design off my findings. This is my personal blog where I share my own experiences and I may not always get it right the first time. Thank you all for your feedback, I’m in the process of tweaking the design to provide more ventilation and access.

It’s one of those projects that you think about forever and once it’s done you say to yourself, ‘Why did it take me so long to do this?!’ I love simple projects that are subtle yet make such a difference and make your backyard look polished.


So let’s dive in and you can learn how to make your own!
DIY AC Unit Cover – Supplies:
(4) 4’ Fence posts
(7) 6’ X 6” X 1” Boards
(14) 4’ X 6” X 1” Boards
(2) 4′ X 4″X2″ Boards
(1) 6′ X 4″X 2″ Board
Sealer
Decorative filler (rocks, bark, etc.)
*Your measurements may vary depending on the size of your AC unit.
DIY AC Unit Cover – Tools:
Saw
Bucket
Paint Brush (or rag for stain)

Here is what I started with before. Just a basic AC Unit next to our house.

DIY AC Unit Cover – Posts
Use a hoe to remove the grass around the AC Unit. You may not need to do this if it’s already in gravel or dirt. I left a 2’ border around the unit. You will want to make sure you allow enough space so you can access the control panel.

Next, measure where you want your posts. We wanted to leave a good amount of space between the fence and the AC unit for air circulation, so I went with 14” spacing.
Use a post digger to create holes for your posts. Place a level on top of the posts to make sure the holes are equal depths. I went down about 8” which is a little on the skim side for posts, but it worked just fine for this project.
DIY AC Unit Cover – Quickcrete

Pour a generous amount of Quikcrete into the holes and wait 24 hours for them to set.

DIY AC Unit Cover – staining
When working with a permanent structure like this, you want to stain the backside of the boards prior to securing them onto the fence posts. Otherwise you won’t be able to slide behind it to stain it properly (I learned the hard way doing a similar project a few years ago).
I applied three coats of stain and let them dry overnight.

DIY AC Unit Cover – the boards
Let’s build! Start at the top of the front facing posts and secure one board using two fencing nails on each side. Leave a ¼” gap and secure the second one, and so forth. Each post will have 7 boards. There will be about a 3/4” overhang on each fence post.

Now, onto the sides. Start at the top and work your way down. Place the boards so that they come right up to that 1” overhang so it creates a really nice edge. Leave a ¼” gap between each board and continue until all boards are secured.

DIY AC Unit Cover – weed barrier tip
Before you put the last board onto the fence posts, lay a layer of weed barrier down. This helps prevent weeds/grass from growing up through the bark!
Then lay down your bark or rocks. Bark just happens to be a lot less expensive (only costs me $12 for the whole area) compared to $50-100 worth of river rock.

To finish off the top, secure a 2X4 board on top for a more polished look.
Apply 2-3 coats of stain (depending on the look you want) and then a sealer.
And done!
Doesn’t that feel good?! So excited to have this eye sore covered up.

If you are looking for more outdoor projects, check out our easy DIY Sandbox Build that I built with True Value last summer!
For more fun DIY projects, tips and tricks, visit TrueValueProjects.com or follow True Value on Facebook, Twitter, Instagram and Pinterest.
I was one of the bloggers selected by True Value to work on the DIY Squad. I have been compensated for my time commitment to the program as well as writing about my experience. I have also been compensated for the materials needed for my DIY project. However, my opinions are entirely my own and I have not been paid to publish positive comments.
This is a sponsored conversation written by me on behalf of True Value. The opinions and text are all mine.
About Taryn Whiteaker
Hi! I’m Taryn! The voice behind Taryn Whiteaker Designs. I launched this brand over 11 years ago when I became a stay-at-home mom. What started as a small craft and mom blog eventually grew into a full time design and DIY site. My goal has always been to inspire others (especially women!) with design ideas, DIY tutorials, entertaining ideas and give you the tools you need to complete them yourself!


that looks great.
That looks amazing. I’m just wondering what will happen if your unit breaks? How will a repairman get in there to fix it?
Hi! The AC Control Box is still accessible, and we left about 2″ around the unit, someone could easily get in if they needed to. We also contemplated making one side a gate, so that is also an option.
The gate Idea is best. If the A/C needs Freon the ports are close to the ground. Freon Gauges
have to be used.
If your compressor or other major component goes out, a portion of the fence will have to be dismantled to be able to remove and replace the part. It looks great, but perhaps would have been better to make a gate in the side with the panel instead of a permanent wall. That would make it easier for the HVAC technician to be able to get to it for maintenance and/or repairs. For the record, I am married to a HVAC tech.
Hi! You are correct! We went into it knowing we would have to take a side of panels off if we needed to service it, they took 10-15 minutes to put up per side, so we would have no problem removing them if needed. Down the road we would like to turn one side into a gate.
Electric code requires 30″ wide x 48″ of unobstructed access to both the disconnect and electric access. I do love the look and would move the post on the left side of the unit and put a hinge on that side
I built mine over 2 years ago and I attached one side with hinges, just in case of an emergency or a service call
You need at least 18 inches on every side and access to the electric control box of the condensing unit for a service man , remember he/she must be able to stand and not need to lean on anything to work on it ( safety first , before esthetics) . Thank you , Jason with JF Air and Heat , Charlotte N.C.
Also codes are different in every county so check on that . Thank you and you may want to change how you build it so someone doesn’t do this then has issues
How about a nice front wall and then a nice bush on each side that leaves the space required to replace unit in the future .
I think I would attach the walls ( 1×6 ) boards to 2×4’s then attach the finished unit to the 4×4’s with 2, 3 inch exterior screws on each poles. This would make it easy to remove for servicing.
I was just getting ready to say the same maybe add swing door with latch. But something, because the ac guy would not be able to work. Again air ventilation, looks cute but maybe solid front amd both sides doors with a few hinges. I would not want to dump money down the drain on repairs that could have came from this. Or, being charge more due to the extra work. Even taken apart each time over time wood breaking down or of not first time. Nice, but long term No
I’m a student studying hvac and I was wondering 2 things. 1 you need at least 2 feet (24 inches) for air circulation other wise you will not remove the heat that is coming out of your house or the cook air if you have a heat pump so your unit will run most of the time. 2 like you said how would someone like me work on it when it needs serviced?
Hi- There is 24″ around the entire structure, the front is a tad below that but the sides are a full 24″. When we have someone come do maintenance I take a full side down. As I mention in the post, a gate would be beneficial.
It looks really ? good. My recommendation would have been to hinged all sides for easy access if maintenance is required
I don’t know about the A/C guys in your area but the A/C man that I’m married to (210 lbs) and our employees wouldn’t fit in there…..you have really cut it close on the ventilation you allowed for that unit and when you need service and it is hot and you have no A/C you are really going to wish you had made one of those panels removeable or a gate……my husband’s response when I showed him this picture? Oh they would pay at least an extra $100 for the hassle of getting in and out of that enclosure! I will say it does look really nice! :-)
Mine said the same thing!
Mine said that too. He said when building that though it looks nice should have had it with the gate in the first place. But depending where you live the inspector will tell you to remove it…. Those post and in there with concriet it looks like.
So pretty, but I have been told not to block your AC unit, for when you need it service, but also for it to vent. This way your AC can be work properly and not overheat etc. But I really like and I have been wanting to do so, but was advised against it.
And what happens when the HVAC guy comes to check the pressure in the unit or service it? He needs access to a removable panel on the side of the unit. The box side where the panel is needs to be hinged to be able to open, or be removable. Otherwise you’ll be taking one side of this apart the next time you need service.
Looks really nice but how does a technician get to the unit for service.
Also may want to look into a cover over top, helps prolong the life of the unit. Of course there is a clearance requirement which you would need to research for your unit.
Is this easily removable for repairs or routine maintenance on my system?
It looks great, but as someone whose hubby works on ac— if your unit has to be replaced or worked on—- THIS WOULD BE A NIGHTMARE!!!!!!!
Looks great! One would have to be very careful when digging posts, especially if your utilities are nearby as is the case at my house.
I also agree with the above comments, just had my routine service done and the technician took off the side panel. More access would definitely be needed!
Great suggestion! And yes, we would probably have to take one side of panels off if we needed a repair man.
I actually like it. However, as everyone has been saying about getting to it. There are a few easy fixes for that.
I myself was thinking instead of nailing anything that I would just cut into the the posts, giving enough room to slide the panels in one by one. If you ever need to get to the unit, just lift the panels out one by one.
Seems like an easy enough fix. I think I am going to work on that this weekend.
Thank you. The panels were very easy to put on, only took about 10 minutes per side. So in the event we needed to remove them for a repair man, we easily could. We have also talked about turning one side into a swing gate if we needed to down the road.
What color stain did you use?
I am a female and I know not to block the air conditioner’s vents.
Looks nice, but take care of that air conditioner.
Lol, Ruth I bet you surprise yourself everyday when you find out all the things you know, being a woman and all.. Hahaha!!
I love the look, I have just one side that I can see from our deck and would like to do this to hide it. I might make mine a little taller, then I could possibly hang herb garden containers from it or something. Thanks for the inspiration!
I would like to start out by complementing your work. I think it looks great. I work in the HVAC field and I just wanna say that I would really be careful when it comes to blocking off the condenser like that. They need to breath to run right. If you cut off the systems ventilation it will kill the units efficiency and it won’t cool properly. When it’s in an open space you have infinite air coming In, but blocking it off you’ll lose that. Even if it’s in an open space you still need to keep the coil clean so it ventilates correctly. You’ll end up spending an arm and a leg to get it fixed. 2ft of clearance around sounds like it would be good enough to the average person, but it’s not. Again, it looks great, but be careful doing this.
Hi Steve- thanks you so much for your comment, I appreciate your feedback. The spacing we used was in accordance with or user manual, but it is also nice to hear other opinions. And as I mentioned above in the post, we are working to modify the planks so there is more ventilation.
Awesome! More power to ya then. Glad you took the ventilation into consideration because most people don’t. Keep up the nice work.
Absolutely will NO AC OR HEATPUMP specs or manual tell you that the 2 inch clearance you specify or even the 2 feet will be all right. We have Bryant units and my daughters is 20 years old and has never been blocked and the service has been kept up. She is looking at getting a newer more efficient unit this year, but doesn’t have to because of the great care it has had. No company will honor a warranty on a unit that is blocked and this comes for 50 years of experience in the HVAC business with over 40 of that in our own business. The only feasible surround for an outside condenser or even an AC is a fence that has 4 inches between the pickets and those should be less than an inch across. We had an issue with our HOA that wanted all outdoor units screened from view and I refused. I threatened a lawsuit if they made us do it because I have the proof from an engineer plus all the paper work that comes with the units that it kills the unit much faster and when you pay $10,000 for a good system you do. It want to have to replace it often.
Hi Anne – I appreciate your feedback. There seem to be a lot of varying opinions on clearance issues. I’m not sure where you are reading 2 inch clearance, that could be a typo on my part. Our manual specifically says 18 inch clearance which is what ours is, in fact it’s a little more than that on the sides. Sometimes the pictures can be deceiving. And as I noted in the post, we are looking at modifying the slats to create more ventilation.
Glen d you are going to look at modifying it. Although there are some of brands that will say 18″ clearance any HVAC person worth their salt will tell you the only way to screen a unit properly is to have the screen no ore than 3 feet to the unit and leave open access on at least one side as well as at least a 12 ” clearance under the screen to allow for the unit to pull air up and never put anything over the top. The ideal screen is an open slat with slats being no more 1″ wide and spaced no less than 4″ apart with only 2 sides to this screen. The house is already acting as one side of a screen so you need at least the side that will get the most airflow open. BUT you will need to consider how much less time the unit will work as well as how much more you will be spending for the service tech to service it. Normal service is twice yearly…with screening it you are probably looking at more. There are lots of pretty screens on the market that meet the criteria specified for HVAC units that are easliy moved out of the way for access to all sides of the unit. We have even had service techs call In from a job to ask how to handle a call with a screen because they can’t get in between the screen and the unit to take the cover off. There is more to servicing a unit than just checking the box that is accessible. No good tech will service a unit without taking the cover off and checking the entire unit unless he is just putting a bandaid on a problem such as adding freon to a unit that is freezing up and low on freon. The thing is if it’s low on freon…there is an underlying reason and is most likely a leak somewhere wihin the unit. Which requires the cover be totally removed. You can’t do that with cemented post in the way.
I love how it looks and went to my husband, father and family friend which are all sheet metal ac guys with over 70 years of experience and all three told me that it is not enough ventilation and that even if you took off those panels to get to the unit it would make there job 100 times worse especially with the poles in the way you want to get around to each angle of the unit and it’s not enough space even if you were to take off the wood . Bad idea but looks nice. I’m going to build my fence around a larger area and gated with raised planters looks like you can’t get around the bulk of the unit but you can hide it.
Hi Regina! Thank you for your comment, I always appreciate other people’s opinions. A gate would be a great addition, it’s something we are hoping to do down the road. And yes, as I mentioned above we are working on creating more ventilation.
That is a really good looking AC cover. I love it. My only added tip would be to maybe put a little more space between the wood pieces to ensure your unit isn’t struggling to get air in. Otherwise, great workmanship!
Thanks Roger!
Not sure if you are still following this string but why not place hinges on the bottom of the two outside posts. For service you can just lay it over, perform the service and stand it back up.
Great suggestion! We plan on doing that eventually. We do take the boards down on one side if we do have someone service it and it hasn’t been a problem.
Ok so from someone who works in HVAC. Don’t forget to leave plenty of space for someone to work on the unit itself, but there is a single more important fact. Air must flow around the unit in order to provide cooled air across the coils. These coils have the returning warm water in them. Air is pushed across the coils to cool the water, thus providing cool air. The fan on top is not the only part to provide the cooling. Read your unit specs for required clearance. Build a wall to close and you can destroy your unit AND void the warranty
Hi Stu! Thanks for your note. The clearance we used was actually more than what our manual suggested, but yes I encourage everyone to read their manual because every unit is different.
I’ve been a hvac technician for over 10 years and I will say that I do like that look & it would be a great idea if ALL the panels were made removable. I only say that because routine maintenance and the unexpected leak in the condenser coil would require at least two or more feet ( to be somewhat comfortable) to accomplish the job. It can still be done by building each panel separately, adding hooks on the back that could accommodate a 2×6, and build the frame for the individual panels to hang on.
what color stain did you use? Thank you!
Good Job! What a great looking solution to an unsightly annoyance. I think with the modifications you have already mentioned this will be on my to do list. What color stain did you use?
I put hinges on both corners of mine so it can be moved in and out. Mine looks like a picket fence. It is very easy to move by myself and looks great and lots of air flow.
Yours is very nice.
My husband is making one too but it will be a removale ac unit cover because if anything happens it needs to be accessible to fix or remove. You don’t want to make a pretty cover that cost you money that you have to tear down or make the people who fix ac units a unbearable time removing and or fixing. Also we won’t be using any concrete to hold down any wood. He’s going to make it so its a half cover. Almost like a front facing cover. You can pull back easily and push forward to cover it. We will be adding chicken wire fencing all around it so our female husky won’t gave the urge again to bite or break wires.
All I want to know is what is the stain color. Lol
Not here to chew you out over spacing and accessibility.
Well that is refreshing! It’s BEHR Cordovan Brown in Semi-Transparent, I used about 3 coats. It’s an all-in-one Stain and Sealer for outdoor use.
This answers the question I just posted!
WOW Taryn, you have been a very bad girl, you will be sent to bed without any supper!!! LOL!!! Geez, it looks great and yes you need to do some modifications , that’s what a DIYER is all about. You make something & then as you admire your work you figure out some changes and you make them too. Nice job Taryn!!!
Great job. I can see doing this around my garbage can leaving the open side for the garbage men. As far as the air conditioner, I’ve seen more problems with grass in the vents than this would cause!
I know this article was awhile back, but do you happen to remember what barand/color stain you used?
Do you think this could work as a free standing cover, instead of putting the posts in the ground that way it can be easily moved? Besides making it a bit wider to allow for more air flow do you think any other modifications would be needed or would it be sturdy enough to stand on its own if it sat on top of the ground?
One option would be to use the concrete wooden post supports that way the entire enclosure could be lifted off.
Lots of commments, I’m sure it was addressed but this is the condenser from hell for my repairman . He does regular maintenance ever year , such as washing out the fins ( which is absolutely necessary, and checking the Freon levels. Some hinged doors would be very appreciated.
I agree! This was our first take on this project and I mention in the post things I would do differently. We do take one side of the boards off when we’ve had a repair man come to make it easy for him to do maintenance.
I took a look at this idea and I did a modification by moving the posts out a little bit and not making them permanent in the ground. next what I did is when I built the walls I put them on hangers so that all I needed to do was to lift up each of the panels and move them completely out of the way this allowed the air conditioner guy to come in and do the needed service. I worked with my AC guy to come up with the modifications as what would be best for folks in his position to not only do maintenance but in the event that a new AC unit needs to be put in
Perfect!
Wondering how you got the exact locations of the posts figured out? I’ve got all my materials but that part is stumping me.
This could have been built with three panels, each held on by four lag screws making removal for maintenance quick and easy. Giving full access to the unit in minutes.
Nice job staining the wood. Did you use treated wood for the posts to reduce the chance of wood rot, termites?
Great tips and yes, we used a treated wood for the posts.
You could build that box with hinges on the ground so you could open it like a truck hood, exposing the whole unit once again! Or fix it to slide off those 4 post.
It looks really good, you hit some great feed back, we all did, I’m wanting to do the same. Thx for everyone’s input! ??
What about 3 sided box with heavy duty wheels so you can pull it away from unit.
that’s a great suggestion!
Thanks for the tutorial! I think I’ll do this but without anchoring the cover to the ground. That way I can just remove the whole thing by sliding it away to get to my AC and pool equipment.
Simple solution would be to NOT secure the fence posts into the ground. The entire structure is then movable when needed.
HOW DOES ONE GET IN TO SERVICE THE UNIT?
I remove the boards from one side, It’s very easy.
Lol, this thread is lit.
This project was great and we loved getting outside! We spent all of spring and winter updating the inside of our home and just barely wrapped that up with a hardwood floor resurfacing last month. Your AC unit cover was perfect and we even got the stain to match our hardwood floors!
I am concerned with all the A/C repair people and their spouses that cannot read 7 years of the same comment and reply… I will make sure to do my own A/C repair in the future. Good work.
I’ve made these but with a few variations. 1. posts are not mounted permanently. I set the posts in 6″ wide x 6″ deep concrete. I dig 10″ deep holes holes where the posts would set. I insert weed fabric in holes then 2″ of stone. I take drill drain holes in sides and bottom of plastic buckets of any kind that are large enough to accept the post with 6″ x 6″ round concrete anchor now hard around the post base with holes drilled in sides and bottom. Add 3″ of stone to bucket. When the posts are installed in the buckets they will extend 1″ above ground so the posts will last longer. POSTS SHOULD BE TREATED OR CEDAR AT LEAST. The holes are 26″ away from unit. I install the boards ON 3 SIDES ONLY AND with a 1.5″ gap for additional air movement. On the house side I install a 2×4 at the top only for structure. This entire unit can be lifted out of the way for service access and reinstalled easily.
if you live in an area with lots of snow a canopy may be needed, we were getting large amounts of snow falling off the roof into the fan, we built our first one quite close to the top of our heat pump…. too close… it needs to be about 3 feet above the top of the heat pump or the heat pump will over heat and stop working, it was a simple fix but we wished we knew before hand how to get it right